nginx plus
64 Topics
AWS CloudFormation EC2 UserData example to install NGINX Plus on Ubuntu 20.04 LTS using AWS SecretsManager
Introduction There are a number of ways to automate NGINX Plus instance creation on AWS - you can create a custom AMI, or build a container image. Tools like Ansible, terraform, Pulumi etc. can also install and configure NGINX Plus. This example was tested in CloudFormation template that creates an Ubuntu 20.04 LTS EC2 instance and the uses UserData script to install NGINX Plus. A critical part of NGINX Plus install is to copy your NGINX Plus SSL Certificate and Key - required for access to the NGINX Plus private repository - into /etc/nginx/ssl/. There a few different ways to achieve this, but the AWS SecretsManager service provides a lot of audit, access control, and security capabilities. You can use the snippets below in your AWS CloudFormation templates to retrieve the NGINX certificate and key from AWS, configure the NGINX repository on your EC2 Instance, and then download and install the software. Prerequisites Store your NGINX Plus Certificate and Key in AWS Secrets Manager - in my example I'm storing the certificate and key in separate secret objects. Create an IAM Role and policy to allow your EC2 Instance to access the secrets. My Policy looks like this: { "Version": "2012-10-17", "Statement": [ { "Sid": "VisualEditor0", "Effect": "Allow", "Action": [ "secretsmanager:GetResourcePolicy", "secretsmanager:GetSecretValue", "secretsmanager:DescribeSecret", "secretsmanager:ListSecretVersionIds" ], "Resource": "arn:aws:secretsmanager:*:<account ID>:secret:*" } ] } Obviously you may want to alter the the scope of the resource access. Attach this policy to a role and assign the role to your EC2 Instance in the CFT: Create a parameter (you could skip this and just add the name to the Instance Profile in the next step, but parameters can be useful if you want to change things at deploy time): NginxInstanceRole: Description: Role for instance Instance Type: String Default: EC2Secrets Reference parameter in the EC2 instance profile: NGInstanceProfile: Type: AWS::IAM::InstanceProfile Properties: InstanceProfileName: !Sub "nginx-instance-profile-${AWS::StackName}" Path: / Roles: - !Ref NginxInstanceRole Reference the instance profile in the EC2 block: # EC2 instance which will have access for http and ssh EC2Instance: Type: 'AWS::EC2::Instance' Properties: InstanceType: !Ref InstanceType SubnetId: !Ref SubnetID SecurityGroupIds: - !Ref WebSecurityGroupID - !Ref AdminSecurityGroupID KeyName: !Ref KeyPairName ImageId: !Ref InstanceImageId IamInstanceProfile: !Ref NginxInstanceRole UserData Block Now in the UserData section of your EC2 instance spec the following commands will: Install the jq package (to parse some output) Install the the AWS CLI Pull the secrets using 'aws secretsmanager get-secrets-value' Use the jq package and tr to get the files into the correct format (there may be a better way to manage this). Follow the standard NGINX plus install (add NGINX repo etc) Start the NGINX Plus service UserData: Fn::Base64: !Sub | #!/bin/bash -xe sudo apt-get update -y # good practice to update existing packages sudo apt-get install -y awscli sudo apt install -y jq sudo mkdir /etc/ssl/nginx # install the key and secret aws secretsmanager get-secret-value --secret-id nginxcert --region ${AWS::Region} | jq --raw-output '.SecretString'| tr -d '"{}' | sudo tee /etc/ssl/nginx/nginx-repo.crt aws secretsmanager get-secret-value --secret-id nginxkey --region ${AWS::Region} | jq --raw-output '.SecretString'| tr -d '"{}' | sudo tee /etc/ssl/nginx/nginx-repo.key # Add the repo sudo wget https://cs.nginx.com/static/keys/nginx_signing.key && sudo apt-key add nginx_signing.key sudo wget https://cs.nginx.com/static/keys/app-protect-security-updates.key && sudo apt-key add app-protect-security-updates.key sudo apt-get install -y apt-transport-https lsb-release ca-certificates printf "deb https://pkgs.nginx.com/plus/ubuntu `lsb_release -cs` nginx-plus\n" | sudo tee /etc/apt/sources.list.d/nginx-plus.list sudo wget -P /etc/apt/apt.conf.d https://cs.nginx.com/static/files/90pkgs-nginx # Install and start sudo apt-get update -y # good practice to update existing packages sudo apt-get install nginx-plus -y # install web server sudo systemctl start nginx.service # start webserver This should produce a working NGINX Plus install. Comment below if you'd like a complete working CFT example linked to this article.9KViews0likes0Comments
Better together - F5 Container Ingress Services and NGINX Plus Ingress Controller Integration
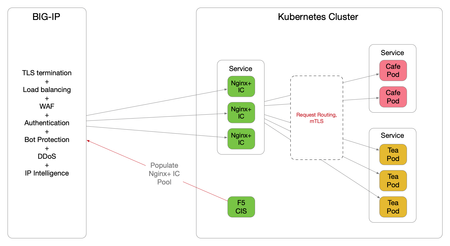
Introduction The F5 Container Ingress Services (CIS) can be integrated with the NGINX Plus Ingress Controllers (NIC) within a Kubernetes (k8s) environment. The benefits are getting the best of both worlds, with the BIG-IP providing comprehensive L4 ~ L7 security services, while leveraging NGINX Plus as the de facto standard for micro services solution. This architecture is depicted below. The integration is made fluid via the CIS, a k8s pod that listens to events in the cluster and dynamically populates the BIG-IP pool pointing to the NIC's as they scale. There are a few components need to be stitched together to support this integration, each of which is discussed in detail over the proceeding sections. NGINX Plus Ingress Controller Follow this (https://docs.nginx.com/nginx-ingress-controller/installation/building-ingress-controller-image/) to build the NIC image. The NIC can be deployed using the Manifests either as a Daemon-Set or a Service. See this ( https://docs.nginx.com/nginx-ingress-controller/installation/installation-with-manifests/ ). A sample Deployment file deploying NIC as a Service is shown below, apiVersion: apps/v1 kind: Deployment metadata: name: nginx-ingress namespace: nginx-ingress spec: replicas: 3 selector: matchLabels: app: nginx-ingress template: metadata: labels: app: nginx-ingress #annotations: #prometheus.io/scrape: "true" #prometheus.io/port: "9113" spec: serviceAccountName: nginx-ingress imagePullSecrets: - name: abgmbh.azurecr.io containers: - image: abgmbh.azurecr.io/nginx-plus-ingress:edge name: nginx-plus-ingress ports: - name: http containerPort: 80 - name: https containerPort: 443 #- name: prometheus #containerPort: 9113 securityContext: allowPrivilegeEscalation: true runAsUser: 101 #nginx capabilities: drop: - ALL add: - NET_BIND_SERVICE env: - name: POD_NAMESPACE valueFrom: fieldRef: fieldPath: metadata.namespace - name: POD_NAME valueFrom: fieldRef: fieldPath: metadata.name args: - -nginx-plus - -nginx-configmaps=$(POD_NAMESPACE)/nginx-config - -default-server-tls-secret=$(POD_NAMESPACE)/default-server-secret - -ingress-class=sock-shop #- -v=3 # Enables extensive logging. Useful for troubleshooting. #- -report-ingress-status #- -external-service=nginx-ingress #- -enable-leader-election #- -enable-prometheus-metrics Notice the ‘- -ingress-class=sock-shop’ argument, it means that the NIC will only work with an Ingress that is annotated with ‘sock-shop’. The absence of this annotation makes NIC the default for all Ingress created. Below shows the counterpart Ingress with the ‘sock-shop’ annotation. apiVersion: extensions/v1beta1 kind: Ingress metadata: name: sock-shop-ingress annotations: kubernetes.io/ingress.class: "sock-shop" spec: tls: - hosts: - socks.ab.gmbh secretName: wildcard.ab.gmbh rules: - host: socks.ab.gmbh http: paths: - path: / backend: serviceName: front-end servicePort: 80 This Ingress says if hostname is socks.ab.gmbh and path is ‘/’, send traffic to a service named ‘front-end’, which is part of the socks application itself. The above concludes Ingress configuration with the NIC. F5 Container Ingress Services The next step is to leverage the CIS to dynamically populate the BIG-IP pool with the NIC addresses. Follow this ( https://clouddocs.f5.com/containers/v2/kubernetes/kctlr-app-install.html ) to deploy the CIS. A sample Deployment file is shown below, apiVersion: extensions/v1beta1 kind: Deployment metadata: name: k8s-bigip-ctlr-deployment namespace: kube-system spec: # DO NOT INCREASE REPLICA COUNT replicas: 1 template: metadata: name: k8s-bigip-ctlr labels: app: k8s-bigip-ctlr spec: # Name of the Service Account bound to a Cluster Role with the required # permissions serviceAccountName: bigip-ctlr containers: - name: k8s-bigip-ctlr image: "f5networks/k8s-bigip-ctlr" env: - name: BIGIP_USERNAME valueFrom: secretKeyRef: # Replace with the name of the Secret containing your login # credentials name: bigip-login key: username - name: BIGIP_PASSWORD valueFrom: secretKeyRef: # Replace with the name of the Secret containing your login # credentials name: bigip-login key: password command: ["/app/bin/k8s-bigip-ctlr"] args: [ # See the k8s-bigip-ctlr documentation for information about # all config options # https://clouddocs.f5.com/products/connectors/k8s-bigip-ctlr/latest "--bigip-username=$(BIGIP_USERNAME)", "--bigip-password=$(BIGIP_PASSWORD)", "--bigip-url=https://x.x.x.x:8443", "--bigip-partition=k8s", "--pool-member-type=cluster", "--agent=as3", "--manage-ingress=false", "--insecure=true", "--as3-validation=true", "--node-poll-interval=30", "--verify-interval=30", "--log-level=INFO" ] imagePullSecrets: # Secret that gives access to a private docker registry - name: f5-docker-images # Secret containing the BIG-IP system login credentials - name: bigip-login Notice the following arguments below. They tell the CIS to consume AS3 declaration to configure the BIG-IP. According to PM, CCCL (Common Controller Core Library) – used to orchestrate F5 BIG-IP, is getting removed this sprint for the CIS 2.0 release. '--manage-ingress=false' means CIS is not doing anything for Ingress resources defined within the k8s, this is because that CIS is not the Ingress Controller, NGINX Plus is, as far as k8s is concerned. The CIS will create a partition named k8s_AS3 on the BIG-IP, this is used to hold L4~7 configuration relating to the AS3 declaration. The best practice is also to manually create a partition named 'k8s' (in our example), where networking info will be stored (e.g., ARP, FDB). "--bigip-url=https://x.x.x.x:8443", "--bigip-partition=k8s", "--pool-member-type=cluster", "--agent=as3", "--manage-ingress=false", "--insecure=true", "--as3-validation=true", To apply AS3, the declaration is embedded within a ConfigMap applied to the CIS pod. kind: ConfigMap apiVersion: v1 metadata: name: as3-template namespace: kube-system labels: f5type: virtual-server as3: "true" data: template: | { "class": "AS3", "action": "deploy", "persist": true, "declaration": { "class": "ADC", "id":"1847a369-5a25-4d1b-8cad-5740988d4423", "schemaVersion": "3.16.0", "Nginx_IC": { "class": "Tenant", "Nginx_IC_vs": { "class": "Application", "template": "https", "serviceMain": { "class": "Service_HTTPS", "virtualAddresses": [ "10.1.0.14" ], "virtualPort": 443, "redirect80": false, "serverTLS": { "bigip": "/Common/clientssl" }, "clientTLS": { "bigip": "/Common/serverssl" }, "pool": "Nginx_IC_pool" }, "Nginx_IC_pool": { "class": "Pool", "monitors": [ "https" ], "members": [ { "servicePort": 443, "shareNodes": true, "serverAddresses": [] } ] } } } } } They are telling the BIG-IP to create a tenant called ‘Nginx_IC’, a virtual named ‘Nginx_IC_vs’ and a pool named ‘Nginx_IC_pool’. The CIS will update the serverAddresses with the NIC addresses dynamically. Now, create a Service to expose the NIC’s. apiVersion: v1 kind: Service metadata: name: nginx-ingress namespace: nginx-ingress labels: cis.f5.com/as3-tenant: Nginx_IC cis.f5.com/as3-app: Nginx_IC_vs cis.f5.com/as3-pool: Nginx_IC_pool spec: type: ClusterIP ports: - port: 443 targetPort: 443 protocol: TCP name: https selector: app: nginx-ingress Notice the labels, they match with the AS3 declaration and this allows the CIS to populate the NIC’s addresses to the correct pool. Also notice the kind of the manifest ‘Service’, this means only a Service is created, not an Ingress, as far as k8s is concerned. On the BIG-IP, the following should be created. The end product is below. Please note that this article is focused solely on control plane, that is, how to get the CIS to populate the BIG-IP with NIC's addresses. The specific mechanisms to deliver packets from the BIG-IP to the NIC's on the data plane is not discussed, as it is decoupled from control plane. For data plane specifics, please take a look here ( https://clouddocs.f5.com/containers/v2/ ). Hope this article helps to lift the veil on some integration mysteries.7.1KViews11likes27CommentsHow to persist 'real' IP into Kubernetes
Summary How do you preserve the “real” IP address to a Pod (container) that is running in a Kubernetes cluster? Recently Eric Chen and I got asked this question by a customer and we’ll share how we solved this problem. What's the Problem? In Kubernetes a “pod” is not sitting on your external network, instead it is sitting comfortably on its own network. The issue is that using NodePort to expose the pod will source NAT (SNAT) and the pod will see the IP address of another internal IP address. You could use a “externalTrafficPolicy” to preserve the IP address, but that has some other limitations (you have to steer traffic to the node where the pod is running). Possible Solutions X-Forwarded-For The obvious solution to preserve the source IP address is to have an external load balancer insert an X-Forwarded-For header into HTTP requests and have the pod use the HTTP header value instead of the client IP address. The load balancer would change a request from: GET /stuff HTTP/1.1 host: mypod.example.com to: GET /stuff HTTP/1.1 host: mypod.example.com X-Forwarded-For: 192.0.2.10 This works well for HTTP traffic, but does not work for TCP traffic. Proxy Protocol Proxy Protocol is a method of preserving the source IP address over a TCP connection. Instead of manipulating the traffic at Layer 7 (modifying the application traffic); we will manipulate the TCP traffic to add a prefix to the connection with the source IP address information. At the TCP level this would change the request to: PROXY TCP[IP::version] [IP::remote_addr] [IP::local_addr] [TCP::remote_port] [TCP::local_port] GET /stuff HTTP/1.1 host: mypod.example.com Note that the application payload is not modified, but has data appended to it. Some implications of proxy protcol: In the case of encrypted traffic, there is no need for the load balancer to terminate the SSL/TLS connection. The destination of the proxy protocol traffic must be able to remove prefix prior to processing the application traffic (otherwise it would believe the connection was somehow corrupted). I.e., both endpoints of a connection need to support proxy protocol. Customer's Problem Statement The customer wanted to use both a BIG-IP at the edge of their Kubernetes cluster AND use NGINX as the Ingress Controller within the Kubernetes. The BIG-IP would be responsible for providing L4 TCP load balancing to NGINX that would be acting as a L7 HTTP/HTTPS Ingress Controller. Using the solutions outlined earlier we were able to provide a solution that met these requirements. BIG-IP utilizes proxy protocol to preserve the source IP address over a TCP connection. BIG-IP can be the sender of proxy protocol with this iRule. NGINX is configured to receive proxy protocol connections from the BIG-IP and uses X-Forwarded-For headers to preserve the source IP address to the pod. To deploy the solution we leveraged Container Ingress Services to deploy the proxy protocol configuration and bring traffic to the NGINX Ingress Controller. NGINX Ingress Controller was configured to use proxy protocol for connections originating from the BIG-IP. Conclusion Using F5 BIG-IP and NGINX we were able to provide a solution to the customers requirements and provide better visibility into the “real” IP address of their clients.6.9KViews1like1Comment
NGINX ingress proxy for Consul Service Mesh
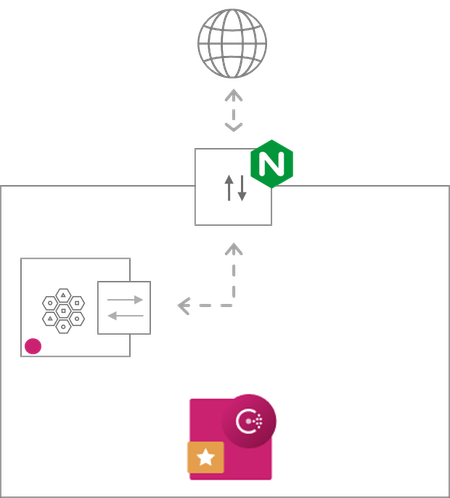
Disclaimer: This blog post is an abridged (NGINX specific) version of the original blog by John Eikenberry at HashiCorp. Consul service mesh provides service-to-service connection authorization and encryption using mutual Transport Layer Security (mTLS). Secure mesh networks require ingress points to act as gateways to enable external traffic to communicate with the internal services. NGINX supports mTLS and can be configured as a robust ingress proxy for your mesh network. For Consul service mesh environments, you can use Consul-template to configure NGINX as a native ingress proxy. This can be beneficial when performance is of utmost importance. Below you can walk through a complete example setup. The examples use consul-template to dynamically generate the proxy configuration and the required certificates for the NGINX to communicate directly with the services inside the mesh network. This blog post is only meant to demonstrate features and may not be a production ready or secure deployment. Each of the services are configured for demonstration purposes and will run in the foreground and output its logs to that console. They are all designed to run from files in the same directory. In this blog post, we use the term ingress proxy to describe Nginx. When we use the term sidecar proxy, we mean the Consul Connect proxy for the internal service. Common Infrastructure The example setup below requires Consul, NGINX, and Python. The former is available at the link provided, NGINX and Python should be easily installable with the package manager on any Linux system. The Ingress proxy needs a service to proxy to, for that you need Consul, a service (E.g., a simple webserver), and the Connect sidecar proxy to connect it to the mesh. The ingress proxy will also need the certificates to make the mTLS connection. Start Consul Connect, Consul’s service mesh feature, requires Consul 1.2.0 or newer. First start your agent. $ consul agent -dev Start a Webserver For the webserver you will use Python’s simple built-in server included in most Linux distributions and Macs. $ python -m SimpleHTTPServer Python’s webserver will listen on port 8000 and publish an index.html by default. For demo purposes, create an index.html for it to publish. $ echo "Hello from inside the mesh." > index.html Next, you’ll need to register your “webserver” with Consul. Note, the Connect option registers a sidecar proxy with the service. $ echo '{ "service": { "name": "webserver", "connect": { "sidecarservice": {} }, "port": 8000 } }' > webserver.json $ consul services register webserver.json You also need to start the sidecar. $ consul connect proxy -sidecar-for webserver Note, the service is using the built-in sidecar proxy. In production you would probably want to consider using Envoy or NGINX instead. Create the Certificate File Templates To establish a connection with the mesh network, you’ll need to use consul-template to fetch the CA root certificate from the Consul servers as well as the applications leaf certificates, which Consul will generate. You need to create the templates that consul-template will use to generate the certificate files needed for NGINX ingress proxy. The template functions caRoots and caLeaf require consul-template version 0.23.0 or newer. Note, the name, “nginx” used in the leaf certificate templates. It needs to match the name used to register the ingress proxy services with Consul below. ca.crt NGINX requires the CA certificate. $ echo '{{range caRoots}}{{.RootCertPEM}}{{end}}' > ca.crt.tmpl Nginx cert.pem and cert.key NGINX requires the certificate and key to be in separate files. $ echo '{{with caLeaf "nginx"}}{{.CertPEM}}{{end}}' > cert.pem.tmpl $ echo '{{with caLeaf "nginx"}}{{.PrivateKeyPEM}}{{end}}' > cert.key.tmpl Setup The Ingress Proxies NGINX proxy service needs to be registered with Consul and have a templated configuration file. In each of the templated configuration files, the connect function is called and returns a list of the services with the passed name “webserver” (matching the registered service above). The list Consul creates is used to create the list of back-end servers to which the ingress proxy connections. The ports are set to different values so you can have both proxies running at the same time. First, register the NGINX ingress proxy service with the Consul servers. $ echo '{ "service": { "name": "nginx", "port": 8081 } }' > nginx-service.json $ consul services register nginx-service.json Next, configure the NGINX configuration file template. Set it to listen on the registered port and route to the Connect-enabled servers retrieved by the Connect call. nginx-proxy.conf.tmpl $ cat > nginx-proxy.conf.tmpl << EOF daemon off; master_process off; pid nginx.pid; error_log /dev/stdout; events {} http { access_log /dev/stdout; server { listen 8081 defaultserver; location / { {{range connect "webserver"}} proxy_pass https://{{.Address}}:{{.Port}}; {{end}} # these refer to files written by templates above proxy_ssl_certificate cert.pem; proxy_ssl_certificate_key cert.key; proxy_ssl_trusted_certificate ca.crt; } } } EOF Consul Template The final piece of the puzzle, tying things together are the consul-template configuration files! These are written in HCL, the Hashicorp Configuration Language, and lay out the commands used to run the proxy, the template files, and their destination files. nginx-ingress-config.hcl $ cat > nginx-ingress-config.hcl << EOF exec { command = "/usr/sbin/nginx -p . -c nginx-proxy.conf" } template { source = "ca.crt.tmpl" destination = "ca.crt" } template { source = "cert.pem.tmpl" destination = "cert.pem" } template { source = "cert.key.tmpl" destination = "cert.key" } template { source = "nginx-proxy.conf.tmpl" destination = "nginx-proxy.conf" } EOF Running and Testing You are now ready to run the consul-template managed NGINX ingress proxy. When you run consul-template, it will process each of the templates, fetching the certificate and server information from consul as needed, and render them to their destination files on disk. Once all the templates have been successfully rendered it will run the command starting the proxy. Run the NGINX managing consul-template instance. $ consul-template -config nginx-ingress-config.hcl Now with everything running, you are finally ready to test the proxies. $ curl http://localhost:8081 Hello from inside the mesh! Conclusion F5 technologies work very well in your Consul environments. In this blog post you walked through setting up NGINX to work as a proxy to provide ingress to services contained in a Consul service mesh. Please reach out to me and the F5-HashiCorp alliance team here if you have any questions, feature requests, or any feedback to make this solution better.5.5KViews0likes0Comments
L7 DoS Protection with NGINX App Protect DoS
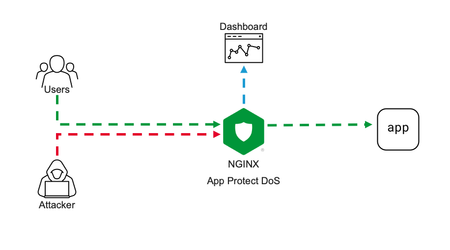
Intro NGINX security modules ecosystem becomes more and more solid. Current App Protect WAF offering is now extended by App Protect DoS protection module. App Protect DoS inherits and extends the state-of-the-art behavioral L7 DoS protection that was initially implemented on BIG-IP and now protects thousands of workloads around the world. In this article, I’ll give a brief explanation of underlying ML-based DDoS prevention technology and demonstrate few examples of how precisely it stops various L7 DoS attacks. Technology It is important to emphasize the difference between the general volumetric-based protection approach that most of the market uses and ML-based technology that powers App Protect DoS. Volumetric-based DDoS protection is an old and well-known mechanism to prevent DDoS attacks. As the name says, such a mechanism counts the number of requests sharing the same source or destination, then simply drops or applies rate-limiting after some threshold crossed. For instance, requests sourcing the same IP are dropped after 100 RPS, requests going to the same URL after 200 RPS, and rate-limiting kicks in after 500 RPS for the entire site. Obviously, the major drawback of such an approach is that the selection criterion is too rough. It can cause erroneous drops of valid user requests and overall service degradation. The phenomenon when a security measure blocks good requests is called a “false positive”. App Protect DoS implements much more intelligent techniques to detect and fight off DDoS attacks. At a high level, it monitors all ongoing traffic and builds a statistical model in other words a baseline in a process called “learning”. The learning process almost never stops, therefore a baseline automatically adjusts to the current web application layout, a pattern of use, and traffic intensity. This is important because it drastically reduces maintenance cost and reaction speed for the solution. There is no more need to manually customize protection configuration for every application or traffic change. Infinite learning produces a legitimate question. Why can’t the system learn attack traffic as a baseline and how does it detect an attack then? To answer this question let us define what a DDoS attack is. A DDoS attack is a traffic stream that intends to deny or degrade access to a service. Note, the definition above doesn’t focus on the amount of traffic. ‘Low and slow’ DDoS attacks can hurt a service as severely as volumetric do. Traffic is only considered malicious when a service level degrades. So, this means that attack traffic can become a baseline, but it is not a big deal since protected service doesn’t suffer. Now only the “service degradation” term separates us from the answer. How does the App Protect DoS measure a service degradation? As humans, we usually measure the quality of a web service in delays. The longer it takes to get a response the more we swear. App Protect DoS mimics human behavior by measuring latency for every single transaction and calculates the level of stress for a service. If overall stress crosses a threshold App Protect DoS declares an attack. Think of it; a service degradation triggers an attack signal, not a traffic volume. Volume is harmless if an application server manages to respond quickly. Nice! The attack is detected for a solid reason. What happens next? First of all, the learning process stops and rolls back to a moment when the stress level was low. The statistical model of the traffic that was collected during peacetime becomes a baseline for anomaly detection. App Protect DoS keeps monitoring the traffic during an attack and uses machine learning to identify the exact request pattern that causes a service degradation. Opposed to old-school volumetric techniques it doesn’t use just a single parameter like source IP or URL, but actually builds as accurate as possible signature of entire request that causes harm. The overall number of parameters that App Protect DoS extracts from every request is in the dozens. A signature usually contains about a dozen including source IP, method, path, headers, payload content structure, and others. Now you can see that App Protect DoS accuracy level is insane comparing to volumetric vectors. The last part is mitigation. App Protect DoS has a whole inventory of mitigation tools including accurate signatures, bad actor detection, rate-limiting or even slowing down traffic across the board, which it uses to return service. The strategy of using those is convoluted but the main objective is to be as accurate as possible and make no harm to valid users. In most cases, App Protect DoS only mitigates requests that match specific signatures and only when the stress threshold for a service is crossed. Therefore, the probability of false positives is vanishingly low. The additional beauty of this technology is that it almost doesn’t require any configuration. Once enabled on a virtual server it does all the job "automagically" and reports back to your security operation center. The following lines present a couple of usage examples. Demo Demo topology is straightforward. On one end I have a couple of VMs. One of them continuously generates steady traffic flow simulating legitimate users. The second one is supposed to generate various L7 DoS attacks pretending to be an attacker. On the other end, one VM hosts a demo application and another one hosts NGINX with App Protect DoS as a protection tool. VM on a side runs ELK cluster to visualize App Protect DoS activity. Workflow of a demo aims to showcase a basic deployment example and overall App Protect DoS protection technology. First, I’ll configure NGINX to forward traffic to a demo application and App Protect DoS to apply for DDoS protection. Then a VM that simulates good users will send continuous traffic flow to App Protect DoS to let it learn a baseline. Once a baseline is established attacker VM will hit a demo app with various DoS attacks. While all this battle is going on our objective is to learn how App Protect DoS behaves, and that good user's experience remains unaffected. Similar to App Protect WAF App Protect DoS is implemented as a separate module for NGINX. It installs to a system as an apt/yum package. Then hooks into NGINX configuration via standard “load_module” directive. load_module modules/ngx_http_app_protect_dos_module.so; Once loaded protection enables under either HTTP, server, or location sections. Depending on what would you like to protect. app_protect_dos_enable [on|off] By default, App Protect DoS takes a protection configuration from a local policy file “/etc/nginx/BADOSDefaultPolicy.json” { "mitigation_mode" : "standard", "use_automation_tools_detection": "on", "signatures" : "on", "bad_actors" : "on" } As I mentioned before App Protect DoS doesn’t require complex config and only takes four parameters. Moreover, default policy covers most of the use cases therefore, a user only needs to enable App Protect DoS on a protected object. The next step is to simulate good users’ traffic to let App Protect DoS learn a good traffic pattern. I use a custom bash script that generates about 6-8 requests per second like an average surfing activity. While inspecting traffic and building a statistical model of good traffic App Protect DoS sends logs and metrics to Elasticsearch so we can monitor all its activity. The dashboard above represents traffic before/after App Protect DoS, degree of application stress, and mitigations in place. Note that the rate of client-side transactions matches the rate of server-side transactions. Meaning that all requests are passing through App Protect DoS and there are not any mitigations applied. Stress value remains steady since the backend easily handles the current rate and latency does not increase. Now I am launching an HTTP flood attack. It generates several thousands of requests per second that can easily overwhelm an unprotected web server. My server has App Protect DoS in front applying all its’ intelligence to fight off the DoS attack. After a few minutes of running the attack traffic, the dashboard shows the following situation. The attack tool generated roughly 1000 RPS. Two charts on the left-hand side show that all transactions went through App Protect DoS and were reaching a demo app for a couple of minutes causing service degradation. Right after service stress has reached a threshold an attack was declared (vertical red line on all charts). As soon as the attack has been declared App Protect DoS starts to apply mitigations to resume the service back to life. As I mentioned before App Protect DoS tries its best not to harm legitimate traffic. Therefore, it iterates from less invasive mitigations to more invasive. During the first several seconds when App Protect DoS just detected an attack and specific anomaly signature is not calculated yet. App Protect DoS applies an HTTP redirect to all requests across the board. Such measure only adds a tiny bit of latency for a web browser but allows it to quickly filter out all not-so-intelligent attack tools that can’t follow redirects. In less than a minute specific anomaly signature gets generated. Note how detailed it is. The signature contains 11 attributes that cover all aspects: method, path, headers, and a payload. Such a level of granularity and reaction time is not feasible neither for volumetric vectors nor a SOC operator armed with a regex engine. Once a signature is generated App Protect DoS reduces the scope of mitigation to only requests that match the signature. It eliminates a chance to affect good traffic at all. Matching traffic receives a redirect and then a challenge in case if an attacker is smart enough to follow redirects. After few minutes of observation App Protect DoS identifies bad actors since most of the requests come from the same IP addresses (right-bottom chart). Then switches mitigation to bad actor challenge. Despite this measure hits all the same traffic it allows App Protect DoS to protect itself. It takes much fewer CPU cycles to identify a target by IP address than match requests against the signature with 11 attributes. From now on App Protect DoS continues with the most efficient protection until attack traffic stops and server stress goes away. The technology overview and the demo above expose only a tiny bit of App Protect DoS protection logic. A whole lot of it engages for more complicated attacks. However, the results look impressive. None of the volumetric protection mechanisms or even a human SOC operator can provide such accurate mitigation within such a short reaction time. It is only possible when a machine fights a machine.5.5KViews1like3CommentsUse of NGINX Controller to Authenticate API Calls
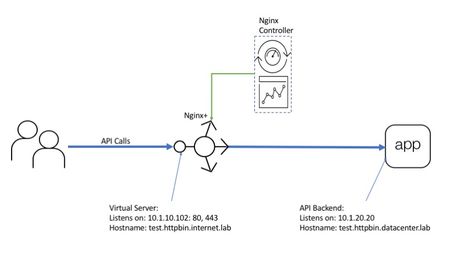
API calls authentication is essential for API security and billing. Authentication helps to reduce load by dropping anonymous calls and provides clear view on per user/group usage information since every call bears an identity marker. NGINX Controller provides an easy method for API owners to setup authentication for calls that traverse NGINX Plus instances as API gateways. What is API authentication and how is it different from authorization? API authentication it is an action when API gateway verifies an identity of a call by checking an identity marker (token, credentials, ...) in the call body. Authorization in turn is usually based on authentication. Authorization mechanisms extract an identity marker from a call and check if this identity is allowed to make the call or not. There are many approaches to authenticate an API call: HTTP Basic: API call carries clear text credentials in HTTP Authorization header. E.g. "Authorization: Basic dXNlcjpwYXNzd29yZA==" API key: API call carries an API key in request (multiple injection points possible) E.g: "GET /endpoint?token=dXNlcjpwYXNzd29yZA" Oauth: Complex open source standard for access delegation. When oAuth is in use API consumer obtains cryptographically signed JWT (json web token) token from an external identity provider and places it in the call. Server in turn uses JWK (json web key) obtained from the same identity provider to verify token signature and make sure data in JWT is true. As you may already know from previous articles NGINX Controller doesn't process traffic on its own but it configures NGINX Plus instances which run as API gateways to apply all necessary actions and policies to the traffic. The picture below shows how all these pieces to work together. Picture 1. Controller can setup two approaches for authenticating API calls: API key based oAuth (JWT) based This article covers procedures needed to configure both of supported API call authentication methods. As a prerequisite I assume you already have NGINX Plus and Controller setup along with at least one API published (if not please take a look at the previous article for details) Assume API owner developed an API and wants to make it avaliable for authenticated users only. Owner knows that customers have different use cases therefore different authentication methods fit each use case better. So it is required to authenticate users by API key or by JWT token. As discussed in previous article NGINX Controller abstracts API gateway configuration with higher level concepts for ease of configuration. The abstractions are shown on picture below. Picture 2. Therefore API definition, gateway, and workload group form a data path, the way how calls get accepted and where they get forwarded if all policies are passed. Policies contain necessary verifications/actions which apply for every API call traversing the data path. Picture 3. Amongst others there is authentication policy which allows to authenticate API calls. As shown on picture 2 the policy applies to published API instance which in turn represents data path for the traffic. Therefore the policy affects every call which flies through. Usually every authentication method fits one use case better then others. E.g. robots/bots better go with API key because process of obtaining of an JWT token from an authorization server is complex and requires a tools which bot/robot may not have. For human situation is opposite. It is much more native for user to type username/password and get token in exchange under the covers instead of copy/paste long API key to every call. Therefore oAuth fits better here. Steps below cover configuration of both supported authentication methods: API key and oAuth2.0. Assume Company_1 has bought access to an API. As a customer Company_1 wants to consume API automatically with robots and allow its employees to make requests manually as well. In order to authenticate employees using oAuth and robots with API key two different identity providers needs to be configured on controller. First we create a provider for employees. In order to NGINX Plus to verify JWT token in a call JWK key is required. There are two ways to supply the JWK key for the provider: upload a file or reference it as web URL. In case of reference NGINX Plus automatically refreshes the key periodically. These two approaches are shown in two pictures below. A second provider is used to authenticate Customer_1 robots with a simple API key. There are two options for creating API keys in provider. The first is to create them manually. The second is to upload CSV file containing user accounts credentials. user@linux$ cat api-clients.csv CUSTOMER_1_ROBOT_1000,2b31388ccbcb4605cb2b77447120c27ecd7f98a47af9f17107f8f12d31597aa2 CUSTOMER_1_ROBOT_1001,71d8c4961e228bfc25cb720e0aa474413ba46b49f586e1fc29e65c0853c8531a CUSTOMER_1_ROBOT_1002,fc979b897e05369ebfd6b4d66b22c90ef3704ef81e4e88fc9907471b0d58d9fa CUSTOMER_1_ROBOT_1003,e18f4cacd6fc4341f576b3236e6eb3b5decf324552dfdd698e5ae336f181652a CUSTOMER_1_ROBOT_1004,3351ac9615248518348fbddf11d9c597967b1e526bd0c0c20b2fdf8bfb7ae30a The next step is to assign an authentication policy to an published API. Each authentication policy may include only one client group therefore we need two of them to authenticate employees with JWT or robots with API token. Policy for robots specifies the provider and a location where an API token is placed. Along with query string in our example also headers, cookies, and bearer token locations are supported. Policy for employees specifies the provider and the JWT location NOTE: (Limitation) Policies in an environment have AND operand between them. This means environment can have only one authentication policy otherwise identity requirements from both of them need to be satisfied for call to pass. Once policy for employees is set up and config has been pushed to NGINX Plus instance, calls authentication is in place and we can now test it. At first let us make sure unauthenticated calls are rejected. I use postman as API client. As you see request without JWT token is rejected with 401 "Unauthorized" response code. Now I obtain valid token from identity provider and insert it in the same call. A call with valid JWT token successfully passes authentication and brings response back! Now we can try to replace authentication policy with policy for robots and conduct the same tests. I am emulating a robot with console tool which can not act as an oAuth client to retrieve a JWT token. So robots simply append API key to the query string. API call without any token is blocked. ubuntu@ip-10-1-1-7:~$ http https://prod.httpbin.internet.lab/uuid HTTP/1.1 401 Unauthorized Connection: keep-alive Content-Length: 40 Content-Type: application/json Date: Wed, 18 Dec 2019 00:12:26 GMT Server: nginx/1.17.6 { "message": "Unauthorized", "status": 401 } API call with valid API key in query string is allowed. ubuntu@ip-10-1-1-7:~$ http https://prod.httpbin.internet.lab/uuid?token=2b31388ccbcb4605cb2b77447120c27ecd7f98a47af9f17107f8f12d31597aa2 HTTP/1.1 200 OK Access-Control-Allow-Credentials: true Access-Control-Allow-Origin: * Connection: keep-alive Content-Length: 53 Content-Type: application/json Date: Wed, 18 Dec 2019 00:12:57 GMT Server: nginx/1.17.6 { "uuid": "b57f6b72-7730-4d0e-bbb7-533af8e2a4c0" } Therefore even such a complex feature implementation as API calls authentication becomes much easier yet flexible when managed by NGINX Controller. Hope this overview was useful. Good luck!3.6KViews1like0Comments
NGINX as an HTTP Load Balancer
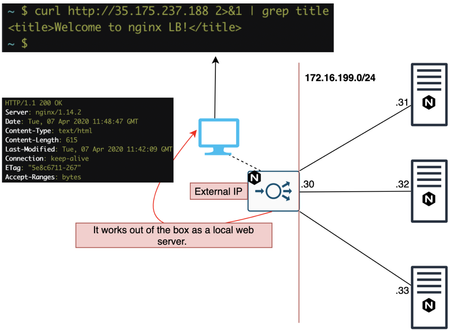
Quick Intro You've probably used NGINX as a WebServer and you might be wondering how does it work as a load balancer. We don't need a different NGINX file or to install a different package to make it a load balancer. NGINX works as a load balancer out of the box as long as we specify we want it to work as a load balancer. In this article, we're going to introduce NGINX HTTP load balancer. If you need more details, please refer to NGINX official documentation. However, NGINX also supports TCP and UDP load balancing and health monitors which are not covered here. NGINX as a WebServer by default Once NGINX is installed, it works as a WebServer by default: The response above came from our client-facing NGINX Load Balancer-to-be which is currently just a webserver. Let's make it an HTTP load balancer, shall we? NGINX as a Load Balancer Disable WebServer Let's comment out the default file on /etc/nginx/sites-enabled to disable our local WebServer just in case: Then I reload the config: If we try to connect now, it won't work now because we disabled the default page: Now, we're ready to create the load balancer's file! Creating Load Balancer's file Essentially, the default NGINX config file (/etc/nginx/nginx.conf) already has an http block which references the /etc/nginx/conf.d directory. With that in mind, we can pretty much create our file in /etc/nginx/conf.d/ and whatever is in there will be in HTTP context: Within upstream directive, we add our backend servers along with the port they're listening to. These are the servers NGINX load balancer will forward the request to. Lastly, we create a server config for our listener with proxy_pass pointing to upstream name (backends). We now reload NGINX again: Lab tests NGINX has a couple of different load balancing methods and round robin (potentially weighted) is the default one. Round robin test I tried the first time: Second time: Third time: Fourth time it goes back to server 1: That's because the default load balancing method for NGINX is round robin. Weight test Now I've added weight=2 and I expect that server 2 will proportionally take 2x more requests than the rest of the servers: Once again I reload the configuration after the changes: First request goes to Server 3: Next one to Server 2: Then again to Server 2: And lastly Server 1: Administratively shutting down a server We can also administratively shut down server 2 for maintenance, for example, by adding the down keyword: When we issue the requests it only goes to server 1 or 3 now: Other Load Balancing methods Least connections Least connections sends requests to the server with the least number of active connections taking into consideration any optionally configured weight: If there's a tie, round robin is used, taking into account the optionally configured weights. For more information on least connections method, please click here. IP Hash The request is sent to the server as a result of a hash calculation based on the first 3 octets of Client IP address or the whole IPv6 address. This method makes sure requests from the same client are always sent to the same server, unless it's unavailable. Note: A hash from server that is marked down is preserved for when it comes back up. For more information on IP hash method, please click here. Custom or Generic Hash We can also define a key for the hash itself. In below example, the key is the variable $request_uri which represents the URI present in the HTTP request sent by client: Least Time (NGINX Plus only) This method is not supported in NGINX free version. In this case, NGINX Plus picks the server with lowest average latency + number of active connections. The lowest average latency is calculated based on an argument passed to least_time with the following values: header: time it took to receive the first byte from server last_byte: time it took to receive the full response from server last_byte inflight: time it took to receive full response from server taking into account incomplete requests In above example, NGINX Plus will make its load balancing decision based on the time it took to receive the full HTTP response from our server and will also include incomplete requests in the calculation. Note that /etc/nginx/conf.d/ is the default directory for NGINX config files. In above case, as I installed NGINX directly from Debian APT repository, it also added sites-enabled. Some Linux distributions do add it to make it easier for those who use Apache. For more information on least time method, please click here. Random In this method, requests are passed on to randomly selected servers but it's only ideal for environments where multiple load balancers are passing on requests to the same back end servers. Note that least_time parameter in this method is only available on NGINX Plus. For more details about this method, please click here.3.4KViews2likes0CommentsF5 NGINX Plus R33 Release Now Available
We’re excited to announce the availability of NGINX Plus Release 33 (R33). The release introduces major changes to NGINX licensing, support for post quantum cryptography, initial support for QuickJS runtime in NGINX JavaScript and a lot more.3.3KViews3likes3CommentsF5 NGINX Plus R35 Release Now Available
We’re excited to announce the availability of F5 NGINX Plus Release 35 (R35). Based on NGINX Open Source, NGINX Plus is the only all-in-one software web server, load balancer, reverse proxy, content cache, and API gateway. New and enhanced features in NGINX Plus R35 include: ACME protocol support: This release introduces native support for Automated Certificate Management Environment (ACME) protocol in NGINX Plus. The ACME protocol automates SSL/TLS certificate lifecycle management by enabling direct communication between clients and certificate authorities for issuance, installation, revocation, and replacement of SSL certificates. Automatic JWT Renewal and Update: This capability simplifies the NGINX Plus renewal experience by automating the process of updating the license JWT for F5 NGINX instances communicating directly with the F5 licensing endpoint for license reporting. Native OIDC Enhancements: This release includes additional enhancements to the Native OpenID connect module, adding support for Relying party (RP) initiated Logout and UserInfo endpoint for streamlining authentication workflows. Support for Early Hints: NGINX Plus R35 introduces support for Early Hints (HTTP 103), which optimizes website performance by allowing browsers to preload resources before the final server response, reducing latency and accelerating content display. QUIC – CUBIC Congestion Control: With R35, we have extended support for congestion algorithms in our HTTP3/QUIC implementation to also support CUBIC which provides better bandwidth utilization resulting in quicker load times and faster downloads. NGINX Javascript QuickJS - Full ES2023 support: With this NGINX Plus release, we now support full ES2023 JavaScript specification for QuickJS runtime for your custom NGINX scripting and extensibility needs using NGINX JavaScript. Changes to Platform Support NGINX Plus R35 introduces the following updates to the NGINX Plus technical specification. Added Platforms: Support for the following platforms has been added with this release Alpine Linux 3.22 RHEL 10 Removed Platforms: Support for the following platforms has been removed starting this release. Alpine Linux 3.18 – Reached End of Support in May 2025 Ubuntu 20.04 (LTS) – Reached End of support in May 2025 Deprecated Platforms: Alpine Linux 3.19 Note: For SUSE Linux Enterprise Server (SLES) 15, SP6 is now the required service pack version. The older service packs have been EOL’ed by the vendor and are no longer supported. New Features In Details ACME Protocol Support The ACME protocol (Automated Certificate Management Environment) is a communications protocol primarily designed to automate the process of issuing, validating, renewing, and revoking digital security certificates (e.g., TLS/SSL certificates). It allows clients to interact with a Certificate Authority (CA) without requiring manual intervention, simplifying the deployment of secure websites and other services that rely on HTTPS. With the NGINX Plus R35 release, we are pleased to announce the preview release of native ACME support in NGINX. ACME support is available as a Rust-based dynamic module for both NGINX Open Source, as well as enterprise F5 NGINX One customers using NGINX Plus. Native ACME support greatly simplifies and automates the process of obtaining and renewing SSL/TLS certificates. There’s no need to track certificate expiration dates and manually update or review configs each time an update is needed. With this support, NGINX can now directly communicate with ACME-compatible Certificate Authorities (CAs) like Let's Encrypt to handle certificate management without requiring external plugins like certbot, cert-manager, etc or ongoing manual intervention. This reduces complexity, minimizes operational overhead, and streamlines the deployment of encrypted HTTPS for websites and applications while also making the certificate management process more secure and less error prone. The implementation introduces a new module ngx_http_acme_module providing built-in directives for requesting, installing, and renewing certificates directly from NGINX configuration. The current implementation supports HTTP-01 challenge with support for TLS-ALPN and DNS-01 challenges planned in future. For a detailed overview of the implementation and the value it brings, refer the ACME blog post. To get step by step instructions on how to configure ACME in your environment, refer to NGINX docs. Automatic JWT Renewal and Update This feature enables the automatic update of the JWT license for customers reporting their usage directly to the F5 licensing endpoint (product.connect.nginx.com) post successful renewal of the subscription. The feature applies to subscriptions nearing expiration (within 30 days) as well as subscriptions that have expired, but remain within the 90-day grace period. Here is how this feature works: Starting 30 days prior to JWT license expiration, NGINX Plus will notify the licensing endpoint server of JWT license expiration as part of the automatic usage reporting process. The licensing endpoint server will continually check for a renewed NGINX One subscription with F5 CRM system. Once the subscription is successfully renewed, the F5 licensing endpoint server will send the updated JWT to corresponding NGINX Plus instance. NGINX Plus instance in turn will automatically deploy the renewed JWT license to the location based on your existing configuration without the need for any NGINX reload or service restart. Note: The renewed JWT file received from F5 is named nginx-mgmt-license and is located at the state_path location on your NGINX instance. For more details, refer to NGINX docs. Native OpenID Connect Module Enhancements The NGINX Plus R34 release introduced native support for OpenID Connect (OIDC) authentication. Continuing the momentum, we are excited to add support for OIDC Relying Party (RP) Initiated Logout along with support for retrieving claims via the OIDC UserInfo endpoint in this release. Relying Party (RP) Initiated Logout RP-Initiated Logout is a method used in federated authentication systems (e.g., systems using OpenID Connect (OIDC) or Security Assertion Markup Language (SAML)) to allow a user to log out of an application (called the relying party) and propagate the logout request to other services in the authentication ecosystem, such as the identity provider (IdP) and other sessions tied to the user. This facilitates session synchronization and clean-up across multiple applications or environments. The RP-Initiated Logout support in NGINX OIDC native module helps provide a seamless user experience by enhancing the consistency of authentication and logout workflows, particularly in Single Sign-On (SSO) environments. It significantly helps improve security by ensuring user sessions are terminated securely thereby reducing the risk of unauthorized access. It also simplifies the development processes by minimizing the need for custom coding and promoting adherence to best practices. Additionally, it strengthens user privacy and supports compliance efforts enabling users to easily terminate sessions, thereby reducing the exposure from lingering session. The implementation involves the client (browser) initiating a logout by sending a request to the relying party's (NGINX) logout endpoint. NGINX(RP) adds additional parameters to the request and redirects it to the IdP, which terminates the associated user session and redirects the client to the specified post_logout_uri. Finally, NGINX as the relying party presents a post-logout confirmation page, signaling the completion of the logout process and ensuring session termination across both the relying party and the identity provider. UserInfo Retrieval Support The OIDC UserInfo endpoint is used by applications to retrieve profile information about the authenticated Identity. Applications can use this endpoint to retrieve profile information, preferences and other user-specific information to ensure a consistent user management process. The support for UserInfo endpoint in the native OIDC module provides a standardized mechanism to fetch user claims from Identity Providers (IdPs) helping simplify the authentication workflows and reducing overall system complexity. Having a standard mechanism also helps define and adopt development best practices across client applications for retrieving user claims offering tremendous value to developers, administrators, and end-users. The implementation enables the RP (nginx) to call an identity provider's OIDC UserInfo endpoint with the access token (Authorization: Bearer) and obtain scope-dependent End-user claims (e.g., profile, email, scope, address). This provides the standard, configuration-driven mechanism for claim retrieval across client applications and reduces integration complexity. Several new directives (logout_uri, post_logout_uri, logout_token_hint, and userinfo) have been added to the ngx_http_oidc_module to support both these features. Refer to our technical blog on how NGINX Plus R35 offers frictionless logout and UserInfo retrieval support as part of the native OIDC implementation for a comprehensive overview of both of these features and how they work under the hood. For instructions on how to configure the native OIDC module for various identity providers, refer the NGINX deployment guide. Early Hints Support Early Hints (RFC 8297) is a HTTP status code to improve website performance by allowing the server to send preliminary hints to the client before the final response is ready. Specifically, the server sends a 103 status code with headers indicating which resources (like CSS, JavaScript, images) the client can pre-fetch while the server is still working on generating the full response. Majority of the web browsers including Chrome, Safari and Edge support it today. A new NGINX directive early_hints has been added to specify the conditions under which backends can send Early Hints to the client. NGINX will parse the Early Hints from the backend and send them to the client. The following example shows how to proxy Early Hints for HTTP/2 and HTTP/3 clients and disable them for HTTP/1.1 early_hints $http2$http3; proxy_pass http://bar.example.com; For more details, refer NGINX docs and a detailed blog on Early Hints support in NGINX. QUIC – Support for CUBIC Congestion Control Algorithm CUBIC is a congestion control algorithm designed to optimize internet performance. It is widely used and well-tested in TCP implementations and excels in high-bandwidth and high-delay networks by efficiently managing data transmission ensuring faster speeds, rapid recovery from congestion, and reduced latency. Its adaptability to various network conditions and fair resource allocation makes it a reliable choice for delivering a smooth and responsive online experience and enhance overall user satisfaction. We announced support for CUBIC congestion algorithm in NGINX open source mainline version 1.27.4. All the bug fixes and enhancements since then are being merged into NGINX Plus R35. For a detailed overview of the implementation, refer to our blog on the topic. NGINX Javascript QuickJS - Full ES2023 support We introduced preview support for QuickJS runtime in NGINX JavaScript(njs) version 0.8.6 in the NGINX Plus R33 release. We have been quietly focused on this initiative since and are pleased to announce full ES2023 JavaScript specification support in NGINX JavaScript(njs) version 0.9.1 with NGINX Plus R35 release. With full ES2023 specification support, you can now use the latest JavaScript features that modern developers expect as standard to extend NGINX capabilities using njs. Refer to this detailed blog for a comprehensive overview of our QuickJS implementation, the motivation behind QuickJS runtime support and where we are headed with NGINX JavaScript. For specific details on how you can leverage QuickJS in your njs scripts, please refer to our documentation. Other Enhancements and Bug Fixes Variable based Access Control Support To enable robust access control using identity claims, R34 and earlier versions required a workaround involving the auth_jwt_require directive. This involved reprocessing the ID token with the auth_jwt module to manage access based on claims. This approach introduced configuration complexity and performance overhead. With R35, NGINX simplifies this process through the auth_require directive, which allows direct use of claims for resource-based access control without relying on auth_jwt. This directive is part of a new module ngx_http_auth_require_module added in this release. For ex, the following NGINX OIDC configuration maps the role claim from the id_token to $admin_role variable and sets it to 1 if the user’s role is “admin”. The /location block then uses auth_require $admin_role to restrict access, allowing only the users with admin role to proceed. http { oidc_provider my_idp { ... } map $oidc_claim_role $admin_role { "admin" 1; } server { auth_oidc my_idp; location /admin { auth_require $admin_role; } } } Though the directive is not exclusive to OIDC, when paired with auth_oidc, it provides a clean and declarative Role-Based Access Control (RBAC) mechanism within the server configuration. For example, you can easily configure access so only admins reach the /admin location, while either admins or users with specific permissions access other locations. The result is streamlined, efficient, and practical access management directly in NGINX. Note that the new auth_require directive does not replace auth_jwt_require as the two serve distinct purposes. While auth_jwt_require is an integral part of JWT validation in the JWT module focusing on headers and claims checks, auth_require operates in a separate ACCESS phase for access control. Deprecating auth_jwt_require would reduce flexibility, particularly in "satisfy" modes of operation, and complicate configurations. Additionally, auth_jwt_require plays a critical role in initializing JWT-related variables, enabling their use in subrequests. This initialization, crucial for JWE claims, cannot be done via REWRITE module directives as JWE claims are not available before JWT decryption. Support for JWS RSASSA-PSS algorithms: RSASSA-PSS algorithms are used for verifying the signatures of JSON Web Tokens (JWTs) to ensure their authenticity and integrity. In NGINX, these algorithms are typically employed via the auth_jwt_module when validating JWTs signed using RSASSA-PSS. We are adding support for following algorithms as specified in RFC 7518 (Section 3.5): PS256 PS384 PS512 Improved Node Outage Detection and Logging This release also introduces improvements in the timeout handling for zone_sync connections enabling faster detection of offline nodes and reducing counter accumulation risks. This improvement is aimed at improving synchronization of nodes in a cluster and early detection of failures improving system’s overall performance and reliability. Additional heuristics are added to detect blocked workers to proactively address prolonged event loop times. License API Updates NGINX license API endpoint now provides additional information. The “uuid” parameter in the license information is now available via the API endpoint. Changes Inherited from NGINX Open Source NGINX Plus R35 is based on NGINX 1.29.0 mainline release and inherits all functional changes, features, and bug fixes made since NGINX Plus R34 was released (which was based on 1.27.4 mainline release). Features: Early Hints support - support for response code 103 from proxy and gRPC backends; CUBIC congestion control algorithm support in QUIC connections. Loading of secret keys from hardware tokens with OpenSSL provider. Support for the "so_keepalive" parameter of the "listen" directive on macOS. Changes: The logging level of SSL errors in a QUIC handshake has been changed from "error" to "crit" for critical errors, and to "info" for the rest; the logging level of unsupported QUIC transport parameters has been lowered from "info" to "debug". Bug Fixes: nginx could not be built by gcc 15 if ngx_http_v2_module or ngx_http_v3_module modules were used. nginx might not be built by gcc 14 or newer with -O3 -flto optimization if ngx_http_v3_module was used. In the "grpc_ssl_password_file", "proxy_ssl_password_file", and "uwsgi_ssl_password_file" directives when loading SSL certificates and encrypted keys from variables; the bug had appeared in 1.23.1. In the $ssl_curve and $ssl_curves variables when using pluggable curves in OpenSSL. nginx could not be built with musl libc. Bugfixes and performance improvements in HTTP/3. Security: (CVE-2025-53859) SMTP Authentication process memory over-read: This vulnerability in the NGINX ngx_mail_smtp_module may allow an unauthenticated attacker to trigger buffer over-read resulting in worker process memory disclosure to the authentication server. For the full list of new changes, features, bug fixes, and workarounds inherited from recent releases, see the NGINX changes . Changes to the NGINX Javascript Module NGINX Plus R35 incorporates changes from the NGINX JavaScript (njs) module version 0.9.1. The following is a list of notable changes in njs since 0.8.9 (which was the version shipped with NGINX Plus R34). Features: Added support for the QuickJS-NG library. Added support for WebCrypto API, FetchAPI, TextEncoder and TextDecoder, querystring module, crypto module and xml module for the QuickJS engine. Added state file for a shared dictionary. Added ECDH support for WebCrypto. Added support for reading r.requestText or r.requestBuffer from a temporary file. Improvements: Performance improvements due to refactored handling of built-in strings, symbols, and small integers Multiple memory usage improvements improved reporting of unhandled promise rejections. Bug Fixes: Fixed segfault in njs_property_query(). The issue was introduced in b28e50b1 (0.9.0). Fixed Function constructor template injection. Fixed GCC compilation with O3 optimization level. Fixed constant is too large for 'long' warning on MIPS -mabi=n32. Fixed compilation with GCC 4.1. Fixed %TypedArray%.from() with the buffer is detached by the mapper. Fixed %TypedArray%.prototype.slice() with overlapping buffers. Fixed handling of detached buffers for typed arrays. Fixed frame saving for async functions with closures. Fixed RegExp compilation of patterns with escaped '[' characters. Fixed handling of undefined values of a captured group in RegExp.prototype[Symbol.split](). Fixed GCC 15 build error with -Wunterminated-string-initialization. Fixed name corruption in variables and headers processing. Fixed incr() method of a shared dictionary with an empty init argument for the QuickJS engine. Bugfix: accepting response headers with underscore characters in Fetch API. Fixed Buffer.concat() with a single argument in QuickJS. Bugfix: added missed syntax error for await in template literal. Fixed non-NULL terminated strings formatting in exceptions for the QuickJS engine. Fixed compatibility with recent change in QuickJS and QuickJS-NG. Fixed serializeToString(). Previously, serializeToString() was exclusiveC14n() which returned a string instead of Buffer. According to the published documentation, it should be c14n() For a comprehensive list of all the features, changes, and bug fixes, see the njs Changelog. F5 NGINX in F5’s Application Delivery & Security Platform NGINX One is part of F5’s Application Delivery & Security Platform. It helps organizations deliver, improve, and secure new applications and APIs. This platform is a unified solution designed to ensure reliable performance, robust security, and seamless scalability for applications deployed across cloud, hybrid, and edge architectures. NGINX One is the all-in-one, subscription-based package that unifies all of NGINX’s capabilities. NGINX One brings together the features of NGINX Plus, F5 NGINX App Protect, and NGINX Kubernetes and management solutions into a single, easy-to-consume package. NGINX Plus, a key component of NGINX One, adds features to open-source NGINX that are designed for enterprise-grade performance, scalability, and security. Ready to try the new release? Follow this guide for more information on installing and deploying NGINX Plus.2.5KViews1like0CommentsGitOps: Declarative Infrastructure and Application Delivery with NGINX App Protect
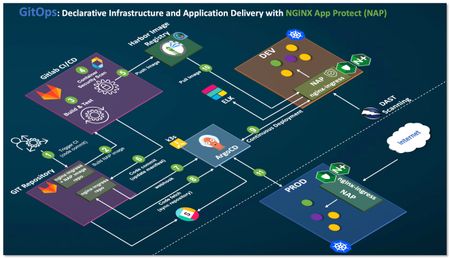
First thing first. What is GitOps? In a nutshell, GitOps is a practice (Git Operation) that allows you to use GIT and code repository as your configuration source of truth (Declarative Infrastructure as Code and Application Delivery as Code) couple with various supporting tools. The state of your git repository syncs with your infrastructure and application states. As operation team runs daily operations (CRUD - "Create, Read, Update and Delete") leveraging the goodness and philosophy of DevOps, they no longer required to store configuration manifest onto various configuration systems. THe Git repo will be the source of truth. Typically, the target systems or infrastructures runs on Kubernetes base platform. For further details and better explanation of GitOps, please refer to below or Google search. https://codefresh.io/learn/gitops/ https://www.atlassian.com/git/tutorials/gitops Why practice GitOps? I have been managing my lab environment for many years. I use my lab for research of technologies, customer demos/Proof-of-Concepts, applications testing, and code development. Due to the nature of constant changes to my environment (agile and dynamic nature), especially with my multiple versions of Kubernetes platform, I have been spending too much time updating, changing, building, deploying and testing various cloud native apps. Commands like docker build, kubectl, istioctl and git have been constantly and repetitively used to operate environments. Hence, I practice GitOps for my Kubernetes infrastructure. Of course, task/operation can be automated and orchestrated with tools such as Ansible, Terraform, Chef and Puppet. You may not necessarily need GitOps to achieve similar outcome. I managed with GitOps practice partly to learn the new "language" and to experience first-hand the full benefit of GitOps. Here are some of my learnings and operations experience that I have been using to manage F5's NGINX App Protect and many demo apps protected by it, which may benefit you and give you some insight on how you can run your own GitOps. You may leverage your own GitOps workflow from here. For details and description on F5's NGINX App Protect, please refer to https://www.nginx.com/products/nginx-app-protect/ Key architecture decision of my GitOps Workflow. Modular architecture - allows me to swap in/out technologies without rework. "Lego block" Must reduce my operational works - saves time, no repetitive task, write once and deploy many. Centralize all my configuration manifest - single source of truth. Currently, my configuration exists everywhere - jump hosts, local laptop, cloud storage and etc. I had lost track of which configuration was the latest. Must be simple, modern, easy to understand and as native as possible. Use Case and desirable outcome Build and keep up to date NGINX Plus Ingress Controller with NGINX App Protect in my Kubernetes environment. Build and keep up to date NGINX App Protect's attack signature and Threat Champaign signature. Zero downtime/impact to apps protected by NGINX App Protect with frequent releases, update and patch cycle for NGINX App Protect. My Problem Statement I need to ensure that my infrastructure (Kubernetes Ingress controller) and web application firewall (NGINX App Protect) is kept up to date with ease. For example, when there are new NGINX-ingress and NGINX App Protect updates (e.g., new version, attack signature and threat campaign signature), I would like to seamlessly push changes out to NGINX-ingress and NGINX App Protect (as it protects my backend apps) without impacting applications protected by NGINX App Protect. GitOps Workflow Start small, start with clear workflow. Below is a depiction of the overall GitOps workflow. NGINX App Protect is the target application. Hence, before description of the full GitOps Workflow, let us understand deployment options for NGINX App Protect. NGINX App Protect Deployment model There are four deployment models for NGINX App Protect. A common deployment models are: Edge - external load balancer and proxies (Global enforcement) Dynamic module inside Ingress Controller (per service/URI/ingress resource enforcement) Per-Service Proxy model - Kubernetes service tier (per service enforcement) Per-pod Proxy model - proxy embedded in pod (per endpoint enforcement) Pipeline demonstrated in this article will work with either NGINX App Protect deployed as Ingress Controller (2) or per-service proxy model (3). For the purposes of this article, NGINX App Protect is deployed at the Ingress controller at the entry point to Kubernetes (Kubernetes Edge Proxy). For those who prefer video, Video Demonstration Part 1 /3 – GitOps with NGINX Plus Ingress and NGINX App Protect - Overview Part 2 /3 – GitOps with NGINX Plus Ingress and NGINX App Protect – Demo in Action Part 3/3 - GitOps with NGINX Plus Ingress and NGINX App Protect - WAF Security Policy Management. Description of GitOps workflow Operation (myself) updates nginx-ingress + NAP image repo (e.g. .gitlab-ci.yml in nginx-plus-ingress) via VSCODE and perform code merge and commit changes to repo stored in Gitlab. Gitlab CI/CD pipeline triggered. Build, test and deploy job started. Git clone kubernetes-ingress repo from https://github.com/nginxinc/kubernetes-ingress/. Checkout latest kubernetes-ingress version and build new image with DockerfilewithAppProtectForPlus dockerfile. [ Ensure you have appropriate nginx app protect license in place ] As part of the build process, it triggers trivy container security scanning for vulnerabilities (Open Source version of AquaSec). Upon completion of static binary scanning, pipeline upload scanned report back to repo for continuous security improvement. Pipeline pushes image to private repository. Private image repo has been configured to perform nightly container security scan (Clair Scanner). Leverage multiple scanning tools - check and balance. Pipeline clone nginx-ingress deployment repo (my-kubernetes-apps) and update nginx-ingress deployment manifest with the latest build image tag (refer excerpt of the manifest below). Gitlab triggers a webhook to ArgoCD to refresh/sync the desire application state on ArgoCD with deployment state in Kubernetes. By default, ArgoCD will sync with Kubernetes every 3 mins. Webhook will trigger instance sync. ArgoCD (deployed on independent K3S cluster) fetches new code from the repo and detects code changes. ArgoCD automates the deployment of the desired application states in the specified target environment. It tracks updates to git branches, tags or pinned to a specific version of manifest at a git commit. Kubernetes triggers an image pull from private repo, performs a rolling updates, and ensures zero interruption to existing traffic. New pods (nginx-ingress) will spin up and traffic will move to new pods before terminating the old pod. Depending on environment and organisation maturity, a successful build, test and deployment onto DEV environment can be pushed to production environment. Note: DAST Scanning (ZAP Scanner) is not shown in this demo. Currently, running offline non-automated scanning. ArgoCD and Gitlab are integrated with Slack notifications. Events are reported into Slack channel via webhook. NGINX App Protect events are send to ELK stack for visibility and analytics. Snippet on where Gitlab CI update nginx-plus-ingress deployment manifest (Flow#6). Each new image build will be tagged with <branch>-hash-<version> ... spec: imagePullSecrets: - name: regcred serviceAccountName: nginx-ingress containers: - image: reg.foobz.com.au/apps/nginx-plus-ingress:master-f660306d-1.9.1 imagePullPolicy: IfNotPresent name: nginx-plus-ingress ... Gitlab CI/CD Pipeline Successful run of CI/CD pipeline to build, test, scan and push container image to private repository and execute code commit onto nginx-plus-ingress repo. Note: Trivy scanning report will be uploaded or committed back to the same repo. To prevent Gitlab CI triggering another build process ("pipeline loop"), the code commit is tagged with [skip ci]. ArgoCD continuous deployment ArgoCD constantly (default every 3 mins) syncs desired application state with my Kubernetes cluster. Its ensures configuration manifest stored in Git repository is always synchronised with the target environment. Mytrain-dev apps are protected by nginx-ingress + NGINX App Protect. Specific (per service/URI enforcement). NGINX App Protect policy is applied onto this service. nginx-ingress + NGINX App Protect is deployed as an Ingress Controller in Kubernetes. pod-template-hash=xxxx is labeled and tracked by ArgoCD. $ kubectl -n nginx-ingress get pod --show-labels NAME READY STATUS RESTARTS AGE LABELS nginx-ingress-776b64dc89-pdtv7 1/1 Running 0 8h app=nginx-ingress,pod-template-hash=776b64dc89 nginx-ingress-776b64dc89-rwk8w 1/1 Running 0 8h app=nginx-ingress,pod-template-hash=776b64dc89 Please refer to the attached video links above for full demo in actions. References Tools involved NGINX Plus Ingress Controller - https://www.nginx.com/products/nginx-ingress-controller/ NGINX App Protect - https://www.nginx.com/products/nginx-app-protect/ Gitlab - https://gitlab.com Trivy Scanner - https://github.com/aquasecurity/trivy ArgoCD - https://argoproj.github.io/argo-cd/ Harbor Private Repository - https://goharbor.io/ Clair Scanner - https://github.com/quay/clair Slack - https://slack.com DAST Scanner - https://www.zaproxy.org/ Elasticsearch, Logstash and Kibana (ELK) - https://www.elastic.co/what-is/elk-stack, https://github.com/464d41/f5-waf-elk-dashboards K3S - https://k3s.io/ Source repo used for this demonstration Repo for building nginx-ingress + NGINX App Protect image repo https://github.com/fbchan/nginx-plus-ingress.git Repo use for deployment manifest of nginx-ingress controller with the NGINX App Protect policy. https://github.com/fbchan/my-kubernetes-apps.git Summary GitOps perhaps is a new buzzword. It may or may not make sense in your environment. It definitely makes sense for me. It integrated well with NGINX App Protect and allows me to constantly update and push new code changes into my environment with ease. A few months down the road, when I need to update nginx-ingress and NGINX App Protect, I just need to trigger a CI job, and then everything works like magic. Your mileage may vary. Experience leads me to think along the line of - start small, start simple by "GitOps-ing" on one of your apps that may require frequency changes. Learn, revise and continuously improve from there. The outcome that GitOps provides will ease your operational burden with "do more with less". Ease of integration of nginx-ingress and NGINX App Protect into your declarative infrastructure and application delivery with GitOps and F5's industry leading Web Application firewall protection will definitely alleviate your organisation's risk exposure to external and internal applications threat.2.5KViews1like3Comments