Home Lab Server Build Using an Intel NUC and Free VMware ESXi 7
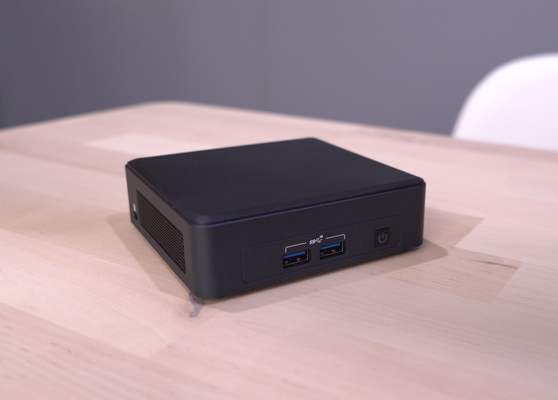
If you're like me, despite having cheap or even free access to cloud compute, you still want to have a bit of compute in a home lab. I can create and destroy to my hearts content. Things can get weird and messy - and it's nobodys problem but my own. For the past 10 years, my home lab has consisted of a couple 2U Dell R710 servers. They are were beefy in specs but they are very loud and consume a relatively large amount of power and space. They have served me really well over the years but it is finally time to upgrade. I ordered an Intel NUC last year. It should be able to handle the workload I'm running on my Dell servers with room to spare. Due to supply chain issues, it took a few months but it finally arrived. I was extremely surprised at how small these are. I knew they were small but I did not expect it to fit in the palm of my hand! I threw on VMware ESXi 7 for the hypervisor but I wanted to document the build for anyone who is building up a similar setup as I encountered a couple issues during my installation. Here is my complete parts list: Intel NUC11TNKV7 2x Kingston 32GB DDR4 3200MHz SODIMM 1TB Samsung 970 EVO NVMe I did document this in a video but this article also serves as a companion to that since there is a lot of commands involved. I immediately found out that because the network card on the NUC does not have a compatible driver included on the ESXi 7 image, I had to create an ISO with the Community Network Driver (Fling). The steps are documented here:https://www.virten.net/2021/11/vmware-esxi-7-0-update-3-on-intel-nuc/however I also came across my own nuances which I'm noting below. First, download the ESXi Offline Bundle and Fling Community Network Driver and place them in a temporary folder. You need to install the vmware.powercli and vmware.imagebuilder modules from the Powershell command line install-module -name vmware.powercli install-module -name vmware.imagebuilder HOWEVER vmware.powercli and vmware.imagebuilder modules for Powershell is not supported on Powershell v6 and above which meant I could not run these commands on my Mac. Luckily, I had a Windows box kicking around with Powershell v5. I was also getting an error in trying to download the VMware.imagebuilder plugin. As it turns out, my version of PowerShell must have been using TLS 1.0/1.1. These intructions configured TLS1.2:https://docs.microsoft.com/en-us/powershell/scripting/gallery/installing-psget?view=powershell-7.2 [Net.ServicePointManager]::SecurityProtocol = [Net.ServicePointManager]::SecurityProtocol -bor [Net.SecurityProtocolType]::Tls12 After all that, I was able to proceed with building the image. The steps were pretty close to what is in the Virten article however the version of ESXi they used was pulled and replaced. I ended up with a different build which is reflected with the file names I used. Add-EsxSoftwareDepot .\VMware-ESXi-7.0U3c-19193900-depot.zip Add-EsxSoftwareDepot .\Net-Community-Driver_1.2.2.0-1vmw.700.1.0.15843807_18835109.zip New-EsxImageProfile -CloneProfile "ESXi-7.0U3c-19193900-standard" -name "ESXi-7.0U3c-19193900-NUC" -Vendor "buulam" Add-EsxSoftwarePackage -ImageProfile "ESXi-7.0U3c-19193900-NUC" -SoftwarePackage "net-community" Export-ESXImageProfile -ImageProfile "ESXi-7.0U3c-19193900-NUC" -ExportToISO -filepath ESXi-7.0U3c-19193900-NUC.iso Note: If you encounter the following error: "windowspowershell\modules\vmware.vimautomation.sdk\12.5.0.19093564\vmware.vimautomation.sdk.psm1 cannot be loaded because running scripts is disabled on this system" you may need to enter the following command: Set-ExecutionPolicy -ExecutionPolicy AllSigned Credit to Pawan Jheeta for this find! Now that I have an ISO image with the Fling Community Network Driver, it was time to create the bootable USB installer. I have a Mac and here are the steps I used to create the USB flash drive:https://virtuallywired.io/2020/08/01/create-a-bootable-esxi-7-usb-installer-on-macos/. I did not encounter any issues with these steps so please refer to the linked article to follow them. In case you are running Windows, this appears to be a good guide for creating the USB flash drive:https://www.virten.net/2014/12/howto-create-a-bootable-esxi-installer-usb-flash-drive/ Once you have the bootable USB flash drive created, you can insert that into the Intel NUC and begin your ESXi installation. The remaining steps I will leave to be explained in my video. I accepted all the defaults except for configuring a static IP address for the management address. I hope this helps some of you out and if there are any questions, please reply to this thread. I'd also love to hear about your home labs!21KViews7likes6Comments
Bypass Azure Login Page by adding a login hint in the SAML Request
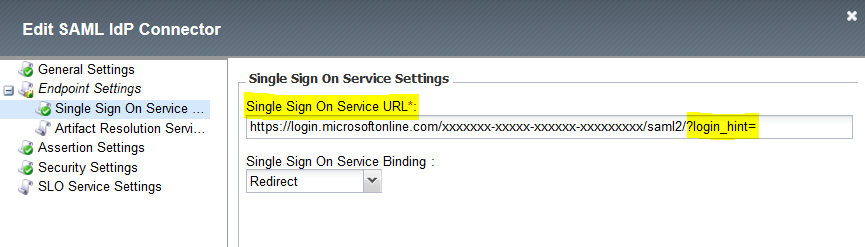
Problem this snippet solves: Enhance the login experience between F5 (SAML SP) and Azure (SAML IDP) by injecting the "email address" as a login hint on behalf of the user. This enhances the user experience because it allows to bypass the Azure Login Page and avoids the user to type two times his login/email address. Example of use Your application need to be accessed by both "domain users" and "federated users". Your application is protected by the F5 APM with a "Login Page" that asks for the user "email address". Based on the "email address" value you determine the domain: if the user is a "domain user", you authenticate him on the local directory (AD Auth, LDAP Auth or ...) if the user is a "federated user" (such as xxx@gmail.com), you send him to the Azure IDP that will manage all federated access This snippet is particularly interesting for the "federated user" scenario because: without this code, a "federated user" will need to type his "login" twice. First time on "F5 Login Page" and the second time on "Azure Login Page" with this code, a "federated user" will need to type his "login" only on the F5 Login Page How to use this snippet: Go to "Access > Federation > SAML Service Provider > External IDP Connectors" and edit the "External IdP Connectors" object that match with the Azure IDP app. On the "Single Sign On Service Settings" add at the end of the "Single Sign On Service URL" the following string "?login_hint=" as shown in the picture below. The string "?login_hint=" is added here only to be able to uniquely identify it later by the iRule and replaced it. 3. Finally, apply the iRule below on the VS that has the Access Policy enabled and for which the SAML SP role is attributed and is binded to the Azure IDP application. The iRule will simply catch the "Single Sign On Service URL" and replace it with "?login_hint=xxxx@gmail.com". Code : when CLIENT_ACCEPTED { ACCESS::restrict_irule_events disable } when HTTP_RESPONSE_RELEASE { if { [string tolower [HTTP::header value "Location"]] contains "/saml2/?login_hint="} { set user_login [ACCESS::session data get "session.logon.last.mail"] #log local0. "Before adding the hint [HTTP::header value "Location"]" set locationWithoutHint "?login_hint=" set locationWithHint "?login_hint=$user_login" HTTP::header replace Location [string map -nocase "${locationWithoutHint} ${locationWithHint}" [HTTP::header Location]] #log local0. "After adding the hint [HTTP::header value "Location"]" } } Tested this on version: No Version Found4.6KViews1like5CommentsChecksums for F5 Supported Cloud templates on GitHub
Problem this snippet solves: Checksums for F5 supported cloud templates F5 Networks provides checksums for all of our supported Amazon Web Services CloudFormation, Microsoft Azure ARM, Google Deployment Manager, and OpenStack Heat Orchestration templates. See the README files on GitHub for information on individual templates. You can find the templates in the appropriate supported directory on GitHub: Amazon CloudFormation templates: https://github.com/F5Networks/f5-aws-cloudformation/tree/master/supported Microsoft ARM Templates: https://github.com/F5Networks/f5-azure-arm-templates/tree/master/supported Google Templates: https://github.com/F5Networks/f5-google-gdm-templates VMware vCenter Templates: https://github.com/F5Networks/f5-vmware-vcenter-templates OpenStack Heat Orchestration Templates: https://github.com/F5Networks/f5-openstack-hot F5 Ansible Modules: http://docs.ansible.com/ansible/latest/list_of_network_modules.html#f5 Because this page was getting much too long to host all the checksums for all Cloud platforms, we now have individual pages for the checksums: Amazon AWS checksums Microsoft Azure checksums Google Cloud checksums VMware vCenter checksums OpenStack Heat Orchestration checksums F5 Ansible Module checksums Code : You can get a checksum for a particular template by running one of the following commands depending on your operating system: * **Linux**: `sha512sum ` * **Windows using CertUtil**: `CertUtil –hashfile SHA512`4.5KViews0likes0Comments
Convert curl command to BIG-IP Monitor Send String
Problem this snippet solves: Convert curl commands into a HTTP or HTTPS monitor Send String. How to use this snippet: Save this code into a Python script and run as a replacement for curl. Related Article: How to create custom HTTP monitors with Postman, curl, and Python An example would be: % python curl_to_send_string.py -X POST -H "Host: api.example.com" -H "User-Agent: Custom BIG-IP Monitor" -H "Accept-Encoding: identity" -H "Connection: Close" -H "Content-Type: application/json" -d '{ "hello": "world" } ' "http://10.1.10.135:8080/post?show_env=1" SEND STRING: POST /post?show_env=1 HTTP/1.1\r\nHost: api.example.com\r\nUser-Agent: Custom BIG-IP Monitor\r\nAccept-Encoding: identity\r\nConnection: Close\r\nContent-Type: application/json\r\n\r\n{\n \"hello\":\n \"world\"\n}\n Code : Python 2.x import getopt import sys import urllib optlist, args = getopt.getopt(sys.argv[1:], 'X:H:d:') flat_optlist = dict(optlist) method = flat_optlist.get('-X','GET') (host,uri) = urllib.splithost(urllib.splittype(args[0])[1]) protocol = 'HTTP/1.1' headers = ["%s %s %s" %(method, uri, protocol)] headers.extend([h[1] for h in optlist if h[0] == '-H']) if not filter(lambda x: 'host:' in x.lower(),headers): headers.insert(1,'Host: %s' %(host)) send_string = "\\r\\n".join(headers) send_string += "\\r\\n\\r\\n" if '-d' in flat_optlist: send_string += flat_optlist['-d'].replace('\n','\\n') send_string = send_string.replace("\"", "\\\"") print "SEND STRING:" print send_string Python 3.x import getopt import sys from urllib.parse import splittype, urlparse optlist, args = getopt.getopt(sys.argv[1:], 'X:H:d:') flat_optlist = dict(optlist) method = flat_optlist.get('-X','GET') parts = urlparse(splittype(args[0])[1]) (host,uri) = (parts.hostname,parts.path) protocol = 'HTTP/1.1' headers = ["%s %s %s" %(method, uri, protocol)] headers.extend([h[1] for h in optlist if h[0] == '-H']) if not filter(lambda x: 'host:' in x.lower(),headers): headers.insert(1,'Host: %s' %(host)) send_string = "\\r\\n".join(headers) send_string += "\\r\\n\\r\\n" if '-d' in flat_optlist: send_string += flat_optlist['-d'].replace('\n','\\n') send_string = send_string.replace("\"", "\\\"") print("SEND STRING:") print(send_string) Tested this on version: 11.54.5KViews0likes17CommentsCode to create unreachable ELA license files from BIG-IQ
Problem this snippet solves: *NOTE* if you are upgrading your BIG-IP,please refer to F5 solution:https://support.f5.com/csp/article/K13540950 BIG-IQ traditionally expects to be able to reach any BIG-IP devices it is going to license. This code helps create a license file from the ELA SKU offerings which can be applied on an Unreachable BIG-IP. I've added some troubleshoting steps at the end of the article, Dossier errors seen on the BIG-IP, just in case! How to use this snippet: SSH into the BIG-IP device and run the following command to gain the MAC address of the management interface tmsh show sys mac-address | grep -i interface [root@bigip1:Active:Standalone] config # tmsh show sys mac-address | grep -i interface ll:50:56:xx:xx:36net interfacemgmtmac-address xxxxxxxxxxxxxxxxxnet interface1.3mac-address xxxxxxxxxxxxxxxxxnet interface1.1mac-address xxxxxxxxxxxxxxxxx net interface1.2mac-address In the example above the MAC address we need is “ll:50:56:xx:xx:36” Now SSH into the BIG-IQ Move into the /shared directory (cd /shared) Copy over the Create-license.PY python script and run it by typing python Create-license.py The script runs and will prompt you for the following information [root@Preece-bigiq-cm1:Active:Standalone] shared # python Create-license.py Enter BIG-IQ user ID: admin Enter BIG-IQ Password: Enter Management IP address of BIG-IQ: 44.131.176.101 Enter Management IP address of BIG-IP to be licensed: 44.131.176.22 Enter Management MAC address of BIG-IP to be licensed: ll:50:56:xx:kk:36 Enter the name of the License Pool from which to take BIG-IP license: Load-18 Enter the license name to be assigned to the BIG-IP: F5-BIG-MSP-BT-1GIPIF-LIC-DEV Enter hypervisor used, valid options are: aws, azure, gce, hyperv, kvm, vmware,xen: vmware Optional: Enter chargeback tag if required: Department-A Optional: Enter tenant name if required: Customer-B Once the details have been filled in the script authenticates to the BIG-IQ and generates the license (30 seconds) If everything went well, you will be presented with a success message. The license file is saved as IP-address_bigip.license in the same directory as you run the script Using SCP copy the new license file from the BIG-IQ to your desktop. Copy the license file into the /config directory of the BIG-IP device. Rename the file, copy ip-address.bigip.license bigip.license Reload the license by typing reloadlic Observe the BIG-IP device restart its services and show as active. You can review in the GUI (System—License) and provision modules as needed. Code : import getpass # used to hide the users password input import json import os import requests from time import sleep """ This script uses the BIG-IQ API to license an unreachable (dark site) BIG-IP. The BIG-IQ licensing API needs certain details provided in order to license an appliance, these details can either be provided in a file call lic-data.json or if that file does not exist you will be prompted to enter them. The minimum contents of lic-data.json should be: { "licensePoolName": " -- Enter License Pool Name here. License Pool name can be found in BIG-IQ GUI -- ", "command": "assign", "address": " -- Enter MGMT IP Address of BIG-IP here -- ", "assignmentType": "UNREACHABLE", "macAddress": " -- Enter MAC address of MGMT IP for the BIG-IP here -- ", "hypervisor": " -- Enter hypervisor value here options are; aws, azure, gce, hyperv, kvm, vmware, xen: --", "unitOfMeasure": "yearly", "skuKeyword1": "-- Enter License Name here. License Name (or Offering name) can be found in the BIG-IQ GUI -- " } Additional Optional key:value pairs can be added to the JSON file to afix useful tags to the license. The json file with optional key:value pairs looks like: { "licensePoolName": " -- Enter License Pool Name here. License Pool name can be found in BIG-IQ GUI -- ", "command": "assign", "address": " -- Enter MGMT IP Address of BIG-IP here -- ", "assignmentType": "UNREACHABLE", "macAddress": " -- Enter MAC address of MGMT IP for the BIG-IP here -- ", "hypervisor": " -- Enter hypervisor value here options are; aws, azure, gce, hyperv, kvm, vmware, xen: --", "unitOfMeasure": "yearly", "skuKeyword1": "-- Enter License Name here. License Name (or Offering name) can be found in the BIG-IQ GUI -- ", "chargebackTag": "OPTIONAL: Remove this line if you are not going to use it", "tenant": "OPTIONAL: Remove this line if you are not going to use it" } A completed minimal lic-data.json file will look like this: { "licensePoolName": "byol-pool-utility", "command": "assign", "address": "10.1.1.10", "assignmentType": "UNREACHABLE", "macAddress": "06:ce:c2:43:b3:05", "hypervisor": "kvm", "unitOfMeasure": "yearly", "skuKeyword1": "F5-BIG-MSP-BT-P3-3GF-LIC-DEV" } lic-data.json must reside in the directory from which you execute this python script. """ def bigiqAuth(_bigiqAuthUrl, _bigiqCredentials): """ This function authenticates with BIG-IQ and collects the authentication token provided. Theo token will be used for subsequent calls to BIG-IQ """ _errFlag=0 try: _bigiqAuthInfo=_bigiq_session.post(_bigiqAuthUrl, data=json.dumps(_bigiqCredentials), verify=False) print(_bigiqAuthUrl) _bigiqAuthInfo.raise_for_status() print("Response code: %s" %_bigiqAuthInfo.status_code) except requests.exceptions.HTTPError as err: print(err) _errFlag=1 #end try if _errFlag==0: _bigiqResponse=_bigiqAuthInfo.json() _bigiqToken=_bigiqResponse['token'] for _token in _bigiqToken: if (_token == 'token'): _bigiqAuthToken=(_bigiqToken[_token]) # End if # Next _authHeaders={ "X-F5-Auth-Token": "{_authToken}".format(_authToken=_bigiqAuthToken) } else: _authHeaders=0 #end if print("** Completed Authentication ***") return(_authHeaders); #End Def def extractLicense(_rawLicenseJSON): """ This function pulls the generated license from BIG-IQ """ for _license in _rawLicenseJSON: if (_license=='licenseText'): _extractedLicense=_rawLicenseJSON[_license] #end if if (_license=='status'): if (_rawLicenseJSON[_license]=="FINISHED"): print("***** License has been assigned *****") else: _extractedLicense="FAILED" #end if #end if #next return(_extractedLicense); #End def def licenseData(): """ This function read the lic-data.json file. If it does not exist you will be prompted to enter the necessary values. """ if os.path.exists('lic-data.json'): with open('./lic-data.json') as licfile: _licdata = json.load(licfile) else: _bigipAddress=raw_input("Enter Management IP address of BIG-IP to be licensed: ") _bigipMACaddress=raw_input("Enter Management MAC address of BIG-IP to be licensed: ") _licensePoolName=raw_input("Enter the name of the License Pool from which to take BIG-IP license: ") _licenseSKU=raw_input("Enter the license name to be assigned to the BIG-IP: ") _hypervisorType=raw_input("Enter hypervisor used, valid options are: aws, azure, gce, hyperv, kvm, vmware, xen: ") _chargebackTag=raw_input("Optional: Enter chargeback tag if required: ") _tenantTag=raw_input("Optional: Enter tenant name if required: ") _licdata={ "licensePoolName": "{_licensePool}".format(_licensePool=_licensePoolName), "command": "assign", "address": "{_bigipIP}".format(_bigipIP=_bigipAddress), "assignmentType": "UNREACHABLE", "macAddress": "{_bigipMAC}".format(_bigipMAC=_bigipMACaddress), "hypervisor": "{_hypervisor}".format(_hypervisor=_hypervisorType), "unitOfMeasure": "yearly", "skuKeyword1": "{_license}".format(_license=_licenseSKU), "chargebackTag": "{_chargeback}".format(_chargeback=_chargebackTag), "tenant": "{_tenant}".format(_tenant=_tenantTag) } # End if return(_licdata); def urlConstruction(_bigiqUrl, _bigiqIP): """ This function rewrites the selflink URL returned by BIG-IQ to reflect BIG-IQ management IP address rather than localhost """ count=0 _urlDeConstruct=_bigiqUrl.split("/") _urlReConstruct="" for _urlElement in _urlDeConstruct: #print("%d %s" %(count,_urlElement)) if (_urlElement=="https:"): _urlReConstruct=_urlReConstruct+_urlElement+"//" elif (_urlElement=="localhost"): _urlReConstruct=_urlReConstruct+_bigiqIP else: if (_urlElement!=""): _urlReConstruct=_urlReConstruct+"/"+_urlElement #end if #end if count+=1 #Next return(_urlReConstruct); #End Def _userID=raw_input("Enter BIG-IQ user ID: ") _password=getpass.getpass(prompt="Enter BIG-IQ Password: ") _bigiqAddress=raw_input("Enter Management IP address of BIG-IQ: ") _credPostBody={ "username": "{_uname}".format(_uname=_userID), "password": "{_pword}".format(_pword=_password), "loginProvideriName": "RadiusServer" } _deviceToBeLicensed=licenseData() _bigipAddress=_deviceToBeLicensed['address'] print("BIG-IP Address is: %s" %_bigipAddress) _bigiq_session=requests.session() _bigiq_auth_url="https://{_bigiqIP}/mgmt/shared/authn/login".format(_bigiqIP=_bigiqAddress) # Authenticates with BIG-IQ _bigiqAuthHeader=bigiqAuth(_bigiq_auth_url, _credPostBody) # if _bigiqAuthHeader==0: print("Unable to authenticate with BIG-IQ. Check BIG-IQ reachability and credentials") else: _bigiq_url1="https://{_bigiqIP}/mgmt/cm/device/tasks/licensing/pool/member-management".format(_bigiqIP=_bigiqAddress) # # --- This section requests the license from BIG-IQ. Posting the criteria as laid out in the _deviceToBeLicensed JSON blob # _errFlag=0 try: _bigiqLicenseDevice=_bigiq_session.post(_bigiq_url1, headers=_bigiqAuthHeader, data=json.dumps(_deviceToBeLicensed), verify=False) _bigiqLicenseDevice.raise_for_status() print("Response code: %s" %_bigiqLicenseDevice.status_code) except requests.exceptions.HTTPError as err: print("Issue received, check rquest and or check connectivity %s" %err) _errFlag=1 #end try if _errFlag==0: #print(_bigiqLicenseDevice.status_code) _bigiqResponse=_bigiqLicenseDevice.json() print(_bigiqResponse) print(_bigiqResponse['selfLink']) _bigiqLicenseStatus_url=_bigiqResponse['selfLink'] _bigiqLicenseStatus_url=urlConstruction(_bigiqLicenseStatus_url, _bigiqAddress) print(_bigiqLicenseStatus_url) print("--- Standby for 30 seconds whilst BIG-IQ generates license ---") sleep(30) _errFlag1=0 try: _licenseStatus=_bigiq_session.get(_bigiqLicenseStatus_url, headers=_bigiqAuthHeader, verify=False) _licenseStatus.raise_for_status() print("Response code: %s" %_licenseStatus.status_code) except requests.exceptions.HTTPError as err: print("Issue received, check rquest and or check connectivity %s" %err) _errFlag=1 #end try if _errFlag==0: print(_licenseStatus.content) _licenseStatusDetail=_licenseStatus.json() _licenseOutput=extractLicense(_licenseStatusDetail) if (_licenseOutput=="FAILED"): print("***** License Assignment Failed. Most likely a valid license already exists for device, revoke it before applying a new license *****") else: _licenseFname=(_bigipAddress+"_bigip.license") _licensefile=open(_licenseFname, "w") _licensefile.write("%s" %_licenseOutput) _licensefile.close() print(_licenseOutput) print("***** SUCCESS, the license is stored here %s *****" %_licenseFname) #end if #end if #end if #end if Tested this on version: 13.x, 14.x, 15.x and 16.x Troubleshooting When you apply the license to the BIG-IP you may see an error similar to: License is not operational (expired or digital signature does not match contents) This could simply be that you copy and paste the license file badly, please use MD5SUM on the BIG-IQ to the output license file and compare to the same file on the BIG-IP Example: md5sum 10.2.3.4_bigip.license You can also review the /var/log/ltm file for "Dossier error" messages Dossier error: 1 (MAC address is mismatched) Dossier error: 12 (Hypervisor is mismatched) If this does not help, please open a support case and attach a recent qkview file.2.2KViews3likes4CommentsF5 XC Distributed Cloud HTTP Header manipulations and matching of the client ip/user HTTP headers
1 . F5 XC distributed cloud HTTP Header manipulations In the F5 XC Distributed Cloud some client information is saved to variables that can be inserted in HTTP headers similar to how F5 Big-IP saves some data that can after that be used in a iRule or Local Traffic Policy. By default XC will insert XFF header with the client IP address but what if the end servers want an HTTP header with another name to contain the real client IP. Under the HTTP load balancer under "Other Options" under "More Options" the "Header Options" can be found. Then the the predefined variables can be used for this job like in the example below the $[client_address] is used. A list of the predefined variables for F5 XC: https://docs.cloud.f5.com/docs/how-to/advanced-security/configure-http-header-processing There is $[user] variable and maybe in the future if F5 XC does the authentication of the users this option will be insert the user in a proxy chaining scenario but for now I think that this just manipulates data in the XAU (X-Authenticated-User) HTTP header. 2. Matching of the real client ip HTTP headers You can also match a XFF header if it is inserted by a proxy device before the F5 XC nodes for security bypass/blocking or for logging in the F5 XC. For User logging from the XFF Under "Common Security Controls" create a "User Identification Policy". You can also match a regex that matches the ip address and this is in case there are multiple IP addresses in the XFF header as there could have been many Proxy devices in the data path and we want see if just one is present. For Security bypass or blocking based based on XFF Under "Common Security Controls" create a "Trusted Client Rules" or "Client Blocking Rules". Also if you have "User Identification Policy" then you can just use the "User Identifier" but it can't use regex in this case. To match a regex value in the header that is just a single IP address, even when the header has many ip addresses, use the regex (1\.1\.1\.1) as an example to mach address 1.1.1.1. To use the client IP address as a source Ip address to the backend Origin Servers in the TCP packet after going through the F5 XC (similar to removing the SNAT pool or Automap in F5 Big-IP) use the option below: The same way the XAU (X-Authenticated-User) HTTP header can be used in a proxy chaining topology, when there is a proxy before the F5 XC that has added this header. Edit: Keep in mind that in some cases in the XC Regex for example (1\.1\.1\.1) should be written without () as 1\.1\.1\.1 , so test it as this could be something new and I have seen it in service policy regex matches, when making a new custom signature that was not in WAAP WAF XC policy. I could make a seperate article for this 🙂2.2KViews8likes1Comment
Automate F5 Initial Setup - iControl & Ansible
Problem this snippet solves: While everyone loves F5, we all know the initial system setup, networking components and device service cluster is a tedious process. This simple Ansible playbook will allow you to automate the entire F5 initial setup by reading a CSV file and leave you with a ready to go active/standby pair. This does include setting up - NTP, DNS, Hostname, LACP, dot1q, Self-IPs, device trust, configuration sync, etc How to use this snippet: How to Use Required Items Ansible (tested on version 2.1) Blank pair of F5s with management IP configured (version 12.0 & 12.1) Install Ansible if Needed Official Ansible Install Guide Great 3rd Party Install Guide Download and Run F5 Ansible Setup Playbook - f5_ansible_setup.yml Please run the following Ansible Playbook. This will download the required modules, playbook for F5 Initial Setup and example CSV file. Be sure to run this playbook from ~/ansible/playbooks/ F5 Ansible Setup Playbook Fill Out CSV File - f5_initial_setup.csv Use the example CSV file as an example to fit to your environment. Using the CSV file allows you to not have to edit the actual F5 Initial Setup Playbook. This was tested on a pair of 5200v's with so adjust interfaces as needed. The CSV file will be automatically downloaded from GitHub when you run the F5 Ansible Install Playbook. Run F5 Initial Setup Playbook - f5_initial_setup.yml Once you have edited the CSV file to your needs, run the F5 Initial Setup Playbook. This playbook will read the CSV file and configure the two F5 devices from scratch. When everything completes, you should be left with an active/standby pair of devices ready to go! If you want to manually install the Ansible Playbook & Modules, please check out - GitHub Code : https://github.com/mwallco/f5_ansible Tested this on version: 12.01.6KViews0likes15Comments