xc
16 TopicsMalware Protection with F5 Distributed Cloud Web App & API Protection
F5 Distributed Cloud WAAP comes with robust malware protection built with the precision and scope to address the unique challenges of safeguarding file uploads. Allowing users to upload files is a staple of web applications. Whether it's uploading images for insurance claims, profile photos for social networks, or text files like tax documents, file uploads play an essential role in modern digital workflows. However, this convenience comes with a hidden and significant risk: file upload endpoints can be a vector for injecting and executing malicious code. While traditional web application firewalls (WAFs) often excel at detecting code injection attacks in textual request bodies or URL parameters, they falter when it comes to binary files. Binary files represent a unique challenge—malware can be embedded in hard-to-detect formats like images, PDFs, or other file types, making traditional WAF signatures and detection models unable to detect such attacks. Compounding the problem, many organizations face significant hurdles when using WAFs to monitor file uploads. To prevent excessive false positives that disrupt legitimate user activity, development and security teams often opt to bypass WAF protection for file uploads or define overly broad exclusions for upload paths. These exclusions create blind spots in application defenses, effectively leaving upload endpoints and, by extension, the wider application ecosystem vulnerable to exploitation. F5 Distributed Cloud WAAP is available with robust malware protection that has been built with the precision and scope to address the unique challenges of safeguarding file uploads. In this demo we will show you how to enable Malware Protection on your F5 Distributed Cloud Load Balancer to detect and block malicious file uploads. For more info on configuring Malware Protection on your F5 Distributed Cloud Load Balancer, see Create HTTP Load Balancer > Configure Malware Protection. 65Views1like0Comments
AI-Enabled Risk Scoring Helps Reduce Risks
Risk Categories AI-enabled Risk Scoring for F5 Distributed Cloud WAF reduces key risk categories: Security, Business/availability, and Operational. Security risk (missed attacks / false negatives): F5 Distributed Cloud's AI-Powered WAF Risk Scoring improves detection by combining multiple signals per request so you don't miss attacks that traditional WAFs may not catch: High-confidence signatures Curated signature combinations (with LLM labeling to improve precision) Attack indicators (e.g., SQLi signals, libinjection, multiple signatures) A real-time ML model—to catch attacks that traditional WAFs may miss Business/availability risk (false positives blocking real users) By assigning High/Medium/Low risk outcomes using layered analysis, teams can enforce blocking with more confidence and keep false positives low, reducing accidental customer impact such as blocking legitimate users. Staged workflows are enabled, such as: Block High Review Medium (implicitly allow Low while continuing to observe) Operational risk (slow time-to-protection and heavy tuning burden) F5 Distributed Cloud's AI-Powered WAF Risk Scoring reduces manual exceptions and case-by-case policy tuning, enabling teams to deploy the WAF in blocking mode sooner, with less ongoing friction across SecOps, dev, and platform teams. Outcome-based scoring enables: Improved consistency of enforcement across distributed apps/APIs Standardization of protection by reducing bespoke tuning per app How the system makes a risk decision Risk level is computed from layering multiple complementary analyses: High Risk or High Accuracy Signature matches Heuristics – such as injection attacks, multiple attack signatures detected, predictable resource exploitation, other risk indicators Neural network - Signatures can sometimes lead to false positives. To address that, a neural network acts as a secondary classifier to determine whether attack fragments flagged by signatures signal an attack, improving accuracy while maintaining real-time performance. Key system scope The ML model analyzes behavioral patterns to refine risk assessment, ensuring accurate classification and enabling effective threat prioritization. Calling the ML model will adhere to the following scope: The ML model is called only if at least one enabled (not excluded/disabled) signature triggers in these categories: Server-Side Code Injection, SQL Injection, XSS, Command Execution, Path Traversal, LDAP Injection, XPath Injection The model analyzes only HTTP request fragments that trigger signatures (not full raw requests). If signatures are excluded or disabled, they are not considered for invoking the model. Model output: 1 = malicious → request risk level set to High 0 = benign → request risk level set to False Positive A primer on Signature Accuracy vs Signature Risk Accuracy Indicates the ability of the attack signature to identify the attack including susceptibility to false-positive alarms: Low: Indicates a high likelihood of false positives. Medium: Indicates some likelihood of false positives. High: Indicates a low likelihood of false positives. Risk Indicates the level of potential damage this attack might cause if it is successful: Low: Indicates the attack does not cause direct damage or reveal highly sensitive data. Medium: Indicates the attack may reveal sensitive data or cause moderate damage. High: Indicates the attack may cause a full system compromise. Does AI-enabled Risk Scoring add latency? AI-enabled Risk Scoring works in line with F5 Distributed Cloud WAF, inspecting real-time traffic without adding noticeable latency in our tests.370Views1like0CommentsImplementing Risk-Based Actions with AI-Powered WAF: Customer Policy Paths
Why Custom policy is where risk-based actions matter most The default policy is straightforward: it applies a broad mix of signatures, threat campaigns, and violations; “Enhance with AI” is an optional add-on. Custom policies are where customers can accidentally recreate the same problems Risk Scoring is designed to solve—usually by combining: Overly broad/noisy signature selection (especially low-accuracy signatures) Aggressive enforcement (blocking Medium too early) Disabling/excluding key signatures and unintentionally reducing ML invocation So the rest of this blog is a tight, configuration-oriented walkthrough of the Custom path. Custom policy: configuration walkthrough (decision points → operational outcomes) Baseline: Navigate to the Custom controls LB Config → Web Application Firewall Create/edit the WAF object (Metadata `Name`, etc.) Set Security Policy = Custom Choose Signature Selection by Accuracy Optionally enable Enhance with AI (Risk Scoring) If enabled, optionally configure Action by Risk Score (risk-based enforcement) Step 1: Signature Selection by Accuracy (choose your baseline level) Accuracy indicates susceptibility to false positives: Low: high likelihood of false positives Medium: some likelihood of false positives High: low likelihood of false positives Note: This setting is foundational: it determines which signatures are active, and therefore the quality and volume of detection signals that feed into downstream risk evaluation. Operationally: High accuracy tends to support faster, safer enforcement. Medium/Low accuracy can expand coverage but increases the chance you’ll need exceptions, investigations, or staged rollout discipline. Step 2: Enhance with AI (turn on Risk Scoring) Enhance with AI = On enables AI-powered risk scoring and assigns each request a High/Medium/Low risk score using layered signals. Two implementation details to make explicit in your blog because they affect customer expectations: ML invocation depends on enabled signatures firing in the specified injection/execution categories. If teams disable/exclude those signatures, they may reduce when the model runs—changing practical behavior of risk evaluation. Step 3: Action by Risk Score (map risk levels to enforcement) When Action by Risk Score is enabled: By default, high-risk requests are blocked Users can choose whether Medium-risk requests are blocked (via dropdown) This is the primary knob that determines how quickly a user decides to move from “safe enforcement” to “broad enforcement.” Recommended rollout path: Day 0 → Day 7 → Steady state This is the most common and safest operational progression for customers Day 0 (safe enforcement baseline) Custom → Signature Selection by Accuracy = High (or High + Medium if you need broader coverage immediately) Enhance with AI = On Action by Risk Score = High Outcome Gets to blocking quickly while minimizing availability risk. High is blocked. This is the “prove safety while stopping obvious bad” posture. Day 7 (controlled expansion) Keep Custom + Enhance with AI + Action by Risk Score Optionally widen Signature Selection from High → High + Medium if coverage is insufficient Enhance with AI = On Action by Risk Score = High + Medium Outcome Expands detection inputs without immediately expanding enforcement. Teams focus on what’s landing in Medium and whether exclusions/disabled signatures are reducing ML invocation in key categories Steady state (mature enforcement) Custom → signature selection set to the broadest set Widen Signature Selection from High + Medium → High + Medium + Low Action by Risk Score = High + Medium Enhance with AI = On Action by Risk Score = High + Medium Outcome Risk outcomes become the enforcement interface. Broad, consistent blocking across apps/APIs with reduced per-app tuning and fewer signature-level decisions Common Pitfalls: Avoid Block Medium on Day 0 when including low-accuracy signatures—this is the fastest way to recreate false-positive outages. If you disable/exclude signatures in the key injection/execution categories, you can reduce ML invocation and change risk evaluation behavior. Summary Custom policies traditionally scale poorly because every app ends up with bespoke signature decisions and exception handling. Risk Scoring is designed to invert that: keep signatures as key signals but standardize enforcement via risk outcomes. If you implement Custom with the Day 0 → Day 7 → Steady state progression above, you get a predictable path from “block safely now” to “enforce broadly later” without returning to signature-by-signature tuning as your primary operating model.619Views2likes1CommentMoving HTTP Load Balancers Between F5 Distributed Cloud Namespaces — Why It's Harder Than You Think
The Problem If you have been working with F5 Distributed Cloud (XC) for a while, you have probably run into this: your namespace structure no longer reflects how your teams or applications are organized. Maybe the initial layout was a quick decision during onboarding. Maybe teams have merged, projects have grown, or your naming convention has evolved. Either way, you now want to move a handful of HTTP load balancers from one namespace to another. Simple enough, right? Just change the namespace field and save... Except you can't. There is no "move" operation on F5 XC - not in the UI, not in the API. Changing the namespace of a load balancer means deleting it in the source and re-creating it in the target. And that is where things get complicated. Why a Simple Delete-and-Recreate Is Not Enough On the surface, the API is straightforward: "GET" the config, "DELETE" the object, "POST" it into the new namespace. But a production HTTP load balancer on XC is rarely a standalone object. It sits at the top of a dependency tree that can include origin pools, health checks, TLS certificates, service policies, app firewalls, rate limiters, and more. Every one of those dependencies needs to be handled correctly - or the migration breaks. Here are the main challenges we might run into. Referential Integrity F5 XC enforces strict referential integrity. You cannot delete an origin pool that is still referenced by a load balancer. You cannot create a load balancer that references an origin pool that does not exist yet. This means the order of operations matters: delete top-down (LBs first, then dependencies), create bottom-up (dependencies first, then LBs). It also means that if two load balancers share an origin pool, you cannot move them independently. Delete the first LB, try to delete the shared pool, and the API returns a 409 Conflict because the second LB still references it. Both LBs - and all of their shared dependencies - have to be moved together as a single atomic unit. New CNAMEs After Every Move When you delete and re-create an HTTP load balancer, F5 XC assigns a new "host_name" (the CNAME target that your DNS records point to). If the LB uses Let's Encrypt auto-certificates, the ACME challenge CNAME changes too. That means after every move, someone needs to update external DNS records - and until that happens, the application is unreachable or the TLS certificate renewal fails. For tenants using XC-managed DNS zones with "Allow Application Loadbalancer Managed Records" enabled, this is handled automatically. But many customers manage their own DNS, and they need the old and new CNAME values for every moved LB. Certificates with Non-Portable Private Keys This one is subtle. When a load balancer uses a manually imported TLS certificate, the private key is stored in one of several formats: blindfolded (encrypted with the Volterra blindfold key) or clear secret. In both of these cases, the XC API never returns the private key material in its GET response. You get the certificate and metadata, but not the key. That means you cannot extract-and-recreate the certificate in a new namespace via the API. Cross-namespace certificate references (outside of "shared" namespace) are also not supported. So if an LB in namespace A uses a manually imported certificate stored in namespace A, and you want to move that LB to namespace B, you need to first manually upload the same certificate into namespace B (or into the "shared" namespace) before the migration can proceed. API Metadata The XC API returns a "referring_objects" field on every config GET response. In theory, this tells you what other objects reference a given resource - exactly what you need to know before deleting something. In practice, this field can be empty even when active references exist. The only reliable way to detect all external references is to actively scan: fetch the config of every load balancer in the namespace and check their specs for references to the objects you are about to move. Cross-Namespace References Are Not Allowed On F5 XC, an HTTP load balancer can only reference objects in its own namespace, in "system" or "shared" namespace. If your origin pool lives in namespace A and you move the LB to namespace B, the origin pool must either come along to namespace B or already exist there. There is no way to have the LB in namespace B point to a pool in namespace A. This means you need to discover the complete transitive dependency tree of every LB, determine which dependencies need to move, detect which are shared between multiple LBs, and batch everything accordingly. The Tool: XC Namespace migration To deal with all of this, (A)I built **xc-ns-mover** — a Python CLI tool that automates the entire process. It has two components: Scanner - scans all namespaces on your tenant, lists every HTTP load balancer, and writes a CSV report. This gives you the inventory to decide what to move. Mover - takes a CSV of load balancers, discovers all dependencies, groups LBs that share dependencies into atomic batches, runs a series of pre-flight checks, and then executes the migration - or generates a dry-run report so you can review everything first, or do the job manually (JSON Code blocks available in the report) What the Mover Does Before Touching Anything The mover runs six pre-flight phases before making any changes: Discovery and batching - fetches every LB config, walks the dependency tree, and uses a union-find algorithm to cluster LBs with shared dependencies into batches. External reference scan - for every dependency being moved, checks whether any LB outside the move list references it. If so, that dependency cannot be moved without breaking the external LB, and the batch is blocked. Conflict detection - lists all existing objects in the target namespace. If a name already exists, the user can skip the object or rename it with a configurable prefix (e.g., "migrated-my-pool"). All internal JSON references are updated automatically. Certificate pre-flight - identifies certificates with non-portable private keys, then searches the target and "shared" namespaces for a matching certificate by domain/SAN comparison (including wildcard matching per RFC 6125). If a match is found, the LB's certificate reference is automatically rewritten. If not, the batch is blocked until the certificate is manually created. DNS zone pre-flight - queries the tenant's DNS zones to detect which ones have managed LB records enabled. LBs under managed zones are flagged as "auto-managed" in the report — no manual DNS update needed. After all checks pass, the actual migration follows a strict order per batch: backup everything, delete top-down, create bottom-up, verify new CNAMEs. If anything fails, automatic rollback kicks in — objects created in the target are deleted, objects deleted from the source are restored from backups. The Reports Every run produces an HTML report. The dry-run report shows planned configurations, the full dependency graph , certificate issues, DNS changes required, and any blocking issues — all before a single API call mutates anything. The post-migration report includes old and new CNAME values, a DNS changes table with exactly which records need updating, and full configuration backups of everything that was touched. Things to Keep in Mind A few caveats that are worth highlighting: Brief interruption is unavoidable - The migration deletes and re-creates load balancers. During that window (typically seconds to a few minutes per batch), traffic to affected domains will be impacted. Plan a change window. Only HTTP load balancers are supported - TCP load balancers and other object types are not handled by this tool. DNS updates are your responsibility - The report gives you all the values - old CNAME, new CNAME, ACME challenge CNAME - but you need to update your DNS provider. Always run the dry-run first - The tool enforces this by default: it stores a fingerprint after a dry-run and verifies it before executing. If the config changes, a new dry-run is required. The project is open source and available on GitHub. This is privately maintained and not "officially supported": https://github.com/de1chk1nd/resources-and-tools/blob/main/tools/xc-ns-mover/README.md If you find bugs or have feature requests, please open a GitHub issue.348Views4likes0CommentsSimplifying and Securing Network Segmentation with F5 Distributed Cloud and Nutanix Flow
Introduction Enterprises often separate environments—such as development and production—to improve efficiency, reduce risk, and maintain compliance. A critical enabler of this separation is network segmentation, which isolates networks into smaller, secured segments—strengthening security, optimizing performance, and supporting regulatory standards. In this article, we explore the integration between Nutanix Flow and F5 Distributed Cloud, showcasing how F5 and Nutanix collaborate to simplify and secure network segmentation across diverse environments—on-premises, remote, and hybrid multicloud. Integration Overview At the heart of this integration is the capability to deploy a F5 Distributed Cloud Customer Edge (CE) inside a Nutanix Flow VPC, establish BGP peering with the Nutanix Flow BGP Gateway, and inject CE-advertised BGP routes into the VPC routing table. This architecture provides full control over application delivery and security within the VPC. It enables selective advertisement of HTTP load balancers (LBs) or VIPs to designated VPCs, ensuring secure and efficient connectivity. By leveraging F5 Distributed Cloud to segment and extend networks to remote location—whether on-premises or in the public cloud—combined with Nutanix Flow for microsegmentation within VPCs, enterprises achieve comprehensive end-to-end security. This approach enforces a consistent security posture while reducing complexity across diverse infrastructures. In our previous article (click here) , we explored application delivery and security. Here, we focus on network segmentation and how this integration simplifies connectivity across environments. Demo Walkthrough The demo consists of two parts: Extending a local network segment from a Nutanix Flow VPC to a remote site using F5 Distributed Cloud. Applying microsegmentation within the network segment using Nutanix Flow Security Next-Gen. San Jose (SJ) serves as our local site, and the demo environment dev3 is a Nutanix Flow VPC with an F5 Distributed Cloud Customer Edge (CE) deployed inside: *Note: The SJ CE is named jy-nutanix-overlay-dev3 in the F5 Distributed Cloud Console and xc-ce-dev3 in the Nutanix Prism Central. On the F5 Distributed Cloud Console, we created a network segment named jy-nutanix-sjc-nyc-segment and we assigned it specifically to the subnet 192.170.84.0/24: eBGP peering is ESTABLISHED between the CE and the Nutanix Flow BGP Gateway in this segment: At the remote site in NYC, a CE named jy-nutanix-nyc is deployed with a local subnet of 192.168.60.0/24: To extend jy-nutanix-sjc-nyc-segment from SJ to NYC, simply assign the segment jy-nutanix-sjc-nyc-segment to the NYC CE local subnet 192.168.60.0/24 in the F5 Distributed Cloud Console: Effortlessly and in no time, the segment jy-nutanix-sjc-nyc-segment is now extended across environments from SJ to NYC: Checking the CE routing table, we can see that the local routes originated from the CEs are being exchanged among them: At the local site SJ, the SJ CE jy-nutanix-overlay-dev3 advertises the remote route originating from the NYC CE jy-nutanix-nyc to the Nutanix Flow BGP Gateway via BGP, and installs the route in the dev3 routing table: SJ VMs can now reach NYC VMs and vice versa, while continuing to use their Nutanix Flow VPC logical router as the default gateway: To enforce granular security within the segment, Nutanix Flow Security Next-Gen provides microsegmentation. Together, F5 Distributed Cloud and Nutanix Flow Security Next-Gen deliver a cohesive solution: F5 Distributed cloud seamlessly extends network segments across environments, while Nutanix Flow Security Next-Gen ensures fine-grained security controls within those segments: Our demo extends a network segment between two data centers, but the same approach can also be applied between on-premises and public cloud environments—delivering flexibility across hybrid multicloud environments. Conclusion F5 Distributed Cloud simplifies network segmentation across hybrid and multi-cloud environments, making it both secure and effortless. By seamlessly extending network segments across any environment, F5 removes the complexity traditionally associated with connecting diverse infrastructures. Combined with Nutanix Flow Security Next-Gen for microsegmentation within each segment, this integration delivers end-to-end protection and consistent policy enforcement. Together, F5 and Nutanix help enterprises reduce operational overhead, maintain compliance, and strengthen security—while enabling agility and scalability across all environments. This integration is coming soon in CY2026. If you’re interested in early access, please contact your F5 representative. Related URLs Delivering Secure Application Services Anywhere with Nutanix Flow and F5 Distributed Cloud | DevCentral F5 Distributed Cloud - https://www.f5.com/products/distributed-cloud-services Nutanix Flow Network Security - https://www.nutanix.com/products/flow 693Views2likes0Comments
Thinking Outside the Box: Rewriting Web Pages with F5 Distributed Cloud (XC)
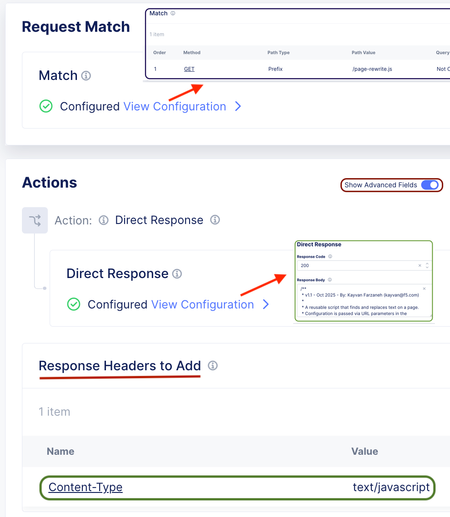
This article demonstrates how to dynamically rewrite web page content, such as updating links or replacing text, by using native features in F5 Distributed Cloud (XC). It provides a creative workaround that leverages JavaScript injection to modify pages on the fly, avoiding the need for a separate proxy like NGINX or BIG-IP.944Views4likes3CommentsF5 XC – Persistence and Resiliency pt. I (persistence)
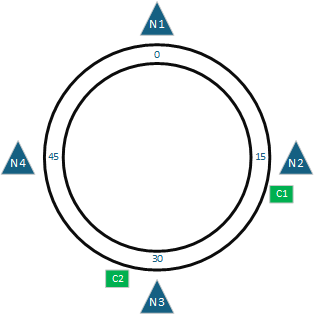
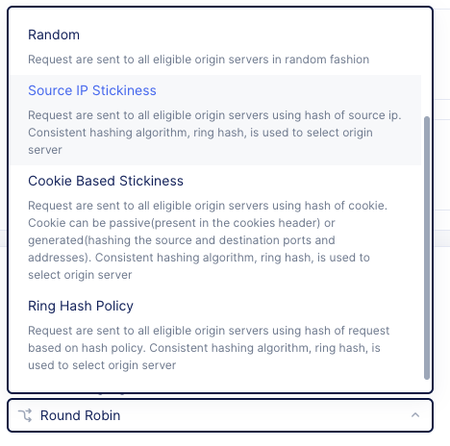
Since we're talking about distributed environments (multiple PoPs, CEs, etc.) and need to ensure consistent behavior without necessarily being able to form a cluster (e.g., PoP Frankfurt and PoP Amsterdam), we use a method that is suitable for distributed structures: Ring Hashing (Consistent Hashing).669Views1like0CommentsSecure and Seamless Cloud Application Migration with F5 Distributed Cloud and Nutanix
Introduction F5 Distributed Cloud (XC) offers SaaS-based security, networking, and application management services for multicloud environments, on-premises infrastructures, and edge locations. F5 Distributed Cloud Services Customer Edge (CE) enhances these capabilities by integrating into a customer’s environment, enabling centralized management via the F5 Distributed Cloud Console while being fully operated by the customer. F5 Distributed Cloud Services Customer Edge (CE) can be deployed in public clouds, on-premises, or at the edge. Nutanix is a leading provider of Hyperconverged Infrastructure (HCI), which integrates storage, compute, networking, and virtualization into a unified, scalable, and easily managed solution. Nutanix Cloud Clusters (NC2) extend on-premises data centers to public clouds, maintaining the simplicity of the Nutanix software stack with a unified management console. NC2 runs AOS and AHV on public cloud instances, offering the same CLI, user interface, and APIs as on-premises environments. This article explores how F5 Distributed Cloud and Nutanix collaborate to deliver secure and seamless application services across various types of cloud application migrations. Whether migrating applications to the cloud, repatriating them from public clouds, or transitioning into a hybrid multicloud environment, F5 Distributed Cloud and Nutanix ensure optimal performance and security at all times. Illustration F5 Distributed Cloud App Connect securely connect distributed application services across hybrid and multicloud environments. It operates seamlessly with a platform of web application and API protection (WAAP) services, safeguarding apps and APIs against a wide range of threats through robust security policies including an integrated WAF, DDoS protection, bot management, and other security tools. This enables the enforcement of consistent and comprehensive security policies across all applications without the need to configure individual custom policies for each app and environment. Additionally, it provides centralized observability by providing clear insights into performance metrics, security posture, and operational statuses across all cloud platforms. In this section, we illustrate how to utilize F5 Distributed App Connect with Nutanix for different cloud application migration scenarios. Cloud Migration In our example, we have a VMware environment within a data center located in San Jose. Our goal is to migrate the on-premises application nutanix.f5-demo.com from the VMware environment to a multicloud environment by distributing the application workloads across Nutanix Cloud Clusters (NC2) on AWS and Nutanix Cloud Clusters (NC2) on Azure. First, we deploy F5 Distributed Cloud Customer Edge (CE) and application workloads on Nutanix Cloud Clusters (NC2) on AWS as well as Nutanix Cloud Clusters (NC2) on Azure. F5 Distributed Cloud App Connect addresses the issue of IP overlapping, enabling us to deploy application workloads using the same IP addresses as those in the VMware environment in the San Jose data center. Next, we create origin pools on the F5 Distributed Cloud Console. In our example, we create two origin pools: nutanix-nc2-aws-pool for origin servers on NC2 on AWS and nutanix-nc2-azure-pool for origin servers on NC2 on Azure. To ensure minimal application services disruption, we update the HTTP Load Balancer for nutanix.f5-demo.com to include both new origin pools, and we assign them with a higher weight than the existing pool vmware-sj-pool so that the origin servers on Nutanix Cloud Clusters (NC2) on AWS and on Nutanix Cloud Clusters (NC2) on Azure will receive more traffic compared to the origin servers in the VMware environment in the San Jose data center. Note that web application firewall (WAF) nutanix-demo is enabled. Finally, we remove vmware-sj-pool to complete the cloud migration. Cloud Repatriation In this example, xc.f5-demo.com is deployed in a multicloud environment across AWS and Azure. Our objective is to migrate the application back to the Nutanix environment in the San Jose data center from the public clouds. To begin, we deploy F5 Distributed Cloud Customer Edge (CE) and application workloads in Nutanix AHV. We deploy the application workloads using the same IP addresses as those in the public clouds because IP overlapping is not a concern with F5 Distributed Cloud App Connect. On the F5 Distributed Cloud Console, we create an origin pool nutanix-sj-pool with the origin servers originating from the Nutanix environment in the San Jose data center. We then update the HTTP Load Balancer for xc.f5-demo.com to include the new origin pool, and assign it with a higher weight than both existing pools: xc-aws-pool with origin servers on AWS and xc-azure-pool with origin servers on Azure. As a result, the origin servers in the Nutanix environment, located in the San Jose data center will receive more traffic compared to origin servers in other pools. To ensure all applications receive the same level of security protection, web application firewall (WAF) nutanix-demo is also applied here. To complete the cloud repatriation, we remove xc-aws-pool and xc-azure-pool. The application service experiences minimal disruption during and after the migration. Hybrid Multicloud Our goal in this example is to bring xc-nutanix.f5-demo.com into a hybrid multicloud environment, as it is presently deployed solely in the San Jose data center. We first deploy F5 Distributed Cloud Customer Edge (CE) and application workloads on Nutanix Cloud Clusters (NC2) on AWS as well as on Nutanix Cloud Clusters (NC2) on Azure. We create an origin pool with origin servers originating from each of the F5 Distributed Cloud Customer Edge (CE) sites on the F5 Distributed Cloud Console. Next, we update the HTTP Load Balancer for xc-nutanix.f5-demo.com so that it includes all origin pools: nutanix-sj-pool (Nutanix AHV in our San Jose data center), nutanix-nc2-aws-pool (NC2 on AWS), and nutanix-nc2-azure-pool (NC2 on Azure). Note that web application firewall (WAF) nutanix-demo is applied here as well so that we can ensure a consistent level of security protection across all applications no matter where they are deployed. xc-nutanix.f5-demo.com is now in a hybrid multicloud environment. F5 Distributed Cloud Console is the centralized console for configuration management and observability. It provides real-time metrics and analytics, which allows us proactively monitor security events. Additionally, its integrated AI assistant delivers real-time insights and actionable recommendations of security events, enhancing our understanding of the security events and enabling more informed decision-making. This enables us to swiftly detect and respond to emerging threats, thereby sustaining a robust security posture. Conclusion Cloud application migration can be complex and challenging. F5 Distributed Cloud and Nutanix collaborate to offer a secure and streamlined solution that minimizes risk and disruption during and after the migration process, including those migrating from VMware environments. This ensures a seamless cloud application transition while maintaining business continuity throughout the entire process and beyond. 1.2KViews1like0Comments