security
2957 TopicsAutomatic Certificate Management with ACMEv2 in F5 BIG-IP
One of the most anticipated features of F5 BIG-IP is integration with ACMEv2. With the General Availability of BIG-IP 21.1.0 on May/26, this feature came into being. In this tutorial, we are going to configure it, using Let's Encrypt as the CA. The domain for which we are generating/renewing certificates is carlosf5lab.lat. The official docs for this feature are located in SSL Certificate Management | BIG-IP Documentation. Pre-requisite 1: DNS Resolver that can reach the internet (at least the CA endpoints). In this case, we are using the native DNS Resolver that comes with BIG-IP. Pre-requisite 2: The internal proxy that will make the connection with the CA. Pre-requisite 3: a self signed SSL certificate that the ACMEv2 protocol uses as the identifier for a device account. You don't have to fill the Subject Alternative Name. For the Common Name, an e-mail contact is advised. Now, we are going to create the ACME Provider object. Give it a name, and select the internal proxy previously created. For the CA Certificate to enable the secure connection with the Directory URL, you can use the default ca-bundle.crt. The Directory URL is the endpoint for the ACMEv2 protocol. In Let's Encrypt case, it is https://acme-v02.api.letsencrypt.org/directory For the Account Key, choose the previously created self-signed certificate. For the trickier part of all, the field "Contacts" is mandatory, and it must be an URL. That’s why you must use the format mailto:email_address. Check the Terms and Conditions, and the Create Account boxes. After a while, the Account Status must read as "Valid". To prove you own the domain whose certificate Let's Encrypt is going to create/renew, it must be pointing to an IP (A Record) where you must have your Virtual Server listening on Port 80 configured to respond to the ACMEv2 Challenge. (In this specific lab, the domain carlosf5lab.lat points to a Public IP mapped to an internal IP). Now you can order your first certificate via ACMEv2 on BIG-IP: After a while, the Key tab should read something like: Which means your certificate was generated: To track the ACME Provider, you can check its statistics: That's it, my friend! If it helped you, give a thumbs up to this post!355Views4likes6CommentsSecuring AI with F5 AI Guardrails and Nutanix Enterprise AI
Enterprises are rapidly moving from AI experimentation to production-grade deployments, using Kubernetes to deliver and scale AI services consistently across environments. As AI workloads become embedded in business-critical workflows, new risks emerge—particularly at runtime. Generative AI systems can expose sensitive data, generate responses to restricted topics, or be manipulated through prompt injection and jailbreak techniques during user interactions. The challenge is no longer just how to deploy AI models, but how to control AI behavior in real-time—without adding operational complexity or slowing innovation. F5 and Nutanix address this challenge together by combining Nutanix Enterprise AI (NAI) with F5 AI Guardrails. Nutanix Enterprise AI provides a Kubernetes-based platform to deploy and operate AI models and inference services at scale, while F5 AI Guardrails enforces real-time security and policy controls on AI interactions. 🎬 See the Joint Solution in Action ✨ NEW✨🎬 Watch this demo video to see F5 AI Guardrails work seamlessly together with Nutanix Enterprise AI (NAI) Agent Gateway Unified Endpoint (New in NAI v2.7) to secure LLM inference at scale. 🎬 Watch this demo video to see how F5 and Nutanix work together to deliver secure, trustworthy, enterprise‑ready AI—running side by side on Nutanix Kubernetes Platform (NKP) deployed on Nutanix Infrastructure. F5 AI Guardrails Overview F5 AI Guardrails provides runtime security and governance for AI applications, models, and agents by enforcing policy‑based controls on how AI interacts with users and data. It includes a broad set of out‑of‑the‑box guardrails that enable organizations to immediately begin securing and governing AI interactions from day one. These built‑in guardrails address common AI risks such as prompt injection, jailbreaks, PII exposure, restricted topics, and more. In addition to built‑in guardrails, F5 AI Guardrails supports custom guardrails, allowing teams to tailor policy enforcement to specific use cases. One option for defining custom guardrails is through natural‑language policy creation, guided by an integrated F5 AI Assistant. The AI Assistant reviews and refines guardrail definitions using F5 best practices, ensuring that descriptions are clear, concise, and consistently structured for optimal performance. AI Guardrails simplifies AI observability by providing continuous visibility and traceability across AI interactions, with audit‑ready observability, scanning, and logging to support governance and compliance. As part of the F5 Application Delivery and Security Platform (ADSP), AI Guardrails delivers runtime protection for AI models, agents, and connected data, extending F5’s application delivery, security, and observability capabilities across applications and APIs. https://www.f5.com/products/ai-guardrails Nutanix Enterprise AI (NAI) Overview Nutanix Enterprise AI (NAI) is a cloud‑native, Kubernetes‑based AI platform designed to help organizations run AI inference at scale. NAI is supported on CNCF‑certified Kubernetes platforms, including Nutanix Kubernetes Platform (NKP). It enables enterprises to deploy, manage, and operate AI models, inference endpoints, and AI agents through a single, unified management experience, allowing organizations to run AI consistently wherever they operate Kubernetes while maintaining enterprise control, security, and visibility. https://www.nutanix.com/products/nutanix-enterprise-ai F5 and Nutanix: Better Together bernetes cluster Nutanix Enterprise AI provides a Kubernetes‑based platform for deploying, managing, and operating AI models, inference endpoints, and AI agents, while F5 AI Guardrails provides runtime security and governance for AI interactions. F5 AI Guardrails can run side by side with Nutanix Enterprise AI, with both solutions deployed on the same Nutanix Kubernetes Platform (NKP)–managed Kubernetes cluster, enabling them to operate on a common Kubernetes foundation. Together, F5 and Nutanix deliver secure, trustworthy, enterprise‑ready AI deployments by combining an enterprise AI platform with runtime AI security—enabling organizations to move fast with AI without losing control over security, compliance, and governance. 369Views2likes0Comments
Forwarding Logs to SIEM Tools via HTTP Proxy for F5 Distributed Cloud Global Log Receiver
Purpose This guide provides a solution for forwarding logs to SIEM tools that support syslog but lack HTTP/HTTPS ingestion capabilities. It covers the deployment and tuning of an HTTP Proxy log receiver configured to work with F5 Distributed Cloud (XC) Global Log Receiver settings. Audience: This guide is intended for technical professionals, including SecOps teams and Solution Architects, who are responsible for integrating SIEM tools with F5 XC Global Log Receiver. Readers should have a solid understanding of HTTP communication (methods, request body, reverse proxy), syslog, and data center network architecture. Familiarity with F5 XC concepts such as namespaces, log types, events, and XC-GLR is also required. Introduction: Problem Statement: SIEM tools often support syslog ingestion but lack HTTP/HTTPS log reception capabilities. Objective: Explain how to deploy and configure an HTTP Proxy to forward logs to F5 Distributed Cloud Global Log Receiver. Solution Overview: Architecture Diagram and workflow: Configuration Steps: Configure Global Log Receiver in F5 Distributed Cloud Console Navigate to: Home → Shared Configuration → Global Log Receiver Create or edit the Global Log Receiver settings for HTTP receiver Ensure the Global Log Receiver batch size is based on the payload size expected from F5 NGINX. Example configuration snap: Set Up NGINX as an HTTPs Log Receiver Install NGINX on your designated server. Configure log_format Configure NGINX to accept HTTP POST requests only and forward access logs to syslog Example configuration snippet: log_format custom_log_format_1 escape=json $request_body; # Example: include request body only server { listen 443 ssl; server_name <logreceiver_server_name>; ssl_certificate /etc/ssl/<logreceiver_server_cert>; ssl_certificate_key /etc/ssl/<logreceiver_server_key>; # Other SSL/TLS configurations (e.g., protocols, ciphers) ssl_protocols TLSv1.2 TLSv1.3; ssl_ciphers HIGH:!aNULL:!MD5; client_body_in_single_buffer on; # The directive is recommended when using the $request_body variable, to save the number of copy operations involved client_body_in_file_only off; #default client_max_body_size 32M; # based on tuning gzip on; location /log_endpoint { # Allow only POST requests for sending log data limit_except POST { deny all; } # Configure access_log to write incoming data to a file # access_log /var/log/nginx/log_receiver.log custom_log_format_1; access_log syslog:server=127.0.0.1:514,facility=local7,tag=nginx,severity=info custom_log_format_1; proxy_pass http://localhost:8091/; # This dummy Internal server required to collect request_body variable. } } # dummy internal server to respond back 200 ok server { listen 8091; server_name localhost; location / { return 200 "Log received successfully."; } } Set Up rsyslog server Install/configure rsyslog on your designated server. Configure 60-nginx.conf file in /etc/rsyslog.d/ directory Sample 60-nginx.conf file #nginx.* @@127.0.0.1:514 :syslogtag, isequal, "[nginx]" /var/log/nginx-syslog/nginx-access-log.log OR Set Up BIG-IP as an HTTPs Log Receiver Syslog pool ltm pool glr_syslog_pool { members { <syslog-servr-ip>:514 { address <syslog-server-ip-address> session monitor-enabled state up } } monitor tcp } iRule for hsl logging when CLIENT_ACCEPTED priority 500 { set hsl_handle "" set request_body "" } when HTTP_REQUEST priority 500 { if { [HTTP::method] eq "POST" } { HTTP::collect [HTTP::header Content-Length] } else { HTTP::respond 200 content "data received" } } when HTTP_REQUEST_DATA priority 500 { set request_body [HTTP::payload] if { ! [info exists hsl_handle] || $hsl_handle eq "" } { set hsl_handle [HSL::open -proto UDP -pool "/Common/glr_syslog_pool"] } HSL::send $hsl_handle "<134> XC_LOG: $request_body" HTTP::respond 200 content "data received" HTTP::release } Virtual Server configuration ltm virtual vs-3 { destination <vs-ip>:443 ip-protocol tcp mask 255.255.255.255 profiles { demo-ent-merja-in { context clientside } http { } tcp { } } rules { <iRule-created-in-earlier-step> } serverssl-use-sni disabled source 0.0.0.0/0 source-address-translation { type automap } translate-address enabled translate-port enabled } rsyslog server config inputs #### The following modules are enabled in rsyslogd.conf module(load="omfile") module(load="imtcp") input(type="imtcp" port="514") ### /etc/rsyslog.d/70-bigip.conf template(name="F5_Format" type="string" string="%TIMESTAMP% %msg%\n") if ($msg contains "XC_LOG:") then { action( type="omfile" File="/var/log/10.1.20.177/f5_hsl_custom.log" Template="F5_Format" ) stop } References: F5 Distributed Cloud Global log receiver supports many log receivers natively: F5 Distributed Cloud Technical Knowledge page on "Configure Global Log receiver" Prerequisites: An external log collection system reachable publicly. The following IP address ranges are required to be added to your firewall's allowlist: 193.16.236.64/29 185.160.8.152/29635Views6likes0CommentsWhat’s New in Zero Trust Access v10?
Introduction F5 BIG-IP Zero Trust Access, a key component of the F5 Application Delivery and Security Platform (ADSP), helps teams secure apps that are spread across hybrid, multi-cloud and AI environments. In this article, I’ll highlight some of the key Access features available in F5 BIG-IP v21.1. F5 BIG-IP v21.1 was released in May of 2026. This release included an updated Zero Trust Access version (v10) with new features. Demo Video New Features in Zero Trust Access IPsec VPN Support Added support for Access IPsec VPN Tunnels, to meet global security standards and enable the transition from SSL/TLS-VPNs to IPsec VPNs. Clients can now connect to BIG-IP using the Windows Edge Client or F5 Access for macOS, establish an IPsec tunnel, and securely access the backend network. To enable IPsec support, navigate to Access > Connectivity / VPN > Connectivity > Profiles Click on a VPN Profile, “VPN-Profile1” in this example Scroll down and click Edit Profile Change the VPN Profile Type to IPsec and click OK When you set the VPN Profile Type to IPsec, the system automatically generates an Access IPsec Policy. HTTP Connector Support Added to Per-Session Policies in APM Support for the HTTP Connector in per-session policies is now available in F5 BIG-IP Access Policy Manager (APM). This feature enables administrators to send HTTP requests to external services during session establishment and use the response for authentication, authorization, and access control decisions. To use the HTTP Connector, navigate to Access > Profiles / Policies > Access Profiles Edit the Per-Session Policy of any Profile you wish to add an HTTP Connector to, “Test“ in this example Click the plus to add an item Go to the General Purpose tab, select HTTP Connector and click Add Item Select the HTTP Connector Profile then click Save Dynamic Client Registration (DCR) support This release adds support for OAuth 2.0 Dynamic Client Registration (RFC 7591). Administrators can enable DCR on OAuth profiles to allow authorized clients to dynamically register using an Initial Access Token (IAT). The feature includes support for the Client Credentials grant type, configurable client authentication settings, client secret expiration, and enhanced logging. To enable DCR, navigate to Federation > OAuth Authorization Server > OAuth Profile Click on the name of the profile you want to edit, oauth in this example Check the box to enable Dynamic Client Registration Click Update at the bottom Custom Logging Preferences for Windows Edge Client The Windows Edge Client now offers custom logging preferences, giving you enhanced control over log verbosity to improve both security and flexibility. You can select the required log level from the APM Client Log Level drop-down in General Settings while creating a Connectivity Profile. To change the Logging Preferences, navigate to Access > Connectivity / VPN > Connectivity > Profiles Click on a VPN Profile, “VPN-Profile1” in this example Scroll down and click Edit Profile Change the APM Clients Log Level and click OK Native Support for SAML Authentication for Windows APM clients now support native SAML authentication, significantly improving user experience, maintainability, and overall supportability. Edge Client on macOS and Windows can leverage the system’s default browser to authenticate users with identity providers (IdPs), enabling modern authentication mechanisms such as FIDO2 and Microsoft Entra ID device authentication. To enable this feature, navigate to Access > Connectivity / VPN > Connectivity > Profiles Click on a VPN Profile, “VPN-Profile1” in this example Scroll down and click Edit Profile Select the Desktop Client Settings, check the box to Enable System Browser and click OK Auto-Upgrade Machine Tunnel Service Windows Edge Clients can now automatically upgrade the F5 Machine Tunnel Service when a newer version is available on BIG-IP, and the auto-upgrade feature is enabled. Additionally, if the Machine Tunnel service is running before the upgrade, it continues to run after the upgrade completes without affecting existing VPN configuration settings. Endpoint Inspection Support on Ubuntu with ARM64 Endpoint Inspection is now supported on Ubuntu with ARM64, allowing seamless management and inspection of endpoints on Linux ARM64 platforms. Conclusion F5 BIG-IP Zero Trust Access, a key component of the F5 Application Delivery and Security Platform (ADSP), helps teams secure apps that are spread across hybrid, multi-cloud and AI environments. The latest version of F5 BIG-IP is packed with new Zero Trust Access features. Related Content F5 BIG-IP Zero Trust Access Zero Trust Solution Overview Secure Corporate Apps with a Zero Trust Security Model F5 BIG-IP APM Identity Aware Proxy (IAP): The Gateway to a Zero Trust Architecture Zero Trust Application Access for Federal Agencies BIG-IP APM Configuration for Compliance Retrieval Service 60Views3likes0Comments
What's new in BIG-IP v21.1?
Introduction F5 has officially released BIG-IP v21.1, delivering cutting-edge innovations designed to meet the dynamic needs of businesses and organizations. This version introduces advanced features such as quantum-resistant cryptography, AI-driven enhancements, protocol protection, and significant strides in software modernization. Packed with fixes and powerful new capabilities, BIG-IP v21.1 strengthens the F5 Application Delivery and Security Platform (ADSP) by improving delivery, security, and deployment, ensuring your applications remain fast, secure, and simple to manage. PQC Readiness Support for Additional NIST-Compliant PQC Key Exchanges Building upon the groundwork laid in v17.5.0, BIG-IP v21.1 introduces expanded Post Quantum Cryptography (PQC) support. This release adds SecP + ML-KEM key exchanges, combining traditional cryptographic methods with quantum-resistant algorithms for hybrid cryptography. New Supported Key Exchanges: SecP256r1ML-KEM-768 SecP384r1ML-KEM-1024 These enhancements benefit organizations in government and regulated industries adhering to NIST guidelines and FIPS standards. Both client- and server-side connections are supported alongside SSL Forward Proxy use cases. Quantum-Resistant TLS/SSL VPN Tunneling As quantum computing emerges, traditional encryption methods face threats from advanced computational power. To counteract this, BIG-IP Zero Trust Access (formerly BIG-IP APM) introduces quantum-resistant TLS/SSL VPN tunneling with X25519 + ML-KEM-768 hybrid key exchanges. This solution ensures NIST compliance while securing modern VPN tunnels. AI Workload Delivery, Security, and Access Enhancements Expanded Security and Delivery for Model Context Protocol (MCP) BIG-IP v21.1 enhances MCP support to ensure secure and consistent communication between AI models, applications, and data sources. MCP Protection: BIG-IP Advanced WAF now inspects MCP traffic, shielding AI workflows from emerging threats such as tool poisoning, secret exposure, and injection attacks detailed in the OWASP MCP Top 10. A new Security Policy template called MCP Protection Policy has been added: A new Blocking Page Response type has been added. The MCP Session ID is included in the Response Headers: The MCP Request ID is included in the Response Body: Sample response for an “Echo tool”: Sample rejected response: MCP Session Persistence: New session persistence for MCP traffic ensures smoother workflows by consistently routing session requests to the correct server. A new MCP Persistence Profile aimcp has been added: Optimized Agent-to-Agent Connectivity The introduction of experimental support for the Agent2Agent (A2A) protocol optimizes communication between AI agents, ensuring interoperability across fragmented platforms. Features Include: Load balancing for A2A traffic. Governance via iRules based logging and visibility. While experimental in v21.1, future releases promise full support with expanded management capabilities. Seamless, Secure Access for AI Agents The Dynamic Client Registration (DCR) capability expedites access requests for agentic AI systems. Agents can register themselves programmatically with BIG-IP Zero Trust Access, eliminating manual steps and streamlining workflows via API driven automation. F5 BIG-IP Zero Trust Access enables dynamic client registration to expedite access requests. Modern API and Protocol Protection HTTP/3 Protocol Traffic Security With HTTP/3 adoption expected to surpass HTTP/2 soon, BIG-IP Advanced WAF brings cutting edge protection for HTTP/3 traffic, matching the security levels of earlier protocol versions. Currently limited to client side protection, server side capabilities will follow in subsequent releases. OpenAPI 3.1 Specification Support BIG-IP Advanced WAF now protects APIs defined by OpenAPI 3.1, learning expected endpoints, data types, and security requirements while blocking improper requests, undocumented endpoint abuse, and API specific attacks. Previous OpenAPI versions (2.0, 3.0) remain supported. BIG-IP TMOS Software Modernization DNS Enhancements Multiple Response Policy Zones Feed Zones DNS security and efficiency are strengthened with the ability to configure and consolidate multiple RPZ feeds into a single DNS cache profile. Enhanced DNS Threat Mitigation Improved granularity allows IP-based blocking for malicious domains and dynamic responses to regional compliance mandates. Flexible DNS Response Actions Organizations gain flexibility to block, redirect, or manage traffic dynamically, streamlining DNS-level policy management. BIG-IP TMOS Software Modernization Introducing the New BIG-IP Declarative API Designed for modern application environments, the new BIG-IP Declarative API (in Alpha state) offers: Integrated lifecycle management. Per-app scalability for simplified configurations. Broadened automation capabilities with near real-time deployment. This marks a significant upgrade over AS3, empowering faster and more efficient automation workflows. Continued Control Plane Enhancements Control plane improvements focus on reliability, performance, and resource efficiency through upgrades to MCPd, iControl REST, and the BigD daemon. These enhancements: Speed up iControl REST API requests by up to 10%. Boost control-plane resilience under low-memory conditions. Enable multi-threaded scalability for BigD health monitoring. Expect recurring advancements across future BIG-IP versions. New Features in SSL Orchestrator v14 Policy-based Dynamic Egress Routing Policy-based dynamic egress routing is introduced in SSL Orchestrator that enables you to easily define egress routes based on traffic conditions, directly within the policy definition, thereby avoiding the need to configure complex layers involving multiple topologies and iRules. This feature is supported for Outbound and Inbound Gateway topologies. You can create a policy in BIG-IP LTM tailored to your routing requirements and then attach the policy to the SSL Orchestrator Virtual Server. This will ensure that the traffic is dynamically routed to the appropriate egress route based on the configurations defined within the LTM policy. L2 Devices Scalability Previously, SSL Orchestrator supported up to 8 physical devices per L2 Inspection Service. Now, SSL Orchestrator supports up to 50 devices per L2 Inspection Service, enabling greater scalability and flexibility. Inspection Service Persistence SSL Orchestrator now supports inspection service persistence, which enables client connections to consistently flow through the same inspection service, allowing it to track the entire user application flow seamlessly. This feature is supported for L2, L3, HTTP, and Advanced WAF off-box inspection services. A new Default Persistence Profile dropdown has been added to the Services page: Destination Address Affinity Hash Host (specific to HTTP services) Source Address Affinity SSL (for TCP Virtual Servers of L2/L3 services) Universal New Forcepoint URLDB Categories The following new Forcepoint URLDB categories have been added: Cryptocurrency (235): sites that provide digital currencies, decentralized financial services. Includes platforms facilitating cryptocurrency trading, wallets, ICOs, and blockchain-based financial services. Crypto Mining (236): sites that promote mining pools or enable crypto mining, including software downloads and browser-based mining scripts. Relaxed Protocol Compliance Rules for External Sites SSL Orchestrator now supports Relaxed HTTP Protocol Compliance by allowing you to select Transparent HTTP profiles to ease enforcement for non-compliant websites. This approach eliminates protocol disruptions and provides flexibility for forward proxy scenarios. The L7 Profile dropdown is introduced in Outbound Topology settings in the Interception Rules screen, which enables you to select a reverse or transparent HTTP Profile. By default, the topology specific http profile is used. HTTP Service: The Proxy Type dropdown is introduced. When you select Proxy Type as Transparent, the HTTP Profile dropdown will appear, allowing you to select the required HTTP transparent Profile. New Features in Zero Trust Access IPsec VPN Support Added support for Access IPsec VPN Tunnels, to meet global security standards and enable the transition from SSL/TLS-VPNs to IPsec VPNs. Clients can now connect to BIG-IP using the Windows Edge Client or F5 Access for macOS, establish an IPsec tunnel, and securely access the backend network. A new field, VPN Type, is introduced in the Connectivity Profile screen. When you set it to IPsec, the system automatically generates an Access IPsec Policy. HTTP Connector Support Added to Per-Session Policies in APM Support for the HTTP Connector in per-session policies is now available in F5 BIG-IP Access Policy Manager (APM). This feature enables administrators to send HTTP requests to external services during session establishment and use the response for authentication, authorization, and access control decisions. Dynamic Client Registration (DCR) support This release adds support for OAuth 2.0 Dynamic Client Registration (RFC 7591). Administrators can enable DCR on OAuth profiles to allow authorized clients to dynamically register using an Initial Access Token (IAT). The feature includes support for the Client Credentials grant type, configurable client authentication settings, client secret expiration, and enhanced logging. Custom Logging Preferences for Windows Edge Client The Windows Edge Client now offers custom logging preferences, giving you enhanced control over log verbosity to improve both security and flexibility. You can select the required log level from the APM Client Log Level drop-down in General Settings while creating a connectivity profile. Native Support for SAML Authentication for Windows APM clients now support native SAML authentication, significantly improving user experience, maintainability, and overall supportability. Edge Client on macOS and Windows can leverage the system’s default browser to authenticate users with identity providers (IdPs), enabling modern authentication mechanisms such as FIDO2 and Microsoft Entra ID device authentication. To enable this feature, select the Enable System Browser checkbox in Desktop Client Settings while creating a Connectivity Profile from Access > Connectivity / VPN > Connectivity > Profiles in BIG-IP. Auto-Upgrade Machine Tunnel Service Windows Edge Clients can now automatically upgrade the F5 Machine Tunnel Service when a newer version is available on BIG-IP, and the auto-upgrade feature is enabled. Additionally, if the Machine Tunnel service is running before the upgrade, it continues to run after the upgrade completes without affecting existing VPN configuration settings. Endpoint Inspection Support on Ubuntu with ARM64 Endpoint Inspection is now supported on Ubuntu with ARM64, allowing seamless management and inspection of endpoints on Linux ARM64 platforms. Conclusion Upgrade to BIG-IP v21.1 to unlock a new wave of features that enhance application delivery, security, and management. From PQC readiness and dynamic AI solutions to cutting-edge protocol protection, this release propels BIG-IP capabilities forward. Related Content BIG-IP v21.1 Release Notes Live Webinar on BIG-IP v21.1 Features Blog F5 BIG-IP v21.1 is now generally available, bringing PQC and AI security enhancements Feel free to reach out for additional resources or clarification. Happy upgrading!140Views1like0CommentsService Extensions with SSL Orchestrator: SaaS Tenant Isolation
Introduction F5 BIG-IP SSL Orchestrator is a great solution for managing SaaS Tenant Isolation. It gives you granular control over access to external SaaS applications. Microsoft Office365, Webex, Dropbox, GitHub, and many other SaaS applications are supported. Service Extensions are a new programmable capability in the SSL Orchestrator Service Chain (as of BIG-IP 17.0) that allow for customizable behaviors on decrypted HTTP traffic directly from within the Service Chain. In this article you will learn how to download, install, and configure the policy that enables the “SaaS Tenant Isolation” Service Extension. SSL Orchestrator is a key component of the F5 Application Delivery and Security Platform (ADSP). What is SaaS Tenant Isolation? SaaS Tenant Isolation is a function for managing tenant isolation (aka. restrictions) for several SaaS applications in a corporate environment. Tenant Isolation is a way for corporate entities to control access to non-corporate SaaS endpoints, typically to defend against misuse and sensitive data exfiltration. For example, an enterprise user may have Office365 accounts from multiple organizations. Tenant isolation prevents that user from copying data from their company’s Sharepoint to an Office365 endpoint in another organization. This service extension enhances the SSL Orchestrator built-in Office365 Tenant Restrictions service, providing for additional SaaS property controls: Office365 Tenant Restrictions v1 (for reference) Office365 Tenant Restrictions v2 (for reference) Webex (for reference) Google Gsuite (for reference1,reference2,reference3,reference4) Dropbox (for reference) YouTube (for reference) Slack (for reference) Zoom GitHub (for reference) ChatGPT (for reference) Note: the “for reference” links contain more information from each provider about how SaaS Tenant Isolation works Demo Video Deployment Prerequisites F5 BIG-IP version 17.1.x SSL Orchestrator version 11.1+ This article assumes you have SSL Orchestrator configured with a Topology and Service Chain. SaaS Tenant Isolation Service Extension Installation The information below is from the GitHub repository for the SaaS Tenant Isolation Service Extension (click here for a direct link). It includes an installer to create all the necessary objects. Download the installer: curl -sk https://raw.githubusercontent.com/f5devcentral/sslo-service-extensions/refs/heads/main/saas-tenant-isolation/saas-tenant-isolation-installer.sh -o saas-tenant-isolation-installer.sh CLI output: Make the script executable: chmod +x saas-tenant-isolation-installer.sh CLI output: Export the BIG-IP username and password: export BIGUSER='admin:password' Note: replace “password” with your actual BIG-IP admin password CLI output: Run the script to create all the SaaS Tenant Isolation objects: ./saas-tenant-isolation-installer.sh CLI output: The installer creates a new Inspection Service named "ssloS_F5_SaaS-Tenant-Isolation". Add this Inspection Service to any Service Chain that can receive decrypted HTTP traffic. Service Extension Services will only trigger on decrypted HTTP, so can be inserted into Service Chains that may also see TLS bypass traffic (not decrypted). SSL Orchestrator will simply bypass this Service for anything that is not decrypted HTTP. After following the steps above, the SSL Orchestrator screen should look like this: YouTube Tenant Restrictions To configure YouTube Tenant Restrictions, you will need to edit the iRule named “saas-tenant-rule” Navigate to Local Traffic > iRules > iRule List Click on the iRule named “saas-tenant-rule” (you may need to expand the iRule List) To enable the policy, set the value for “USE_YOUTUBE” from 0 to 1. Click Update. YouTube Tenant Restrictions can be set to either “Moderate” or “Strict”. Move the SaaS Tenant Isolation Service to a Service Chain Go to the SSL Orchestrator Configuration screen Click Service Chains then select your Service Chain Select the F5_SaaS_Tenant-Isolation Service and click the arrow to move it to the right Click Deploy Click OK Click OK The configuration is now complete Test YouTube Tenant Restrictions From a client computer, access youtube.com. An attempt to search for “adult content” results in the following: Microsoft (Office) 365 Tenant Restrictions The “saas-tenant-rule” has a set of editable configuration options for Office 365. For example: USE_OFFICE365_V1: Enables or disables tenant control for this SaaS endpoint. SAAS_OFFICE365_V1_HEADERS: Defines the header(s) to be be injected for this SaaS endpoint. Each line in the list consists of two values: Header Name: (ex. Restrict-Access-To-Tenants) Header Value: Typically and organization ID. The Ref: field in the comment block points to a resource that explains how this field must be populated. To customize the functionality navigate to Local Traffic > iRules > iRule List Click on the iRule named “saas-tenant-rule” (you may need to expand the iRule List) Office365 will be used in this example. The configuration is similar for all SaaS Tenants. To enable the policy, set the value for “USE_OFFICE365_V1” from 0 to 1. Click Update. Populate the header values required for your organization and click Update For reference, refer to: https://learn.microsoft.com/en-us/entra/identity/enterprise-apps/tenant-restrictions For more details on Office 365 Tenant Restrictions, click HERE Testing Header Injection To test generic Header Injection from a client computer, access the following site: https://httpbin.org/headers By default you should see the following: Note the two x-headers injected at the bottom Then go back to the iRule “saas-tenant-rule” and scroll down to the “USE_TESTING” section These are the same headers you saw from httpbin.org The values can be customized like the following: Don’t forget to click Update Try the httpbin.org/headers site again and you should see the following: The two "X-Test-Header-" headers are injected by the iRule Conclusion F5 BIG-IP SSL Orchestrator is a great solution for managing SaaS Tenant Isolation. It gives you granular control over access to external SaaS applications. Microsoft Office365, Webex, Dropbox, GitHub, and many other SaaS applications are supported. Related Content Service Extensions with SSL Orchestrator User Coaching of AI Related Content SSL Orchestrator Service Extensions: DoH Guardian Office 365 Tenant Restrictions SSL Orchestrator Advanced Use Cases: Fun with SaaS Tenant Isolation Introduction to BIG-IP SSL Orchestrator Integrating Security Solutions with F5 BIG-IP SSL Orchestrator 203Views2likes0Comments
What’s New in F5 BIG-IP SSL Orchestrator v14?
Introduction F5 BIG-IP SSL Orchestrator centralizes & manages decryption of SSL/TLS traffic. This enables security and monitoring tools to view the decrypted content and analyze it for threats and other anomalies. SSL Orchestrator removes the burden of decrypting content from your security tools, so they perform better and are more scalable. SSL Orchestrator is a key component of the F5 Application Delivery and Security Platform (ADSP). F5 BIG-IP v21.1 was released in May of 2026. This release included an updated SSL Orchestrator version (v14) with new features. Demo Video New Features in SSL Orchestrator v14 Policy-based Dynamic Egress Routing NOTE: This feature is supported for Outbound and Inbound Gateway topologies. The BIG-IP system provides Local Traffic Policies that simplify the way in which you can manage traffic associated with a virtual server. Using policies involves three basic steps: you create a draft policy, publish the policy, and then associate the published policy with a virtual server. Each policy includes a matching strategy for the specified rules, as well as conditions and actions configured within each rule, to manage traffic. Please refer to BIG-IP Local Traffic Management: Getting Started with Policies for full documentation First, create an alternate gateway Pool. From Local Traffic select Pools. Click Create Give it a name, Egress2_Pool in this example. Add an appropriate Health Monitor. Specify the IP address and Service Port (or all ports). Click Finished Second, create an LTM Policy. From Local Traffic select Policies Under Draft Policies click Create Give it a name, Demo-Dynamic-Egress in this example then click Create Policy Under Rules click Create Give it a name, Egress-Rule1 in this example, click Save Click the name of the rule to edit the traffic conditions and action. Click the Plus sign to add a rule Condition The Conditions for a local traffic policy rule define the necessary criteria that must be met for the rule's actions to be applied. For example, a policy might include the following condition type and settings, which, when met by a request, would allow the rule's specified actions to be applied. Condition Type = TCP Selector = vlan id Condition = is Values = 104 At = client accepted The above Condition will look like this: One possible Action could be: Action = Forward traffic To = pool Select the pool, Egress2_Pool in this example Click Save when done Select the option to Save and Publish Policy After the policy is saved and published it will look like this: The Policy is created and ready to be attached to your Virtual Server From Local Traffic select Virtual Servers Click on your Virtual Server, sslo_L3_Outbound-in-t-4 in this example Click the Resources tab then Manage under Policies Move the Policy from Available to Enabled and click Finished It should look like the following when done Inspection Service Persistence SSL Orchestrator now supports inspection service persistence, which enables client connections to consistently flow through the same inspection service, allowing it to track the entire user application flow seamlessly. This feature is supported for L2, L3, HTTP, and Advanced WAF off-box inspection services. A new Default Persistence Profile dropdown has been added to the Services page: Destination Address Affinity Hash Host (specific to HTTP services) Source Address Affinity SSL (for TCP Virtual Servers of L2/L3 services) Universal To configure this, go to SSL Orchestrator > Configuration > Services Click the name of the Service you wish to configure, ssloS_Demo_L3_Service in this example In the Service Properties scroll down to the Resources section There’s a new Default Persistence Profile option that is set to None by default Click the down arrow to the right to select the Profile. When done click Save & Next then Deploy NOTE: Some Profiles are specific to HTTP and L2/L3 Services so the available Profile choices will vary depending upon Service type. Relaxed Protocol Compliance Rules for External Sites SSL Orchestrator now supports Relaxed HTTP Protocol Compliance by allowing you to select the Transparent HTTP Profile to ease enforcement for non-compliant websites. This approach eliminates protocol disruptions and provides flexibility for forward proxy scenarios. The HTTP Profile can be configured globally for an Outgoing Topology or individually per HTTP Service. The L7 Profile dropdown is introduced in the Outbound Topology settings in the Interception Rules screen, which enables you to select different HTTP Profiles. The Profile selected here will affect all connections egressing the Topology. See the next section for how to set this Profile on a per-Service basis. As a best practice, if setting the L7 Profile to HTTP-Transparent, you should also set any HTTP Services to HTTP-Transparent. To configure the L7 Profile edit the Interception Rule of your SSL Orchestrator Topology Scroll down to locate the L7 Profile settings. Click the down arrow to set the L7 Profile to “http-transparent” Click Save & Next at the bottom, then Deploy the changes The Proxy Type dropdown is introduced in the HTTP Service screen. When you select the Proxy Type as Transparent, the HTTP Profile dropdown will appear, allowing you to select the HTTP transparent Profile. The Profile selected here will apply to all connections through this HTTP Service. To configure the HTTP Profile of a Transparent Proxy Service edit the appropriate Service, “Demo_HTTP_Service” in this example. Scroll down to locate the Proxy Type settings. The Proxy Type should be Transparent if you want to change the HTTP Profile. Set the HTTP Profile to http-transparent. Click Save & Next at the bottom, then Deploy the changes New Forcepoint URLDB Categories The following new Forcepoint URLDB categories have been added: Cryptocurrency (235): sites that provide digital currencies, decentralized financial services. Includes platforms facilitating cryptocurrency trading, wallets, ICOs, and blockchain-based financial services. Crypto Mining (236): sites that promote mining pools or enable crypto mining, including software downloads and browser-based mining scripts. L2 Devices Scalability Previously, SSL Orchestrator supported up to 8 physical devices per L2 Inspection Service. Now, SSL Orchestrator supports up to 50 devices per L2 Inspection Service, enabling greater scalability and flexibility. Conclusion F5 BIG-IP SSL Orchestrator simplifies and accelerates the deployment of SSL visibility and orchestration services. Whether for modern, custom, or classic apps, and regardless of their location—be it on premises, in the cloud, or at the edge—F5 BIG-IP SSL Orchestrator is built to handle today’s dynamic app landscape. Related Content Introduction to BIG-IP SSL Orchestrator Integrating Security Solutions with F5 BIG-IP SSL Orchestrator Addressing Shadow AI with F5 BIG-IP SSL Orchestrator F5 BIG-IP SSL Orchestrator Layer 2 Services with rSeries & VELOS What's new in BIG-IP v21.0? 137Views1like0Comments
API Discovery and Enforcement with API Security Local Edition
API Security Local Edition is a self-hosted platform that discovers APIs from BIG-IP traffic insights, builds and maintains an inventory with risk scoring, and pushes enforcement back to BIG-IP. This article covers the architecture, the data flows between components, and the operator workflow from discovery to enforcement. 297Views5likes2Comments
KASM Workspaces Integration with F5 BIG-IP Zero Trust Access (formerly APM)
Introduction F5 BIG-IP Zero Trust Access, a key component of the F5 Application Delivery and Security Platform (ADSP), helps teams secure apps that are spread across hybrid, multi-cloud and AI environments. In this article, I’ll show you how to secure your Kasm Workspace using F5 BIG-IP Zero Trust Access. Kasm Workspaces Kasm Workspaces is a containerized streaming platform designed for secure, web-based access to desktops, applications, and web browsing. It leverages container technology to deliver virtualized environments directly to users' browsers, enhancing security, scalability, and performance. Commonly used for remote work, cybersecurity, and DevOps workflows, Kasm Workspaces provides a flexible and customizable solution for organizations needing secure and efficient access to virtual resources. As noted in the Kasm Documentation, the Kasm Workspaces Web App Role servers should not be exposed directly to the public. That’s where F5 BIG-IP Zero Trust Access can help. Demo Video Deployment Prerequisites F5 BIG-IP version 17.x Zero Trust Access version 10.x Kasm Workspaces version 1.17 installed and configured properly Configure using Automation Toolchain with AS3 and FAST Templates The F5 BIG-IP Automation Toolchain is a suite of tools designed to automate the deployment, configuration, and management of F5 BIG-IP devices. It enables efficient and consistent management using declarative APIs, templates, and integrations with popular automation frameworks. Application services (FAST) templates are predefined configurations that streamline the deployment and management of applications by providing consistent and repeatable setups. NOTE: The configuration using the Automation Toolchain is well-documented in this DevCentral article, which also includes demo videos: How I did it - “Delivering Kasm Workspaces three ways” Configure Manually Using a Virtual Server This article will focus on the manual configuration of the BIG-IP using a Virtual Server. Configuring it this way will give you a deeper understanding of how all the components work together to create a cohesive solution. Network Environment Linux “External” client IP: 10.1.10.4 BIG-IP “External” Self IP: 10.1.10.10 BIG-IP “Internal” Self IP: 10.1.20.10 Kasm Workspace IP: 10.1.20.23 BIG-IP Configuration Create HTTP Monitor: First, let’s create the HTTP Monitor for the Kasm Workspace server. From Local Traffic > Monitors > click the green plus sign to add a new one. Give it a name, “Kasm-Monitor” in this example Set the Type to HTTP Enter the following for the Send String: GET /api/__healthcheck\r\n Enter the following for the Receive String: OK It should look like this: Set Reverse to Yes and click Finished Create Pool: Next we’ll create the Pool From Local Traffic > Pools > Pool List > click the plus sign to add a new one Give it a name, “Kasm-Pool” in this example Select the Health Monitor you created previously and click the arrows to move it to Active Under Resources specify a Node Name, “Kasm-Server” in this example Specify the IP Address, “10.1.20.23” in this example Set the Service Port to 443, then click Add Click Finished Create Virtual Server: Next we’ll create the Virtual Server From Local Traffic > Virtual Servers > Virtual Server List > click the plus sign to add a new one Give it a Name, “vs_kasm” in this example. Keep the Type as Standard. Set the Destination to the IP Address you want the BIG-IP to listen on for connections to the Kasm server, “10.1.10.100” in this example. Set the Service Port to HTTPS, port 443. Click Finished at the bottom Click on the Virtual Server you just created Click Resources Set the Default Pool to kasm_pool, then click Update The Kasm Virtual Server Status should eventually change to Green when the Health Monitor is successful. NOTE: The Virtual Server configuration in this example has been simplified for demonstration purposes. Additional configuration options will be covered later in this article. Kasm Workspaces Configuration The Kasm Workspace will need a Zone configured with the default settings. Login as Admin and check this from Infrastructure > Zones. You will need at least one Workspace. In this example, I have a Workspace with Chrome, Firefox, Terminal and Ubuntu Jammy Click the WORKSPACES Tab at the top of the screen to see what the Workspace looks like Your view should look like this: Test Kasm Workspaces Login as a User NOTE: The IP Address used to connect to the Kasm Workspaces through the BIG-IP is the Virtual Server listening IP Address 10.1.10.100 When the Workspace loads, click Firefox Choose the option to Launch Session in a new Tab After a moment, Firefox will load Here you can see the F5.com website displayed NOTE: The browser pop-up blocker can prevent the Kasm Workspace applications from successfully launching. You can disable the pop-up blocker or create an exception for the BIG-IP Virtual IP (10.1.10.100). Enable SSL Decryption Enabling SSL Decryption allows you to fully inspect the requests and payloads passing through BIG-IP. From Local Traffic > Virtual Servers > click Virtual Server List Then click the name of your Virtual Server, “vs_kasm” in this example In the Configuration section, set the Protocol Profile (Client) to http Set the SSL Profile (Client) to clientssl Set the SSL Profile (Server) to serverssl NOTE: If you have created your own Client and Server SSL Profiles, you should add them here. The instructions above are for demonstration purposes only. Scroll to the bottom and click Update You’re done! Conclusion F5 BIG-IP Zero Trust Access is a key asset to securing containerized platforms like KASM Workspaces. In this article, you learned how to secure your Kasm Workspace using F5 BIG-IP Zero Trust Access. Related Content How I did it - “Delivering Kasm Workspaces three ways” Download Kasm Workspaces Kasm Documentation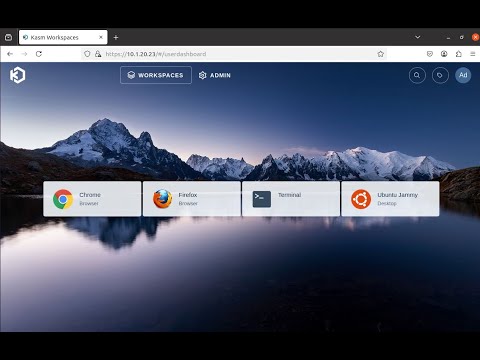 312Views2likes0Comments
Automating F5 ADSP — Part 1: F5 XC and BIG-IP for Delivery and Security
What this use case demonstrates This use case covers three of the four ADSP areas: Delivery, Security, and Deployment. Delivery — F5 Distributed Cloud (XC) load balancer at the edge, F5 BIG-IP LTM handling traffic management inside the VPC. Security — XC WAF at the edge, BIG-IP Advanced WAF (AWAF) applying in-path policy before traffic reaches the application servers. Deployment — XC consumed as SaaS, BIG-IP deployed as a Virtual Edition in GCP. Same article, two deployment models, both provisioned from code. You get two layers of delivery and two layers of WAF, across a SaaS edge and a self-managed VE. The whole stack, VPC through XC load balancer, comes up from a single git push. Architecture What gets deployed: A GCP VPC with management, external, internal, and application subnets BIG-IP with AWAF in a single-NIC configuration OWASP Juice Shop and crAPI as target applications F5 Distributed Cloud HTTP load balancer, origin pool, and WAF policy pointing at the BIG-IP The vulnerabilities in the apps are deliberate. They let you exercise the WAF stack against real attack signatures and API abuse patterns. Without them, you only know the controls deployed, not that they work. DevSecOps in practice The lead-in covers the approach. For UC1, that means: Terraform handles infrastructure, BIG-IP configuration, and F5 Distributed Cloud objects. No click-ops. State lives in a GCS bucket the workflow creates on the first run, with a separate state file per module. The same bucket carries the AS3 declaration BIG-IP pulls on boot, so the runner never needs network access to BIG-IP. GitHub Actions runs the pipeline. Branch names trigger deployments, so git history shows what was meant to happen. GCP Workload Identity Federation replaces static service account keys. The F5 XC API certificate lives in GitHub Actions secrets, not the repo. The pipeline Pushing to a branch runs the workflow. There is no manual terraform to apply. Action Branch Validate, plan, and apply deploy-adsp-uc1 Validate only (no apply) test-adsp-uc1 Destroy all resources destroy-adsp-uc1 This keeps intent visible in git, makes destroy as easy as deploying, and gives reviewers a real PR to look at when something changes. What's in the repo f5devcentral/F5-ADSP-Automation: Directory Purpose infra/gcp/ VPC, subnets, firewall rules compute/gcp/ Juice Shop and crAPI f5/ BIG-IP base config and AWAF policy config/uc1/gcp/env.json GCP project, region, prefix config/uc1/xc/env.json F5 Distributed Cloud config .github/workflows/ CI/CD workflows Demo Try it Prerequisites, secrets, and troubleshooting are in the Use Case Deployment Guide. Contribute Issues and PRs welcome at f5devcentral/F5-ADSP-Automation/Issues. Resources: F5 Application Delivery and Security Platform GitHub Repo and Automation Guide ADSP Architecture Article Series: Automating F5 ADSP Deployments (Intro) Automating F5 ADSP Deployments (Part 1 - F5 XC WAF and BIG-IP Adv. WAF) Automating F5 ADSP Deployments (Part 2 - F5 XC WAF and NGINX App Protect) Automating F5 ADSP Deployments (Part 3 - F5 XC API Protection and NGINX Ingress) Automating F5 ADSP Deployments (Part 4 - F5 XC BOT Defense and BIG-IP AdvWAF) Automating F5 ADSP Deployments (Part 5 - F5 XC, BIG-IP APM, CIS, and NGINX Ingress) Minimizing Security Complexity: Managing Distributed WAF Policies 110Views1like0Comments


