security
2978 TopicsAutomatic Certificate Management with ACMEv2 in F5 BIG-IP
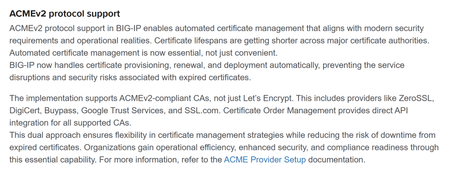
One of the most anticipated features of F5 BIG-IP is integration with ACMEv2. With the General Availability of BIG-IP 21.1.0 on May/26, this feature came into being. In this tutorial, we are going to configure it, using Let's Encrypt as the CA. The domain for which we are generating/renewing certificates is carlosf5lab.lat. The official docs for this feature are located in SSL Certificate Management | BIG-IP Documentation. Pre-requisite 1: DNS Resolver that can reach the internet (at least the CA endpoints). In this case, we are using the native DNS Resolver that comes with BIG-IP. Pre-requisite 2: The internal proxy that will make the connection with the CA. Pre-requisite 3: a self signed SSL certificate that the ACMEv2 protocol uses as the identifier for a device account. You don't have to fill the Subject Alternative Name. For the Common Name, an e-mail contact is advised. Now, we are going to create the ACME Provider object. Give it a name, and select the internal proxy previously created. For the CA Certificate to enable the secure connection with the Directory URL, you can use the default ca-bundle.crt. The Directory URL is the endpoint for the ACMEv2 protocol. In Let's Encrypt case, it is https://acme-v02.api.letsencrypt.org/directory For the Account Key, choose the previously created self-signed certificate. For the trickier part of all, the field "Contacts" is mandatory, and it must be an URL. That’s why you must use the format mailto:email_address. Check the Terms and Conditions, and the Create Account boxes. After a while, the Account Status must read as "Valid". To prove you own the domain whose certificate Let's Encrypt is going to create/renew, it must be pointing to an IP (A Record) where you must have your Virtual Server listening on Port 80 configured to respond to the ACMEv2 Challenge. (In this specific lab, the domain carlosf5lab.lat points to a Public IP mapped to an internal IP). Now you can order your first certificate via ACMEv2 on BIG-IP: After a while, the Key tab should read something like: Which means your certificate was generated: To track the ACME Provider, you can check its statistics: That's it, my friend! If it helped you, give a thumbs up to this post!1.4KViews6likes9CommentsPKI Today 2026: Three Horses, Five Carts, Zero Slack
Everyone wants to tell you the post-quantum story as one horse, one cart, one tidy road to 2030. It isn't. There are three horses, they're all pulling at once, they're hitched to five different carts, and at least two of them are dragging the same cart in slightly different directions. That's why Public Key Infrastructure (PKI), from management to planning for future efforts feels heavier now even though nothing in your environment technically broke. The horses are our deadlines, and they don't coordinate. One is certificate validity collapsing from 398 days toward 47. One is Post-Quantum Cryptography (PQC) mandates, every major regulator setting its own pace around the year 2030. One is the FIPS-140-2 sunset, quietly invalidating cryptographic modules you're still running (I'm also going to lean in on this horse analogy way too much, you're welcome). Survivable, any one of them. But none of them checked the other two's calendar. Ballot: The 47-day Certificate Countdown The first horse is named Ballot, and it's the one already at a gallop. In April 2025 the CA/Browser Forum passed ballot SC-081v3, scheduling a reduction in maximum certificate lifetime from 398 days down to 47 by 2029 [1]. The schedule: 200 days as of March 15, 2026 (done) 100 days in 2027 47 days in 2029, with domain-validation reuse collapsing to 10 days That last step is the one that bites: a certificate you touched once a year becomes one you touch roughly eight times a year, multiplied by every public or regulated certificate in an inventory you haven't finished counting. Treat 2029 as the deadline and you've misread the schedule. The 2027 step to 100 days is where manual renewal breaks for most enterprises [2], and the market isn't waiting for the mandate either: Let's Encrypt has committed to a 45-day default by 2028, ahead of the industry timeline [3]. This is a now problem wearing a 2029 disguise. Reckoning: The Global Post-Quantum Cryptographic Timeline The second horse, called Reckoning, broke out running this year. US Executive Order 14412, signed June 22 2026, turned years of post-quantum draft guidance into enforceable federal deadlines [4]. High-value and high-impact systems must complete key-establishment migration to NIST-approved algorithms by the end of 2030, with digital-signature migration following by the end of 2031, and contractors are pulled to a 2030 line through the acquisition rules [4]. This isn't an American story alone. Every major regulatory bloc is running its own version of the same clock, non-exhaustively: EU: national roadmaps due end of 2026, high-risk systems migrated by 2030, full transition by 2035 [5] Australia: classical asymmetric cryptography retired entirely by end of 2030 [6] Canada: CCCS is running its own migration guidance on a parallel track, distinct from the NIST/CNSA baseline The mandates differ in mechanism and pace, but they converge on the same decade. Sunset: FIPS 140-2's Expiration Date The third horse is the quietest, which is exactly why it catches people. On September 21 2026, NIST's Cryptographic Module Validation Program (CMVP) moves FIPS 140-2 validations to its historical list, and a module on that list can no longer be procured to satisfy a federal cryptographic requirement [7]. Nothing about the module changes on that date. What changes is whether you are allowed to keep buying it. If your compliance story rests on a 140-2 certificate, that validation expires before either of the other two horses finishes its run. The replacement path runs through 140-3, and through providers that haven't finished validating their post-quantum primitives. We name this horse Sunset. The Pale Horse: CRQC's Unscheduled Arrival There is a fourth horse, and it's the reason the other three feel so urgent. Ballot's window collapse has the CA/Browser Forum cracking the whip; the Reckoning has regulators on different continents setting the pace; Sunset has a time window stamped on it by the CMVP. Somebody scheduled all three. Nobody scheduled the fourth. It rides last, and you already know the verse. And I looked, and behold a pale horse: and his name that sat on him was CRQC. Note: I'm pretty sure that's how the passage goes. The cryptographic relevant quantum computer (CRQC), it's the only thing on this page that never filed a transition timeline. You can't plan against its arrival date because it does not have one, which is exactly why the move is to start now instead of when it becomes obvious: by the time it is obvious, the broken thing is the math underneath everything you already shipped. Name the three and you have named the horses. The carts are the actual work efforts they tow behind them: Discovery: Finding the cryptography you can't currently see Automation: Issuance because manual renewal will be a death sentence Multi-CA: Running more than one certificate authority (CA) whether you wanted to or not PQC Deployment (including Hybrid): Deploying new quantum-resistant algorithms defined by your federal mandates PQC Cost: Surviving what those algorithms do to revocation and certificate size The trouble is that the horses don't line up one per cart. Ballot drags both discovery and automation. Reckoning is hitched to our PQC algorithm choices and our CA strategy and your deployment sequencing all at once. Sunset pulls on the same algorithm cart from the other side, because the modules you're forced onto are the ones still validating the new primitives. Pull hard on any one rein and you'll tighten three other traces you weren't watching. Note: A harness trace is what connects the horse to the cart. So this isn't a roadmap in the do-these-seven-things-in-order sense, because the work does not queue that cleanly. It's a map of which force is pulling which part of your estate, where they overlap, and what you can do about it, one dependency harness at a time. And every harness shares a single starting line. The horses do not agree on a deadline, and none of the work they demand is even possible until we know where our cryptography actually lives. Which is the part almost nobody has done. That's where this article series starts: not with algorithms or ballots, but with the unglamorous inventory every regulator quietly assumes you've already finished. From there we follow the path forward, one horse and one cart at a time. Analogy over. But we're just getting started with this article series. References [1] CA/Browser Forum. Ballot SC-081v3 (TLS certificate lifetime reduction), passed April 2025. Maximum validity 398 → 200 days (15 March 2026) → 100 days (2027) → 47 days (2029); DCV reuse window to 10 days. [2] Understanding the Risk Scale: 6-month SSL/TLS Validity Starts March 15, 2026. [3] Let's Encrypt. Decreasing Certificate Lifetimes to 45 Days. [4] Executive Order 14412, signed June 22, 2026. whitehouse.gov. Key-establishment migration end-2030, digital-signature migration end-2031; contractor pull-forward via acquisition rules. (FR Doc 2026-12909, Vol. 91 No. 121, 25 June 2026.) [5] EU NIS Cooperation Group. A Coordinated Implementation Roadmap for the Transition to Post-Quantum Cryptography, June 2025. National plans end-2026, high-risk systems 2030, full transition 2035. [6] Australian Signals Directorate. Information Security Manual (ISM): ceasing traditional asymmetric cryptography targeted for end of 2030. [7] NIST Cryptographic Module Validation Program (CMVP). FIPS 140-2 validations moved to the historical list effective September 21, 2026.54Views2likes0Comments
ADC08 – Lack of Security & Regulatory Compliance
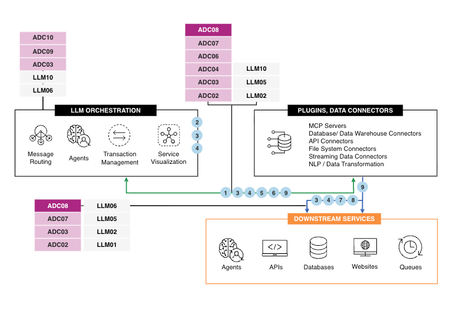
As data-driven applications become integral to the digital economy, industries such as Finance, Healthcare, Insurance, Telecommunications, Hi-Tech, Energy, Government, Retail & E-commerce, Automotive, and Manufacturing face increasing pressure to comply with strict data security and regulatory compliance frameworks. Global regulations regarding data sovereignty, privacy, and security are intensifying, requiring organizations to design their systems to adhere to these mandates while maintaining performance, scalability, and operational efficiency. F5 provides critical infrastructure for secure and compliant application delivery through solutions like Web Application Firewall (WAF) and Management Control Protocol (MCP). By leveraging these technologies, applications across industries can effectively mitigate risks while enhancing performance, availability, and scalability amidst continuously evolving compliance challenges. Although this article uses a Finance example to illustrate these concepts, the principles discussed are broadly applicable to all industries. AI Reference Architecture Use Case example: Financial App Security via F5 WAF and MCP The diagram (above) outlines the process flow of a financial application employing F5 WAF and MCP to bolster security and meet compliance requirements. Here's a breakdown of the use case flow: Client/AI Agent Initiates Request A user or an AI system generates a request to the financial application. F5 BIG-IP ADC Layer: The traffic flows through the F5 Application Delivery Controller (ADC), where critical security and compliance measures are applied: SSL/TLS Encryption & Offloading: Protects sensitive data during transmission by encrypting it using industry-standard protocols. SSL/TLS offloading reduces server overhead and ensures seamless performance. Web Application Firewall (WAF): Detects and blocks malicious traffic, including threats like injection attacks, cross-site scripting (XSS), and other OWASP Top 10 vulnerabilities. FIPS Compliance Checkpoint: Enforces adherence to Federal Information Processing Standards (FIPS) for applications handling sensitive financial and government data. Central Logging & Automated Compliance Enforcement All activities are captured through centralized logging and monitored for compliance violations. Automated tools ensure real-time enforcement of regulatory policies. F5 BIG-IP LTM Load Balancing Optimizes traffic distribution across backend servers, ensuring performance and high availability. MCP Server Processing Data is processed and stored within the MCP server infrastructure, maintaining data sovereignty by adhering to local jurisdiction and privacy laws. Observability & Regulatory Reporting Continuous monitoring enhances visibility into application performance and security. Comprehensive reporting ensures regulatory compliance is documented at every layer. How Compliance Impacts Financial Applications Performance: Regulations like data localization laws introduce performance challenges by requiring data to be stored and processed within specific regions. Encryption processes, such as SSL/TLS, add to computational overhead, and inefficient encryption management can create bottlenecks, particularly in latency sensitive AI driven financial applications. Availability: Lack of compliance with security regulations leads to greater exposure to breaches and downtime. For example, noncompliance with GDPR in the European Union can result in forced system outages and expensive remedial actions to meet regional requirements. Scalability: Data sovereignty regulations limit scalability by requiring organizations to duplicate infrastructure in multiple regions. This can lead to higher operational costs and hinder AI financial applications from leveraging centralized data for model training and transactions. Operational Efficiency: Addressing compliance failures often demands significant manual intervention, diverting IT resources away from strategic projects. Moreover, regulatory violations expose organizations to costly fines, legal penalties, and reputational harm, further affecting profitability and trustworthiness. Best Practices for Ensuring Security and Compliance Financial institutions can enhance application delivery by implementing a suite of measures targeted at addressing compliance and security risks: Encryption with FIPS-Compliant Devices: Utilize advanced encryption protocols to protect sensitive data in transit and at rest. Deploy FIPS-compliant devices to meet federal standards for handling regulated data, ensuring robust security and regulatory adherence. Web Application Firewall (WAF): Secure applications against common vulnerabilities and ensure compliance with industry standard frameworks like PCI DSS. This is critical for financial applications handling transaction data. Automated Compliance Checks and Centralized Logging: Automate compliance validation and real-time monitoring to streamline operations. Centralized logging aids in regulatory audits and ensures transparency while maintaining operational efficiency. Geolocation-Based Traffic Routing: Use application delivery infrastructure to enforce data residency requirements via geolocation based routing, ensuring compliance with regional data sovereignty laws. Scalable and Redundant Infrastructure: Design scalable architectures with redundant systems in compliance with specific jurisdictions, reducing downtime and ensuring reliability across regions. Conclusion The intersection of security, regulatory compliance, and application delivery is critical across all industries, as failure to meet these standards can have financial, operational, and reputational consequences. While this article focused on the financial services sector as an example, the principles and strategies discussed, such as leveraging F5 solutions like WAF and MCP to enhance security, ensure compliance, and optimize performance, are equally applicable to other industries including Healthcare, Retail, Telecommunications, and more. By prioritizing encryption, automation, and scalability, organizations across sectors can navigate regulatory challenges and deliver secure, scalable, and efficient services in today’s increasingly regulated and data driven landscape. Reference Articles Industry-leading application delivery and security services The Application Delivery Top 10 ADSP Platform overview AI reference architecture Mitigating OWASP API Security Risk: Mass Assignment using F5 BIG-IP F5 BIG-IP Zero Trust with BIG-IP SSL Orchestrator62Views1like0Comments
feedService: Automate Threat Feed and Blocklist Ingestion on BIG-IP (iApp + Python)
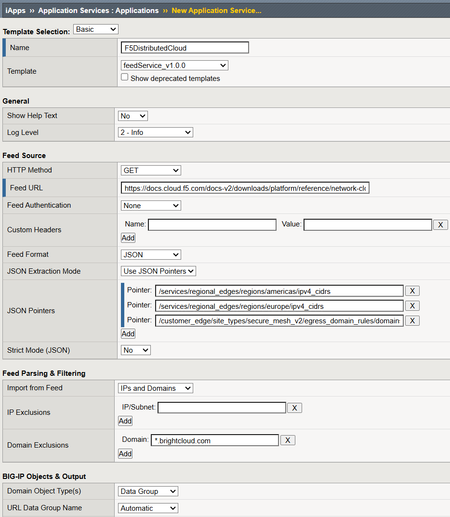
feedService is an iApp- and Python-based automation solution for F5 BIG-IP that automatically downloads, validates, normalizes, and imports feed data into native BIG-IP constructs — with intelligent data classification, change detection, and scheduled updates via iCall.60Views2likes0CommentsService Extensions with SSL Orchestrator: Microsoft 365 Tenant Restrictions
Introduction F5 BIG-IP SSL Orchestrator centralizes & manages decryption of SSL/TLS traffic. This enables security and monitoring tools to view the decrypted content and analyze it for threats and other anomalies. SSL Orchestrator removes the burden of decrypting content from your security tools, so they perform better and are more scalable. SSL Orchestrator is a key component of the F5 Application Delivery and Security Platform (ADSP). This use case allows you to access Company Microsoft 365 resources while blocking access to personal/non-company Microsoft 365 resources. Demo Video Service Extensions Service Extensions are a programmable capability in the SSL Orchestrator Service Chain (as of BIG-IP 17.0) that allow for customizable behaviors on decrypted HTTP traffic directly from within the Service Chain. Service Extensions invoke a new internal service type in SSL Orchestrator that performs its functions directly within an iRule. This iRule can reasonably do anything from inject HTTP headers, return a coaching/blocking page, and also communicate with external services. https://github.com/f5devcentral/sslo-service-extensions Microsoft(Office) 365 Tenant Restrictions This use case allows you to access Company Microsoft 365 resources while blocking access to personal/non-company Microsoft 365 resources. In this scenario, SSL Orchestrator injects Microsoft "Tenant-Restriction" HTTP headers into outbound HTTP flows. The concept of Tenant Restrictions provides a mechanism to allow or deny access to Office 365 resources based on organizational requirements. For example, you may wish to allow access to Company Microsoft 365 Outlook mail but deny access to the same resource when using a personal account. Detailed information from Microsoft on Tenant Restrictions is available here. To configure Tenant Restrictions, you need your company’s ‘Restrict-Access-To-Tenants’ and ‘Restrict-Access-Context’ values. You can obtain these from the Microsoft Azure portal by signing in as the Administrator here. Detailed information from Microsoft on Tenant Restrictions https://docs.microsoft.com/en-us/azure/active-directory/manage-apps/tenant-restrictions Microsoft Azure portal https://portal.azure.com/ After logging in select View under Azure Active Directory. Your Tenant ID and Primary Domain will be shown like in the image below. Restrict Access To Tenants – a value of permitted tenant lists, which is a comma-separated list of tenant domains that users are allowed to access. Any domain that is registered with a tenant can be used to identify the tenant in this list. For example, to permit access to both Contoso and Fabrikam tenants, the name/value pair would look like this: Restrict Access To Tenants: contoso.onmicrosoft.com,fabrikam.onmicrosoft.com Restrict Access Context - a value of a single directory ID, declaring which tenant is setting the Tenant Restrictions. For example, to declare Contoso as the tenant that sets the Tenant Restrictions policy, the name/value pair would look like this: Restrict Access Context: 456ff232-35l2-5h23-b3b3-3236w0826f3d. This article assumes you have a working SSL Orchestrator Deployment configured and wish to add Office 365 Outlook Tenant Restrictions. Steps Configure the Office 365 URL Updater Create the Office 365 Tenant Restrictions Service Test the Tenant Restrictions Step #1 Configure the Office 365 URL Updater From the SSL Orchestrator configuration screen click the Office icon on the top right. Select the box next to Fetch Now Scroll down and click Save You should now see Run Information above Save NOTE: It’s recommended that you configure weekly checks for updates Step #2 Create the Office 365 Tenant Restrictions Service From the configuration screen click Services then Add Select the F5 tab then double-click on Office 365 Tenant Restrictions Give it a name, “Microsoft365” in this example Enter the values for “Restrict Access To Tenants” and “Restrict Access Context” It should look something like this: Click Save & Next Click the name of the Service Chain you want to add it to Move the Microsoft365 Service from Available to Selected Click Save Click OK Click Save & Next Click Deploy Click OK It should look like this when done Step #3 Test the Tenant Restrictions Attempt to login to https://outlook.office.com with a non-company domain. NOTE: you must attempt to login with an email address and password in order to see the following error page: Conclusion F5 BIG-IP SSL Orchestrator simplifies and accelerates the deployment of SSL visibility and orchestration services. Whether for modern, custom, or classic apps, and regardless of their location—be it on premises, in the cloud, or at the edge—F5 BIG-IP SSL Orchestrator is built to handle today’s dynamic app landscape. Related Content Introduction to BIG-IP SSL Orchestrator Integrating Security Solutions with F5 BIG-IP SSL Orchestrator Addressing Shadow AI with F5 BIG-IP SSL Orchestrator F5 BIG-IP SSL Orchestrator Layer 2 Services with rSeries & VELOS What's new in BIG-IP v21.1? 52Views1like0Comments
Protecting Your MCP Server From Secret Exposure With F5 BIG-IP Advanced WAF's Data Guard
The Threat of Token Mismanagement in MCP Servers Tokens and credentials serve as the backbone for authentication and authorization in MCP servers, yet their mishandling presents a significant security risk. Developers sometimes store these secrets insecurely, embedding them in configuration files or leaving them easily accessible. The inherent features of MCP—such as long-lived sessions, stateful agents, and persistent context—add complexity to this risk. Tokens can inadvertently be stored, retrieved, or indexed through user prompts, system recalls, or log inspections. This introduces a new vulnerability: contextual secret leakage, where the model or protocol layer unknowingly becomes a repository for sensitive information. Attackers can exploit this vulnerability to extract and misuse these exposed credentials, gaining unauthorized access production systems. Mitigating OWASP MCP01 with F5 BIG-IP Advanced WAF Data Guard Recognizing the gravity of this issue, OWASP has officially categorized Token Mismanagement and Secret Exposure in MCP servers under the MCP01 vulnerability class. This classification highlights the widespread nature of the threat and underscores the urgent need for tools like F5 BIG-IP Advanced WAF’s Data Guard. Although the long term solution is to correct token mismanagement at the backend servers, the F5 BIG-IP Advanced WAF’s Data Guard offers a quick and easy way to mitigate this vulnerability. By sanitizing server responses, Data Guard ensures that sensitive data—such as tokens—is never inadvertently exposed to unprivileged users. In the following video, we will see how token mismanagement can result in system error logs containing sensitive data. Subsequently, we demonstrate how we can utilize BIG-IP Advanced WAF Data Guard to sanitize these responses, thus mitigating OWASP MCP 01: Token Mismanagement & Secret Exposure. For more information on F5 Data Guard, click here. For a list of OWASP MCP Top 10 vulnerabilities, click here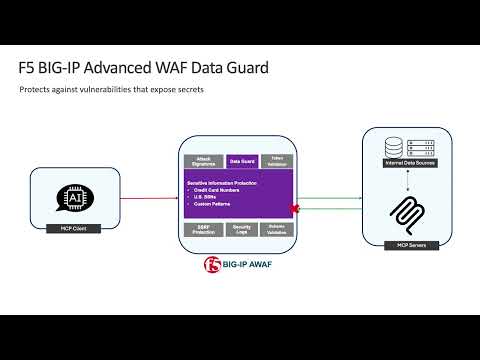 53Views1like0Comments
F5 BIG-IP Certificate API Control for Non-Admin Users
There's a common request we often hear: how to automate PKI objects (certs and keys) to the BIG-IP...without requiring an admin role. As it turns out, the limitation is not in the non-admin user's ability to employ certificate operations, but simply in their ability to get the cert/key objects to the BIG-IP. Object upload to a BIG-IP is, by design, very restrictive. In this article, I'm going to show you how to do end-to-end cert/key API control with a non-admin user.115Views3likes0CommentsRegional Edge SaaS Application Deployment Recommended Practices
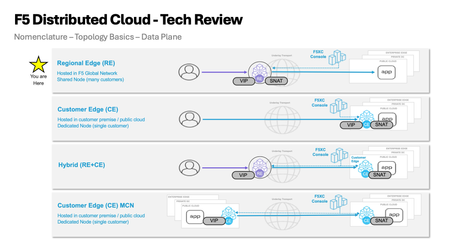
The guidelines presented in this walkthrough are informed by extensive field experience, incorporating insights from customers, F5 Solutions Engineers, Architects, and Professional Services teams. Having supported numerous deployments across diverse environments, this cumulative knowledge provides a practical and reliable starting point for publishing applications. This guide aims to help navigate the Distributed Cloud platform, offering a balanced approach to application delivery and security. The below figure represents the HTTP-LB configuration options alongside the typical flow of traffic from downstream client to upstream origin or application endpoint. Prerequisites: Article on how Distributed Cloud advertises and picks up traffic (Listener Logic) can be found here: F5 Distributed Cloud - Listener Logic Domains and Certificates: This is where you define what the load balancer listens on and how it presents itself to clients. For an initial deployment with a publicly accessible application, the following settings cover most use cases. We recommend a single HTTP-LB per application for visibility, telemetry, day 2 operations, and blast radius. Any more consolidation may cause friction going forward. Recommended Settings: Domain Name:Your application FQDN (e.g., app.example.com) Load Balancer Type: Certificate: Use F5 XC Auto-Cert when possible. If your domain is delegated to XC DNS, certificate management is fully automated. For non-delegated domains, F5 XC provides a cname challenge record value that you can add to your DNS provider to satisfy the Lets Encrypt ACME challenge, then add the provided Host Name.ves.io CNAME record pointing to XC to complete the certificate setup HTTP to HTTPS Redirect:Enable HSTS Header:Enable Listener Port: 443 Client-Side TLS: High security profile Protocol: HTTP/1.1 and HTTP/2 Origins and Health Checking: Origin Pools: A note on structure and origin access: Use Routes (covered in the next section) as the primary mechanism for attaching Origin Pools to your HTTP LB. The default Origin Pool field on the HTTP LB itself is best reserved as a potential fallback option depending on origin and route design (Engage your F5 SE if you need to discuss further). This approach gives you path-aware routing controls and per-route retry and timeout tuning. Also at the origin premise you should limit access to F5 Distributed Cloud RE’s only. You have a few options to achieve this. Limit via a security group or IP Access List to RE IP ranges, mTLS, insert a response header from the HTTP-LB that the origin server is expecting, or a combination of the 3. Recommended Settings for Publicly Available Endpoints: Origin Server Type: Public IP-based. Provide the IPv4 address directly. Where possible, target origins by IP with Host Header. If using public DNS-based origin endpoint targeting, be aware that XC does not honor standard DNS TTL and overrides the value! Origin Server Port: 443 Connection Pool Reuse: Enable Health Check Port: Endpoint port (same as origin port unless otherwise directed) Load Balancing Algorithm: Load Balancer Override (Load Balancer algorithm set at HTTP-LB) Endpoint Selection: Local Endpoints Preferred (Distributed Cloud Construct to leverage local endpoints over remote endpoints goal is to Egress the same RE as Ingress) TLS to Origin: Enable TLS SNI: Host Header TLS Security Level: High Origin Server Verification: Use Default Root CA Certificate mTLS: Disable unless required Other Origin Pool Options: Exception Handling: Setup for specific application/origin server requirements (configurable options available for application specific error-handling requirements) Origin Server Subsets: Disable unless you have a specific canary or subset routing requirement HTTP Protocol Configuration: Automatic (adjust to a specific version if your origin requires it) Proxy Protocol: Disable LB Source IP Persistence: Disable Health Checks: The default health check thresholds are tuned conservatively. In practice, this means a failed origin stays in rotation longer than it should, and a recovered origin comes back into rotation slowly. Adjust the thresholds to react more aggressively to recovery while still being tolerant of transient failures. Recommended Health Check Settings: Setting Recommended Value Default Why Healthy Threshold 1 3 Bring a recovered endpoint back into rotation after a single successful check Unhealthy Threshold 3 1 Require 3 consecutive failures before removing an endpoint — avoids flapping on transient issues Interval 15 seconds 15 seconds No change needed Jitter Percent 30% 30% Stagger health check timing across endpoints (30% of 15s = up to 4.5s offset) Key insight for jitter setting: When you have multiple endpoints in a pool, health checks without jitter all fire at the same instant that can create amongst other issues a temporary artificial network congestion or failure at endpoints. The 30% jitter setting randomizes the start time of each health check within a window (default: 15s interval with a 30% jitter, so checks are offset by up to 4.5 seconds). Leave this at the default unless you have a specific reason to change it. Advanced health check options: Host Header: Set to the value your application expects (do not leave blank if your origin validates the Host header) Path: Set a meaningful health endpoint like /healthz a common convention, but use whatever your application exposes Expected Status Codes: 200, 3xx Request/Response Header Manipulation: Add or remove headers as required by your application Expected http response: Validate the Raw Bytes expected in the Response of HTTP Health Check Origin Pool Display in UI: Routes: Routes are where your HTTP LB gains precision. Rather than sending all traffic to a single origin pool, Routes let you make forwarding decisions based on path, method, headers, and query parameters. They also expose per-route controls for timeouts, retries, header manipulation, and security policy controls that are not available at the origin pool level. Recommended Route Configuration: Route Type: Simple Route HTTP Method: Any Path Match: Prefix (use Regex or Exact match when you need more specificity) / Headers: Add header match conditions only if required Port Match: Adjust only if needed Origin targeting: Origin Pools:Add the Origin Pool(s) you configured in the previous section Host Rewrite Method: Automatic Host Rewrite (or set a specific value if your origin requires a fixed Host header) Query Parameters: Retain (Remove and Replace are available options) Route Activation: Enabled (Disable option) Advanced route options: Load Balancing Control: Use LB Hash Policy Priority: Default Origin Server Subsets: Leave unset unless subset routing is required Request/Response Manipulation: Header add/remove, cookie add/remove, set-cookie add/remove -configure as needed for your application Security (per-route overrides): WAF:Inherit from HTTP LB (recommended) or specify a different policy per route WAF Exclusion:Inherit from HTTP LB or specify an Exclusion Policy — see the note in the Gotchas section below on inline exclusions CORS and CSRF:Configure as needed Protocol Upgrades: SPDY:Disable (enable only if required) WebSockets:Disable (enable only if your application requires WebSocket support) Retry Policy: Key insight “retry values”: The retry settings below are tuned for typical HTTPS application traffic. The per-retry timeout of 1000ms prevents a slow origin from consuming the full route timeout on every attempt, and the retry interval backoff (25ms initial, 2500ms max) avoids hammering a struggling origin. Validate these values with load testing before going live. Custom Retry Policy Settings: Retry Conditions: 500 Gateway-error Connect-failure Refused-stream Reset Retriable-4xx Number of Retries: 3 Per-Retry Timeout: 1000ms Retry Interval: 25ms Max Retry Interval: 2500ms Miscellaneous Route Options: Route Timeout: 30000ms (30 seconds) Route-Specific Buffering: Common Mirroring: Disable Cluster Retract: Disable (validate with testing before enabling) Security Settings: Security configuration in F5 XC is layered. The settings below represent a solid baseline for an initial deployment. Individual applications will likely require tuning — use this as a starting point, not a final state. Web Application Firewall: The recommended starting posture is blocking mode with High and Medium attack signatures active. This catches the most common attack patterns while keeping false positive rates manageable. Do not start in detection-only mode and leave it there — establish a review cycle and move to blocking on a defined schedule. WAF: Enable Enforcement Mode: “Monitor” then after review migrate to “Blocking” Security Policy:Custom Attack Signatures: Default signature set High, Medium, and Low severity Automatic Attack Signature Tuning:Disable Automatic Signature Staging:Enable (7days) Threat Campaigns:Enable Violations:Default Signature-Based Bot Detection:Default Enhance with AI: Enable Mitigate High and Medium (have a review cadence) WAF Exclusion: Use a dedicated WAF Exclusion Policy object — do not use inline exclusions (see Gotchas below) Additional WAF-adjacent features — configure as needed for your application: Data Guard CSRF Protection GraphQL Inspection Cookie Protection API Protection: Enable as needed. If your application exposes a defined API surface, uploading an OpenAPI spec and enabling API Discovery is a worthwhile early step. Malware Protection: Disable DoS Settings: Mitigation Action: Block RPS Threshold: Typically based on Capacity of origin application endpoints Client-Side Challenge: Enabled if web based application Custom Service Policy for DoS: Apply a specific geo location and IPI during DDoS DDoS Mitigation Rules: Default Slow DDoS: Default Service Policies: Service Policies match on a set of criteria and apply an action. They operate at the connection level and complement WAF, which operates at the request content level. Service Policies: Apply Specified Service Policies (list any access restriction policies you need) IP Reputation: select the reputation categories appropriate for your threat model Threat Mesh: Disable User Identifier Policy: Create a policy using Client IP and TLS Fingerprint based on JA4 as identifiers (other identifier types are available) Malicious User Detection: Enable Malicious User Mitigation: Enable, Default settings Rate Limiting: Configure as needed based on expected traffic profile Trusted Client Rules: Configure as needed Client Blocking Rules: Configure as needed CORS Policy: Configure as needed Other Settings: VIP Advertisement: This is what makes the HTTP LB publicly reachable through the F5 Regional Edge network. If you change this to a Custom setting, validate your advertisement policy carefully as a misconfiguration here means no traffic reaches your LB. Advertise Internet Load Balancing Algorithm: Choose based on your application's session and traffic characteristics. Round Robin is the default and works for most stateless applications. If you have session affinity requirements, evaluate the hash-based options. Trusted Client IP: Disable unless you have a specific use case that requires preserving the original client IP through a proxy chain upstream of XC. Location Header: Enable “Add XC RE Ingress Location” to include the Regional Edge location in response headers. This is useful for troubleshooting and for understanding which RE node handled a request. Header and Cookie Options: Configure request/response header additions, removals, and cookie manipulation as required by your application. Error Response: Configure custom error response pages as needed. The default F5 error pages are functional but not branded. Most production deployments will want custom responses for 4xx and 5xx errors. Buffer Policy: Default: No buffering (requests are streamed to the origin) Max Buffer Size: 10,485,760 bytes (10MB) – if the request body exceeds this, XC returns HTTP 413 (Payload Too Large) Timeout behavior: If the full request body is not received before the timeout, XC returns HTTP 408 (Request Timeout) When to enable: Enable buffering if your origin cannot handle streaming request bodies, or if you are using WAF inspection on large POST requests Compression: Algorithm: GZIP only (not configurable) Compression Level: 5 (not configurable) Behavior: XC compresses responses dispatched from the upstream origin when the client signals support via “Accept-Encoding” Enable if your origins do not already compress responses and your client traffic includes browser-based users Idle Timeout: Default: Client Side - 30 seconds Behavior: A stream with no activity (upstream or downstream) for this duration is terminated with HTTP 504 Increase for applications with long-running server-sent events, streaming responses, or slow upload scenarios Common Gotchas: These are the issues that come up repeatedly in initial deployments. Check these before you go live. Using DNS-based origin targeting instead of IP + Host Header: By default Distributed Cloud rewrites the host header so validate and set appropriately. DNS-based origin targeting works but introduces a dependency on DNS TTL behavior that XC does override in non-standard ways. During a failover event, you may experience stale resolution longer than you expect. Use IP-based origin with Host Header wherever possible for predictable behavior. Not Configuring a Health Check at all or Leaving health check thresholds at defaults: By default, a health check is not added to an origin pool. Also, the default Healthy Threshold of 3 means a recovered origin must pass 3 consecutive checks before re-entering rotation. If your check interval is 15 seconds, that is 45 seconds of unnecessary exclusion for an endpoint that came back healthy. Set Healthy Threshold to 1. The default Unhealthy Threshold of 1 is the opposite problem a single failed check removes the endpoint. Set Unhealthy Threshold to 3 to tolerate transient blips. Attaching Origin Pools directly to the HTTP LB instead of utilizing Routes: The default Origin Pool field on the HTTP LB is a catch-all fallback. If you attach your primary origin there and do not configure Routes, you lose access to per-route retry policies, timeouts, header manipulation, and security overrides. Build your routing structure with explicit Routes from the start. Starting in WAF Monitor mode and never switching to blocking: Monitoring mode is a valid tuning step, but it is easy to leave it there indefinitely. Set a review date when you configure monitor mode. Establish your false positive baseline and move to blocking on a defined timeline. Not setting a Host Header on the health check: Leaving the Idle Timeout at 30 seconds for streaming applications: The 30-second idle timeout will terminate long-lived connections, WebSocket connections, server-sent event streams, slow uploads without warning. If your application uses any of these patterns, increase the Idle Timeout before testing.50Views1like0CommentsMalware Protection with F5 Distributed Cloud Web App & API Protection
F5 Distributed Cloud WAAP comes with robust malware protection built with the precision and scope to address the unique challenges of safeguarding file uploads. Allowing users to upload files is a staple of web applications. Whether it's uploading images for insurance claims, profile photos for social networks, or text files like tax documents, file uploads play an essential role in modern digital workflows. However, this convenience comes with a hidden and significant risk: file upload endpoints can be a vector for injecting and executing malicious code. While traditional web application firewalls (WAFs) often excel at detecting code injection attacks in textual request bodies or URL parameters, they falter when it comes to binary files. Binary files represent a unique challenge—malware can be embedded in hard-to-detect formats like images, PDFs, or other file types, making traditional WAF signatures and detection models unable to detect such attacks. Compounding the problem, many organizations face significant hurdles when using WAFs to monitor file uploads. To prevent excessive false positives that disrupt legitimate user activity, development and security teams often opt to bypass WAF protection for file uploads or define overly broad exclusions for upload paths. These exclusions create blind spots in application defenses, effectively leaving upload endpoints and, by extension, the wider application ecosystem vulnerable to exploitation. F5 Distributed Cloud WAAP is available with robust malware protection that has been built with the precision and scope to address the unique challenges of safeguarding file uploads. In this demo we will show you how to enable Malware Protection on your F5 Distributed Cloud Load Balancer to detect and block malicious file uploads. For more info on configuring Malware Protection on your F5 Distributed Cloud Load Balancer, see Create HTTP Load Balancer > Configure Malware Protection.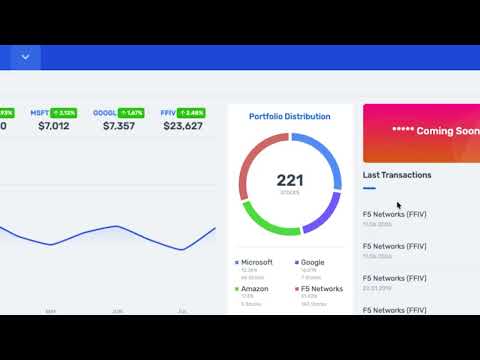 63Views1like0Comments
Stop Registering AI Agents and Apps by Hand - Explore Dynamic Client Registration BIG-IP ZTA
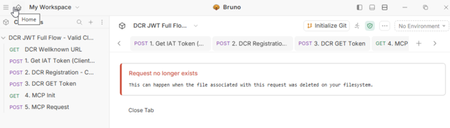
Introduction Managing OAuth client registrations manually at scale is tedious. Every new application needs an admin to log in, configure a client entry, hand off credentials, and hope nothing drifts out of sync. It works fine when you have five clients. It doesn't work when you have fifty or when AI Agents and Apps need to onboard programmatically as part of an automated pipeline. That's the problem Dynamic Client Registration (DCR) solves. BIG-IP ZTA's DCR support lets OAuth client applications register with BIG-IP ZTA’s authorization server dynamically, at runtime, without manual admin intervention for each one. The authorization server exposes a registration endpoint, a client sends its metadata, and APM creates the client entry and returns credentials on the spot. The client is automatically tied to the OAuth profile it registered against. Clean, automated, and auditable. I see it too, exposing the registration endpoint and it's an intentional move. You can't just hit the registration endpoint and create clients freely. Every registration request requires a valid Initial Access Token (IAT). That token comes from a specially designated client application, one that exists solely to issue IATs and can't be used for anything else. No authorization code flows, no resource owner password grants just IAT issuance. This separation keeps the registration endpoint controlled even as client onboarding scales out. The result is a model that works well for Zero Trust architecture, where you want programmatic, policy-controlled access rather than static configurations that age poorly. DCR gives you the automation; the IAT mechanism gives you the guardrails. How it looks in production Thanks to Matt_Dierick for building this lab up Starting with the end in mind, let’s see how this looks in production. In our setup we have an MCP client communicating with MCP server protected by BIG-IP ZTA. MCP Client Run Bruno to start API request for MCP client registration Request an IAT token to ZTA in order to register a new client Register the new client with the previous IAT token, and the output are a Client_ID and Client_Secret Request The JWT token that will be use to call the MCP Server Now, let’s send a valid request to MCP server through BIG-IP ZTA Now we have a clear picture of how the flow starts from client point of view to obtain the JWT token that allows further calls to the protected OAuth resource Let’s build it from BIG-IP ZTA BIG-IP ZTA Dynamic Client Registration flow In this flow the client uses the initial access token to start the process of automatic registration. As observed in the flow diagram below, The client initiates a POST to /register OAuth endpoint with the IAT access token BIG-IP ZTA responds back with the client_id and client secret. The client uses the client_id and client secret to request the JWT Access token Once Authenticated the client is now registered and able to perform future operations. Considerations for Dynamic Client Registration Dynamically registered clients are automatically associated with the OAuth profile Only authorized client applications can perform dynamic registration Clients can be identified as static or dynamic in the UI, similar to the below Below are the steps to build that flow Create Token configurations, Key configurations and JWT provider and provider list 2. Create the OAuth scope 3. Configure Oauth Claim Setting up OAuth profile 1. Navigate to: Main tab → Access → Federation → OAuth Authorization Server → OAuth Profiles 2. Select an OAuth profile. 3. Enable Dynamic Client Registration. 4. Configure the following settings: - IAT Client Applications, It specifies the client applications that can obtain an Initial Access Token (IAT) required to register dynamic clients. Only applications selected here can generate the token used during dynamic registration. - Allowed Grant Types , Supported Scopes, Client Authentication Method, Client Secret Location and Dynamic Client Registration Flow BIG-IP ZTA Dynamic OAuth client access With the client automatically registered, it’s time to see how the client access the protected resource through BIG-IP ZTA. The flow diagram below shows the traffic flow after client obtaining the JWT Access token. - The client uses the JWT Access token to access the protected resources. - BIG-IP ZTA validates the JWT signature, claim and scope and enforce the configured policy. Let’s explore the API protection profile settings below, 1- Create an API protection profile that makes use of both BIG-IP ZTA and BIG-IP Advanced WAF. 2- Let’s explore the API profiles Access settings Add OAuth Scope check subroutine. Define OAuth scope Add the subroutine to the main path in the per-request policy. 3- The scope validation step Optionally part of the API protection profile, you can enable BIG-IP Advanced WAF to protect the API requests. Conclusion If you're running any kind of modern application environment whether AI agents calling protected APIs, microservices spinning up on demand, or third-party integrations that can't wait for a manual provisioning ticket, static client registration is already a bottleneck. BIG-IP ZTA's DCR implementation gives you a clean answer to that problem. Clients register themselves. The IAT-gated endpoint keeps that process from becoming a free-for-all. And because every dynamically registered client is tied to an OAuth profile from the moment it's created, your policy enforcement travels with it automatically. Related content Using APM as an OAuth 2.0 Authorization Server90Views1like0Comments