nginx
104 TopicsStreamlining F5 WAF for NGINX Telemetry to Splunk via F5 NGINX One Console
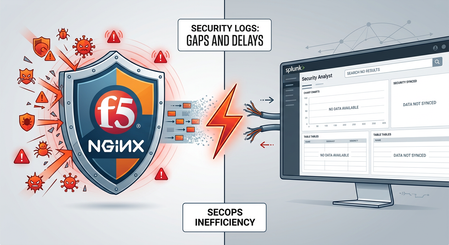
Modern application delivery platforms require centralized security management and observability. F5 NGINX One Console addresses this need by offering a unified management plane for distributed NGINX fleets, including a built-in Security Dashboard that provides platform and security teams with instant visibility into WAF activity, threat spikes, and active enforcement policies across instances. However, in enterprise environments, security operations are rarely isolated. Security Operations Center (SOC) teams rely heavily on SIEM platforms like Splunk as their central command center for threat correlation, incident response, and forensic investigations. While the built-in NGINX One Console Security Dashboard works well for platform operators, enterprise SecOps teams need WAF event data integrated seamlessly into their existing SIEM platforms. What was missing was an automated, effortless export mechanism to stream security logs from F5 WAF for NGINX into Splunk—eliminating complex manual log formatting and custom pipeline management. The Traditional Challenge: Log Format Expertise and Configuration Drift SecOps teams live in Splunk. It's where they correlate threats, investigate incidents, and build forensic timelines. But getting WAF security logs into Splunk has traditionally been a pain: **Custom log formats** -- Engineers had to hand-craft key-value or JSON schemas that Splunk could parse without choking on syntax errors. **Manual config edits on every instance** -- Someone had to SSH into each NGINX node to set up log templates and syslog destinations. **Configuration drift at scale** -- Managing logging configs individually across multi-cloud or containerized deployments meant inconsistent profiles and constant maintenance overhead. The result? WAF protection and SOC visibility lived in separate worlds. Security telemetry was harder to set up than the security policy itself. Closing the Gap: GUI-Driven Log Profile Management in NGINX One Console To eliminate this operational friction, F5 NGINX One Console introduces centralized GUI-driven Log Profile Lifecycle Management for F5 WAF for NGINX. Rather than manually authoring log format directives or updating individual instance configuration files, teams can now define, deploy, and manage Splunk-ready logging profiles across distributed NGINX environments in just a few clicks. What's under the hood: Built-in Splunk Template (log_f5_splunk): Pre-configured with an optimized key-value pair schema designed for native ingestion and automatic field extraction in Splunk. Centralized Deployment Engine: Allows administrators to define log profiles (capturing legal, illegal, or all requests) and push them out uniformly across targeted NGINX instances or instance groups. Automated Pipeline Configuration: Generates and validates the required NGINX directives automatically, ensuring seamless, error-free integration with remote syslog collectors. Video Walkthrough & Live Attack Demonstration Watch how NGINX One Console simplifies log profile deployment and enables real-time threat tracing in Splunk: Conclusion Securing modern web applications requires a tight feedback loop between threat protection and threat visibility. While F5 WAF for NGINX provides robust, low-latency defense at the application edge, the F5 NGINX One Console completes the equation by making security telemetry effortless to deploy and standardize. By delivering GUI-driven, Splunk-native log profile management, organizations can eliminate the friction between platform management and security operations—ensuring every blocked attack contributes directly to SOC intelligence and faster incident response. Resources To learn more about configuring log profiles for your NGINX fleet, refer to the official F5 NGINX One Console Log Profile Documentation.40Views1like0CommentsNGINX Plus, NGINX OSS and NGINX Operator Correlations
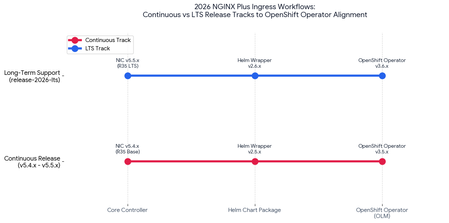
The NGINX Ingress Operator does not follow a strict lock-step minor version numbering scheme with the NGINX Plus Ingress Controller (NIC). Instead, compatibility is maintained through a specific mapping where newer operator versions wrap matching Helm chart versions and support a range of controller versions. Architecture Rules: Major Architecture Break (v1.0.0): Operator versions up to 0.5.1 were Go-based. Operator version 1.0.0 and higher introduced an incompatible shift by making the operator Helm-chart based (built directly from the NGINX Ingress Controller Helm chart). Minimum NIC Requirement: The modern NGINX Ingress Operator only supports NGINX Ingress Controller versions 1.7.0 and later. Mapping Source: F5 maintains an active compatibility mapping for every release cycle. You can check exact matching versions for the controller, Helm chart, and operator in the NGINX Ingress Controller Changelog. 2026 Comprehensive Release Alignment Chart In 2026, the v5.4 LTS and CR releases tracks continues the deep feature compatibility to aid teams migrating from the retired community controller. The mapping below outlines the direct correlation from Operator Version to Ingress Controller (NIC) Version and its underlying NGINX Plus Engine: The chart below details how the Operator versions map directly to underlying Helm charts and targeted controller releases during this period. Release Compatibility Matrix (2024 – 2026) Release Period NGINX Ingress Controller Version (NIC) NGINX Helm Chart Version OpenShift Operator Version Minimum OpenShift (OCP) Version Mid 2026 v5.5.x / v5.4.x v2.6.x v3.6.x / v3.5.x OCP 4.12+ Late 2025 v5.3.x / v5.0.x v2.4.x v3.4.x OCP 4.12+ Mid 2025 v4.2.x / v4.0.x v1.4.x v2.2.x OCP 4.10+ Late 2024 v3.7.x v1.3.x v1.4.x OCP 4.10+ Early 2024 v3.4.x / v3.5.x v1.2.x v1.2.x / v1.3.x OCP 4.10+ NGINX Plus and NGINX OSS Correlation The same rational stated for understanding the correlation between Operators and Plus wholes true for NGINX Plus and NGINX OSS. To correlate NGINX Open Source versions to NGINX Plus versions, you must look at the underlying baseline version that F5 NGINX uses to compile each commercial "Release" (R) binary. Every NGINX Plus version directly inherits its core codebase, features, and binary compatibility limits from a specific NGINX Open Source mainline version. NGINX Plus to Open Source Correlation Map NGINX Plus Release Baseline NGINX Open Source Version Major Core Platform Milestone NGINX Plus 37 1.29.8 First release supported under our new long-term support (LTS) policy. The “R” is dropped under new versioning policy. R36 1.29.3 Native HTTP CONNECT forward proxy module (ngx_http_tunnel_module) R35 1.29.0 Support for Early Hints (HTTP 103) & full ES2023 JavaScript specs R34 1.27.4 TLSv1.2/1.3 default protocols & dynamic certificate caching improvements R33 1.27.3 Initial support for QuickJS JavaScript engine & strict JWT license requirements R32 1.25.5 Stream module context routing (stream to http context proxying) Find the exact correlation: Check via CLI (Most Accurate): Run nginx -v or nginx -V on your NGINX Plus instance. The output explicitly prints the enterprise Release version along with the precise Open Source baseline version it is built on. Review Official Release Notes: Whenever a new NGINX Plus version is announced your can check on the release notes at F5 NGINX. Product Documentation. With the introduction of a new release it explicitly states the baseline community version (e.g., "NGINX Plus 37 inherits features from NGINX open source 1.29.8…”). Best Practices for OpenShift/OLM Disable Automatic Updates: When deploying via OpenShift's Operator Lifecycle Manager (OLM), set the update approval strategy to Manual. Automatic minor upgrades of the operator can introduce breaking changes or mismatch your deployed NIC Custom Resource definitions if not synchronized. Match CRDs: Always check and apply the required Custom Resource Definitions (CRDs) via <oc apply -f crds/> before executing an operator or controller upgrade. Overriding the Default Image Tag for NGINX Plus: One item to watch out for is to ensure you override the default image tag for NGINX Plus. Because the operator images default to deploying the community open-source core if left unconfigured, you’ll need to explicitly declare your target NGINX Plus controller tag inside your NginxIngressController Custom Resource (CR). Here’s an example: apiVersion: charts.nginx.org/v1alpha1 kind: NginxIngressController metadata: name: nginx-plus-ingress namespace: nginx-ingress spec: controller: # 1. Instruct the Operator to activate the NGINX Plus commercial logic nginxPlus: true # 2. Point to the private F5 container registry or your internal mirror image: repository: ://some-repo.com tag: "3.6.2-ubi" # Corresponds directly to the 3.6.2 NIC version # 3. Supply the Kubernetes/OpenShift secret containing your F5 JWT license token serviceAccount: imagePullSecretName: private-registry-jwt-secret You can verify that your operator and runtime container configurations are matched correctly by using the following commands: Verify the running Operator version: kubectl get csv -n nginx-ingress Verify the active Ingress Controller version inside the Pod kubectl exec -it <nginx-ingress-pod-name> -n nginx-ingress -- /nginx-ingress --version Integration Rules to be aware of: Binary Compatibility (Dynamic Modules): When building or upgrading custom third-party C modules, you must source the exact NGINX Open Source version tarballnoted above. Compiling against mismatched codebases will cause immediate signature mismatch errors upon service startup. Mainline Tracking Strategy: F5 forks commercial releases strictly from the NGINX Open Source Mainline branch(odd minor numbers like 1.23.x, 1.25.x, 1.27.x, 1.29.x) rather than the Stable branch. This ensures enterprise software benefits from cutting-edge performance features immediately. Security & CVE Audit Mapping: Security scanners frequently trigger on the underlying Open Source vulnerability maps. For example, the critical heap buffer overflow vulnerability (CVE-2026-42945) impacts NGINX Open Source up to 1.30.0 and correlates directly across NGINX Plus R32 through R36. The referenced CVE was addressed in the Plus release R36 P4 and R32 P6, OSS release 1.31.0 and 130.1.53Views1like0CommentsDeploying an NGINX App across Kubernetes Multi-clusters with F5 BIG-IP Container Ingress Services
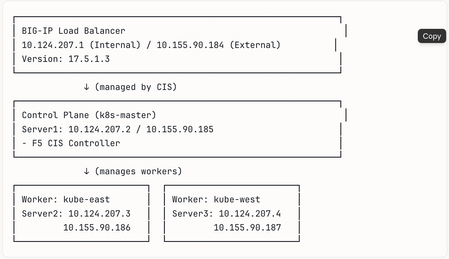
This tutorial simulates orchestrating multiple clusters using a single Kubernetes control plane with separate kubeconfig contexts, the same F5 CIS configuration patterns apply to genuinely separate Kubernetes clusters across different networks, cloud regions, or data centers. The simulation approach allows configuration testing without requiring multiple physical or cloud infrastructure environments.382Views1like0CommentsBringing Agentic Observability to F5 NGINX Plus: Native MCP Traffic Inspection
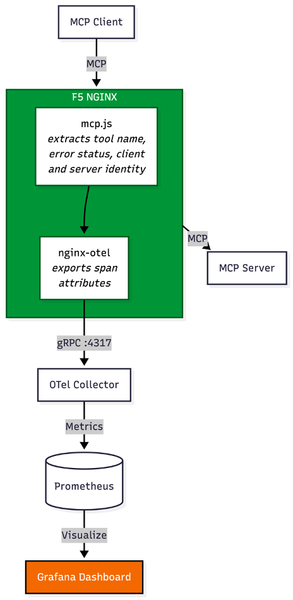
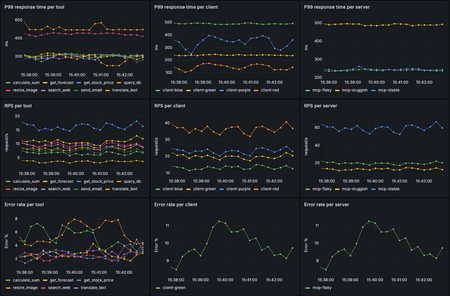
Introduction Before MCP, integrating an AI agent with internal systems required engineering teams to build custom, brittle API connectors for every single backend tool. MCP eliminates this technical debt. It has rapidly emerged as the universal standard for connecting AI agents to external data sources and internal enterprise tools, giving AI models a unified, secure language to interact with enterprise environments. In traditional application delivery, web traffic follows a predictable, linear path: a user initiates an action, an API call is made, and a server responds. MCP changes this paradigm. When an AI agent receives a complex prompt, it utilizes MCP to dynamically determine which tools to call. This can result in a single query, or it can trigger an autonomous fan-out, launching dozens of concurrent background tasks—querying proprietary databases, fetching live external data, or triggering internal workflows. With the release of F5 NGINX Plus R37, platform teams now have native Layer 7 observability into Model Context Protocol (MCP) traffic via the new Agentic Observability module. The Layer 7 Blind Spot in Agentic Traffic While MCP empowers agents, deploying it at an enterprise scale poses a significant architectural challenge. Standard load balancers and traditional API gateways cannot decipher this dynamic agentic traffic; to them, a complex, multi-tool AI fan-out registers simply as a blur of generic HTTP requests. Because conventional infrastructure lacks native MCP inspection, the AI data plane becomes a black box. When an AI-driven spike overwhelms backend resources, infrastructure teams are left unable to answer critical questions: Which specific agent triggered the cascade? Which MCP tool is generating errors? Is a misconfigured agent putting unauthorized load on a legacy database? Beyond Visibility: Native Layer 7 Control (No Heavy Sidecars) To solve this visibility gap without bolting a heavy, dedicated AI proxy into the data path, a new architectural approach is required. Utilizing the native capabilities introduced in NGINX Plus R37 and the underlying nginx-mcp-js module, platform teams can achieve real-time, Layer 7 native insights into MCP traffic. By extracting opaque MCP JSON-RPC payloads and exposing them as standard NGINX variables, organizations can export critical tool-calling telemetry to existing monitoring stacks like Prometheus and Grafana. Crucially, extracting these variables transitions the proxy from a passive observer to an active control point, unlocking specific use cases for managing AI traffic: 1. Granular Telemetry and Root Cause Analysis When an agentic workflow fails or introduces latency, traditional monitoring lacks the context of why the agent initiated the request. Native MCP integration unlocks a comprehensive, real-time matrix of the AI infrastructure. Operators can track the three golden signals—P99 Latency, Throughput (RPS), and Error Rates—across three critical dimensions: Tools: Instantly pinpoint exactly which AI function (like a database-lookup tool or a web search) is dragging down response times or throwing errors. Clients: Spot sudden spikes in traffic and identify the exact AI agent responsible. Servers: Monitor backend MCP servers to isolate flaky or sluggish server profiles from stable ones. 2. Context-Aware Rate Limiting and Quota Management Runaway AI agents or poorly optimized prompts can cause "noisy neighbor" scenarios, executing endless loops of API calls that DDOS backend systems. Instead of bluntly rate-limiting an entire IP address, NGINX Plus can use the newly extracted variables to rate-limit based on the specific tool being called or the specific client identified. Administrators can allow unlimited basic queries while strictly throttling resource-heavy retrieval tools. 3. Intelligent, Tool-Based Routing Not all AI tools require the same backend resources. Sending all agent traffic to a generalized backend pool leads to inefficient resource utilization. By using NGINX JavaScript (njs) to extract the specific tool name from the opaque MCP payload, NGINX Plus exposes this data as a standard variable (e.g., $mcp_tool_name). Administrators can then use native NGINX routing logic—such as the map directive—to route requests dynamically based on the tool invoked. For example, a tool requesting real-time financial data can be mapped via proxy_pass to a high-performance backend pool, while a tool triggering a background email notification can be routed to a low-cost serverless function. See it in Action: To see how to implement these capabilities and secure the AI data plane, and to see how F5 NGINX Plus surfaces deep agentic telemetry to protect backend infrastructure. Conclusion To support AI at scale, platform teams must avoid proxy sprawl. Introducing a secondary, specialized AI gateway creates massive friction, introduces new points of failure, and complicates enterprise architecture. With an existing F5 NGINX Plus footprint, you get deep visibility into agentic behavior, smarter traffic routing, and protection of legacy backends from sudden AI-driven surges—all in the established data path. Resources GitHub: nginx/nginx-mcp-js Documentation: NGINX njs Documentation Module: nginx-otel Module Blog: Introducing Agentic Observability in NGINX: Real-time MCP Traffic Monitoring Article: F5 NGINX PLus R37227Views1like0CommentsF5 NGINX Plus 37.0 Release now available
We’re thrilled to announce the general availability of F5 NGINX Plus Release 37.0. This release delivers an exceptionally broad set of new features, including the ability to monitor agentic traffic, control configurations remotely via a new API, format error logs as JSON with custom variables, monitor upstream latency with high-fidelity metrics, and much more. Additionally, to assist with lifecycle planning, NGINX Plus 37.0 will be the first release supported under our new long-term support (LTS) policy. Wondering why this is the 37.0 and not R37 release? With the introduction of the LTS policy, we’re changing how NGINX Plus is versioned. As always, NGINX Plus inherits all the latest capabilities from NGINX Open Source, the only all-in-one proven and trusted software web server, load balancer, reverse proxy, content cache, and API gateway. We highly recommend upgrading to the most recent NGINX Plus release to take advantage of all the latest features, fixes and security patches in NGINX Open Source and NGINX Plus. Here’s a summary of the most important updates in 37.0: Agentic Observability: Real-time MCP Traffic Monitoring NGINX Plus is ready for the agentic AI era with new observability capabilities that help teams trace and monitor AI agent activity, spot overly chatty agents, identify error-prone MCP tools, detect MCP server latency, and troubleshoot emerging AI application patterns. Control API Reconfiguring NGINX Plus just got much easier. With the new control API, teams can apply updates through a REST API call without the need to watch error logs to verify that reloads succeeded. The result is simpler config management, cleaner integrations, and CI/CD pipelines that are easier to automate. JSON Error Logs with Custom Variables Error logs are now easier to integrate, analyze, and act on. By exporting error logs in JSON format, teams can reduce the need for regex-heavy parsing or custom scripts, simplifying connections to logging pipelines. New customization options also enable richer debugging workflows, including correlation between individual error and access log entries. Enhanced Upstream Latency Metrics Understanding upstream behavior is essential to delivering fast, reliable applications. With latency histograms, teams can now spot user experience issues, API performance problems, and upstream bottlenecks faster than ever. HTTP/2 Support for Upstream Connectivity Applications can communicate with NGINX over HTTP/2 on the upstream side. This gives teams more flexibility to support modern application architectures without requiring backend services to rely on legacy HTTP protocols. Basic Authentication for HTTP CONNECT Forward Proxy Building on the forward proxy support introduced in NGINX Plus R36, 37.0 makes client authentication easier to implement with new Basic authentication support and a streamlined setup experience for JWT-based authentication. Additional Features and Updates inherited from NGINX Open Source: Encrypted Client Hello Multipath TCP ACME Module: Renewal Information Support Upstream connectivity now defaults to HTTP/1.1 with keepalives enabled New Features in Detail Agentic Observability: Real-time MCP Traffic Monitoring Agentic workloads introduce a new kind of traffic pattern: highly dynamic, non-deterministic tool calls that can fan out across multiple MCP servers and shift behavior over time. With the new Agentic Observability module, NGINX can inspect MCP traffic in real time and report throughput, latency, errors, and traces so you can quickly understand which agents are generating traffic, which MCP tools and servers are bottlenecks, and where failures are originating. To get started with Agentic Observability, configure NGINX Plus to use the mcp.js module from the nginx-mcp-js GitHub repository with the NGINX JavaScript module, the nginx-otel module, and an OpenTelemetry backend. See the repository for setup instructions and a sample configuration. The repository also includes an easy-to-deploy demo environment built with Docker Compose, OpenTelemetry, Prometheus, and Grafana. NGINX Control API NGINX Plus 37.0 introduces a new native Control API that provides programmatic access to runtime control and introspection. The API is capable of displaying the status of worker processes, identifying configuration files currently in memory, and updating NGINX configurations. Historically, NGINX configuration updates were initiated via UNIX signals or the nginx -s reload command-line parameter. While syntax issues in the config are caught with this method, error log inspection is still necessary to determine whether reloads succeeded or failed. For example, binding a listening socket to a privileged port would pass a config syntax test, but ultimately fail if NGINX is not running with root privileges. The new Control API provides real-time status on reloads, including downstream errors, as JSON in response to a configuration reload API call. Enabling the Control API Enable the Control API with care. Although it can be configured to listen for API requests on an external socket, this configuration is strongly discouraged. IMPORTANT: For security reasons, do not expose the API on public ports, the public internet, or any broad network. Enable the control listener when launching NGINX by using the -l command-line argument. For example, to expose the API on the Unix socket /tmp/nginx.sock, run the following command: nginx -l unix:/tmp/nginx.sock Configuring the Control API to listen on a Unix socket is currently the best available method for controlling authorization to make requests, because access can be managed through file permissions. The created Unix socket file is accessible only to the user running NGINX. Accessing the API The API is versioned and exposed under the /1 URI. You can use any HTTP client to access the API. The following examples use curl. To access the API exposed on a Unix socket, run the following command: curl --unix-socket /tmp/nginx.sock http://localhost/1/ Response: [ "control", "nginx" ] Inspecting the Running Configuration The following command returns the configuration currently loaded into memory. This is useful for identifying differences between the configuration NGINX is currently using and the configuration on disk. Any differences may indicate that the configuration on disk was changed but not successfully loaded into memory. curl --unix-socket /tmp/nginx.sock http://localhost/1/control/config Sample response: [ { "name": "nginx.conf", "content": " (...) " }, { "name": "stub.conf", "content": " (...) " } ] Triggering a Reload with Structured Feedback The following command causes NGINX to load the configuration from disk into memory. This is equivalent to running nginx -s reload, with the added benefit that the API can return errors beyond configuration syntax issues. curl --unix-socket /tmp/nginx.sock -X PATCH http://localhost/1/control/config Sample response: { "logs": [ “ .... “, “ .... “ ] } JSON Formatted Error Logs NGINX error logs have always provided valuable operational insight, but their traditional string-based format could make them difficult to parse at scale. Without structured fields or consistent delimiters, teams often had to rely on regexes, custom scripts, or complex heuristics to extract the data they needed. JSON is widely used across modern infrastructure for representing structured data, and support for parsing it is nearly universal across logging, monitoring, and automation tools. With JSON-formatted error logs in NGINX Plus, operators and system integrators can eliminate custom parsers and more easily connect NGINX to CI/CD pipelines, log aggregators, and application monitoring platforms. To enable JSON format in error logs, modify the error_log directive by adding the json parameter. error_log /var/log/nginx/error.json error json; Here’s an example of an error log entry formatted in JSON: { "level": "error", "timestamp": "2026-05-04T10:30:15.042+00:00", "pid": 12345, "tid": 12345, "cnum": 3, "msg": "connect() failed", "client": "192.168.1.10", "server": "example.com", "request": "GET /api HTTP/1.1", "upstream": "http://127.0.0.1:8080/api", "errno": 111, "errtext": "Connection refused" } Custom Error Log Variables NGINX Plus access logs are commonly used to inspect traffic and troubleshoot infrastructure integrations, but correlating access log entries with related error log events has historically been difficult. In many cases, teams had to rely on timestamp comparisons, which became increasingly unreliable on high-volume systems with many concurrent requests. NGINX Plus now makes correlation easier with custom error log variables. Using the new error_log_tag directive, operators can add custom context to error log entries, including request identifiers, host information, static strings, and values derived from incoming headers. This makes it easier to connect an error to the request, client, tenant, service, or workflow that produced it. NGINX Plus also adds the $time_iso8601_ms variable, which can be used in access logs to improve timestamp-based correlation with error logs. The error_log_tag directive accepts text-based NGINX variables and complex expressions, and outputs custom data in both JSON and text-formatted error log entries. In the following example, the directive adds a correlation identifier to each error log entry: server { error_log_tag request_id $request_id; error_log_tag x_request_id $http_x_request_id; location /api/ { proxy_pass http://backend; } } Enhanced Upstream Latency Metrics Low-latency application delivery is critical to delivering fast, reliable user experiences. Previously, NGINX Plus reported per-peer upstream latency in milliseconds as a moving average across the full request lifecycle, including the TCP handshake, TLS handshake, request send, and response read. While useful, averages can obscure important details, such as latency spikes, long-tail behavior, or patterns affecting only a subset of requests. With NGINX Plus 37.0, teams can now view latency histograms for each upstream peer. This provides a more detailed view of upstream performance, making it easier to understand latency distributions, analyze percentiles, identify outliers, and correlate upstream behavior with other NGINX Plus metrics and insights. Latency histogram data is available through the NGINX Plus API, can be exported to external observability systems using the Prometheus-njs exporter module, and can be viewed directly in the NGINX Plus dashboard for quick, at-a-glance insight, as shown below. NGINX Plus dashboardshowing new upstream latency data For deeper diagnostics, teams can export latency histogram data to Prometheus and visualize it in Grafana. The example below shows request density by latency bucket alongside p50, p95, and p99 response times, request rates, and upstream errors. By comparing latency distributions with throughput and error rates, operators can more quickly determine whether performance issues are driven by traffic spikes, upstream behavior, or HTTP errors. The following configuration example shows how to enable upstream latency histograms. To collect histogram data, define a shared memory zone in the upstream block. This enables upstream-level telemetry in NGINX Plus, including the new response_time_hist field. http { upstream my_backend { zone my_backend 64k; server backend1.example.com:8080; server backend2.example.com:8080; } server { listen 443 ssl; location / { proxy_pass http://my_backend; } # Expose the Nginx Plus API for metrics retrieval location /api/ { api write=on; allow 127.0.0.1; # restrict to localhost only deny all; } } } To access upstream latency histograms through the NGINX Plus API, use curl to issue the following REST call and pipe the response to jq for easier formatting: curl -s http://localhost/api/9/http/upstreams/my_backend | jq HTTP/2 Support for Upstream Connectivity Previously, NGINX Plus supported upstream HTTP connections using HTTP/1.0 or HTTP/1.1. HTTP/1.1 provided important performance benefits such as keepalive connections, but upstream applications still needed to communicate with NGINX using legacy HTTP protocols. NGINX Plus 37.0 introduces support for proxying and load balancing HTTP/2 traffic directly to upstream servers, allowing teams to extend HTTP/2 deeper into the application delivery path. Use the following example configuration to enable HTTP/2 connectivity to upstreams: upstream http_backend { server 127.0.0.1:8080; keepalive 16; } server { ... location /http/ { proxy_pass http://http_backend; proxy_http_version 2 proxy_set_header Connection ""; ... } } Note: The current implementation of HTTP/2 connectivity to upstreams does not support request multiplexing. Basic Authentication for HTTP CONNECT Forward Proxy NGINX Plus R36 introduced support for configuring NGINX Plus as a forward proxy using the HTTP CONNECT protocol. In 37.0, we’re building on that capability with support for Basic authentication for HTTP CONNECT requests. This gives teams another straightforward option for authenticating clients before allowing them to establish proxy tunnels through NGINX Plus. Use the following example configuration to enable Basic authentication for the HTTP CONNECT forward proxy: server { listen 3128; auth_basic "my proxy"; auth_basic_user_file conf/htpasswd; tunnel_pass; } Long-term Support (LTS) Starting with NGINX Plus 37.0, select releases will be certified as Long-Term Support (LTS) releases. For more details, read about the LTS program and what it means for support policies across LTS and non-LTS releases. The introduction of LTS releases also changes how NGINX Plus is installed, versioned, and updated. Customers should follow the NGINX Plus installation guide carefully and note the updated versioning scheme. Going forward, non-LTS releases will no longer increment the main NGINX Plus release number. For example, the non-LTS release following 37.0 will be versioned as 37.1, while the next LTS release will be versioned as R38.0. Module and package versions will follow the same scheme. For example, NGINX Plus R36 used a package version such as nginx-plus 36-1~noble; starting with 37.0, the package version format changes to nginx-plus 37.0.0-1~noble. NGINX Plus package repository paths are also changing. To pin repositories to the 37.0 release, use /plus/R37.0/... in the repository URI instead of the previous /plus/R36/... format. In some contexts, releases may be referenced by their full version names. For example, the official designator for the 37.0 release is PLS.37.0.0.1, with the final number representing the initial package release. More information can be found about the meaning of version number in the LTS program blog post. Important: If you intend to stay on the LTS upgrade path, we recommend pinning to the /plus/LTS URI. This helps ensure that future upgrades remain on LTS releases and do not unintentionally move your deployment to a non-LTS release. Additional Enhancement Available in NGINX Plus 37.0 NGINX Plus 37.0 is based on the NGINX 1.29.8 mainline release and inherits all functional changes, features, and bug fixes made since NGINX Plus R36 was released (which was based on the 1.29.3 mainline release). For the full list of new changes, features, bug fixes, and workarounds inherited from recent releases, see the NGINX changelog . Changes to Platform Support Added Platforms Support for the following platforms has been added: Alpine Linux 3.23 FreeBSD 15 Ubuntu 26.04 Note: Ubuntu is ending support for older variants of amd64 HW on Ubuntu 26.04. See more: https://documentation.ubuntu.com/project/how-ubuntu-is-made/concepts/supported-architectures/#architecture-variants NGINX Plus will be supported on amd64v3. Support on older hardware variants can be achieved by running older Ubuntu LTS releases (e.g. Ubuntu 24.04 LTS). Removed Platforms Support for the following platforms has been removed: Alpine Linux 3.20 – Reached End of Support on April 1st, 2026 Deprecated Platforms Support for the following platforms will be removed in a future release: Alpine Linux 3.21 Amazon Linux 2 FreeBSD 13 F5 NGINX in F5’s Application Delivery & Security Platform NGINX One is part of F5’s Application Delivery & Security Platform. It helps organizations deliver, improve, and secure new applications and APIs. This platform is a unified solution designed to ensure reliable performance, robust security, and seamless scalability for applications deployed across cloud, hybrid, and edge architectures. NGINX One is the all-in-one, subscription-based package that unifies all of NGINX’s capabilities. NGINX One brings together the features of NGINX Plus, F5 NGINX App Protect, and NGINX Kubernetes and management solutions into a single, easy-to-consume package. NGINX Plus, a key component of NGINX One, adds features to open-source NGINX that are designed for enterprise-grade performance, scalability, and security. Follow this guide for more information on installing and deploying NGINX Plus 37.0 or NGINX Open Source.2.4KViews2likes1CommentF5 NGINX Plus R36 Release Now Available
We’re thrilled to announce the availability of F5 NGINX Plus Release 36 (R36). NGINX Plus R36 adds advanced capabilities like an HTTP CONNECT forward proxy, richer OpenID Connect (OIDC) abilities, expanded ACME options, and new container images packaged with popular modules. In addition, NGINX Plus inherits all the latest capabilities from NGINX Open Source, the only all-in-one software web server, load balancer, reverse proxy, content cache, and API gateway. Here’s a summary of the most important updates in R36: HTTP CONNECT Forward Proxy NGINX Plus can now tunnel HTTP traffic via the HTTP CONNECT method, making it easy to centralize egress policies through a trusted NGINX Plus server. Advanced features enable capabilities that limit proxied traffic to specific origin clients, ports, or destination hosts and networks. Native OIDC Support for PKCE, Front-Channel Logout, and POST Client Authentication We’ve made additional enhancements to the popular OpenID Connect module by adding support for PKCE enforcement, the ability to log out of all applications a client was signed in to, and support for authenticating the OIDC client using the client_secret_post method. ACME Enhancements for Certificate Automation Certificate automation capabilities are more powerful than ever, as we continue to make improvements to the ACME (Automatic Certificate Management Environment) module. New features include support for the TLS-ALPN-01 challenge method, the ability to select a specific certificate chain, IP-based certificates, ACME profiles, and external account bindings. TLS Certificate Compression High-volume or high-latency connections can now benefit from a new capability that optimizes TLS handshakes by compressing certificates and associated CA chains. Container Images with Popular Modules Container images now include our most popular modules, making it even easier to deploy NGINX Plus in container environments. Alongside the previously included njs module, images now ship with the ACME, OpenTelemetry Tracing, and Prometheus Exporter modules. Key features inherited from NGINX Open Source include: Support for 0-RTT in QUIC Inheritance control for headers and trailers Support for OpenSSL 3.5 New Features in Detail HTTP CONNECT Forward Proxy NGINX Plus R36 adds native HTTP CONNECT support via a new ngx_http_tunnel_module that enables NGINX Plus to operate as a forward proxy for outbound HTTP/HTTPS traffic. You can restrict clients, ports, and hosts, as well as which networks are reachable via centralized egress policies. This new capability allows you to monitor outbound connections through one or more NGINX Plus instances instead of relying on separate proxy products or DIY open source projects. Why it matters Enforces consistent egress policies without introducing another proxy to your stack. Centralizes proxy rules and threat monitoring for outbound connections. Reduces the need for custom modules or sidecar proxies to tunnel outbound TLS. Who it helps Platform and network teams that must route all outbound traffic through a controlled proxy. Security teams that want a single place to enforce and audit egress rules. Operators consolidating L7 functions (inbound and outbound) on NGINX Plus. The following is a sample forward proxy configuration that filters ports, destination hosts and networks. Note the requirement to specify a DNS resolver. For simplicity, we've configured a popular, publicly available DNS. However, doing so is not recommended for certain production environments, due to access limitations and unpredictable availability. num_map $request_port $allowed_ports { 443 1; 8440-8445 1; } geo $upstream_last_addr $allowed_nets { 52.58.199.0/24 1; 3.125.197.172/24 1; } map $host $allowed_hosts { hostnames; nginx.org 1; *.nginx.org 1; } server { listen 3128; resolver 1.1.1.1; # unsafe tunnel_allow_upstream $allowed_nets $allowed_ports $allowed_hosts; tunnel_pass; } Native OpenID Connect Support for PKCE, Front-Channel Logout, and POST Client Authentication R36 extends the native OIDC features introduced in R34 with PKCE enforcement, front-channel logout, and support for authenticating clients via the client_secret_post method. PKCE for authorization code flow can now be auto-enabled for a configured Identity Provider when S256 is advertised for “code_challenge_methods_supported” in federated metadata. Alternatively, it can be explicitly toggled with a simple directive: pkce on; # force PKCE even if the OP does not advertise it pkce off; # disable PKCE even if the OP advertises S256 A new front-channel logout endpoint lets an Identity Provider trigger a browser-based sign-out of all applications that a client is signed in to. oidc_provider okta_app { issuer https://dev.okta.com/oauth2/default; client_id <client_id>; client_secret <client_secret>; logout_uri /logout; logout_token_hint on; frontchannel_logout_uri /front_logout; userinfo on; } Support for client_secret_post improves compatibility with identity providers that require POST-based client authentication per OpenID Connect Core 1.0. Why it matters Brings NGINX Plus in line with modern identity provider expectations that treat PKCE as a best practice for all authorization code flows. Enables reliable logout across multiple applications from a single identity provider trigger. Makes NGINX Plus easier to integrate with providers that insist on POST-based client authentication. Who it helps Identity access management and security teams standardizing on OIDC and PKCE. Application and API owners who need consistent login and logout behavior across many services. Architects integrating with cloud identity providers (Entra ID, Okta, etc.) that require specific OIDC patterns. ACME Enhancements for Certificate Automation Building on the ACME support shipped in our previous release, NGINX Plus R36 incorporates new features from the nginx acme project, including: TLS-ALPN-01 challenge support Selection of a specific certificate chain IP-based certificates ACME profiles External account bindings These capabilities align NGINX Plus with what is available in NGINX Open Source via the ngx_http_acme_module. Why it matters Lets you keep more of the certificate lifecycle inside NGINX instead of relying on external tooling. Makes it easier to comply with CA policies and organizational PKI standards. Supports more complex environments such as IP-only endpoints and specific chain requirements. Who it helps SRE and platform teams running large fleets that rely on automated certificate renewal. Security and PKI teams that need tighter control over certificate chains, profiles, and CA bindings. Operators who want to standardize on a single ACME implementation across NGINX Plus and NGINX Open Source. TLS Certificate Compression TLS certificate compression introduced in NGINX Open Source 1.29.1 is now available in NGINX Plus R36. The ssl_certificate_compression directive controls certificate compression during TLS handshakes, which remains off by default and must be explicitly enabled. Why it matters Reduces the size of TLS handshakes when certificate chains are large. Can optimize performance in high connection volume or high-latency environments. Offers incremental performance optimization without changing application behavior. Who it helps Performance-focused operators running services with many short-lived TLS connections. Teams supporting mobile or high-latency clients where every byte in the handshake matters. Operators who want to experiment with handshake optimizations while retaining control via explicit configuration. Container Images with Popular Modules Included Finally, NGINX Plus R36 introduces container images that bundle NGINX Plus with commonly requested first-party modules such as OpenTelemetry (OTel) Tracing, ACME, Prometheus Exporter, and NGINX JavaScript (njs). Options include images with or without F5 NGINX Agent and those running NGINX in privileged or unprivileged mode. Additionally, a slim NGINX Plus–only image will be made available for teams who prefer to build bespoke custom containers. Additional Enhancements Available in NGINX Plus R36 Upstream-specific request headers Dynamically assigned proxy_bind pools Changes Inherited from NGINX Open Source NGINX Plus R36 is based on the NGINX 1.29.3 mainline release and inherits all functional changes, features, and bug fixes made since NGINX Plus R35 was released (which was based on the 1.29.0 mainline release). For the full list of new changes, features, bug fixes, and workarounds inherited from recent releases, see the NGINX changes . Changes to Platform Support Added Platforms Support for the following platforms has been added: Debian 13 Rocky Linux 10 SUSE Linux Enterprise Server 16 Removed Platforms Support for the following platforms has been removed: Alpine Linux 3.19 – Reached End of Support in November 2025 Deprecated Platforms Support for the following platforms will be removed in a future release: Alpine Linux 3.20 Important Warning NGINX Plus is built on the latest minor release of each supported operating system platform. In many cases, the latest revisions of these operating systems are adapting their platforms to support OpenSSL 3.5 (e.g. RHEL 9.7 and 10.1). In these situations, NGINX Plus requires that OpenSSL 3.5.0 or later is installed for proper operation. F5 NGINX in F5’s Application Delivery & Security Platform NGINX One is part of F5’s Application Delivery & Security Platform. It helps organizations deliver, improve, and secure new applications and APIs. This platform is a unified solution designed to ensure reliable performance, robust security, and seamless scalability for applications deployed across cloud, hybrid, and edge architectures. NGINX One is the all-in-one, subscription-based package that unifies all of NGINX’s capabilities. NGINX One brings together the features of NGINX Plus, F5 NGINX App Protect, and NGINX Kubernetes and management solutions into a single, easy-to-consume package. NGINX Plus, a key component of NGINX One, adds features to NGINX Open Source that are designed for enterprise-grade performance, scalability, and security. Follow this guide for more information on installing and deploying NGINX Plus R36 or NGINX Open Source.2.5KViews1like1CommentFuture-Proofing Kubernetes Routing: From Standard Ingress to Role-Based CRDs
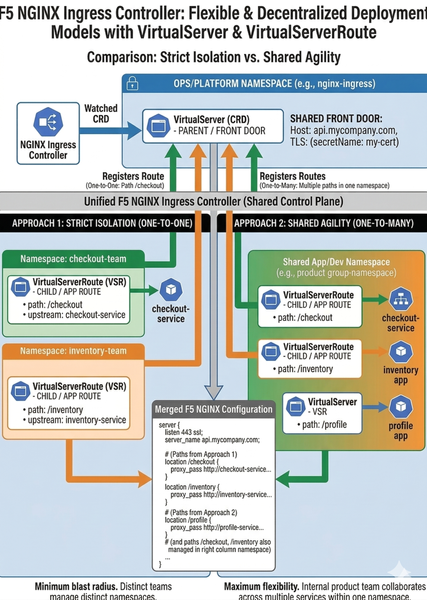
Standard Kubernetes Ingress is a "lowest common denominator" model that enforces rigid, monolithic configurations, limiting agility. F5 NGINX Ingress Controller breaks this mold with role-oriented Custom Resource Definitions (CRDs)—VirtualServer and VirtualServerRoute—enabling a modern system of delegated authority that is a sharp contrast to standard monolithic configurations. This approach provides platforms with central security control while granting application teams the essential freedom to manage their own routes without risk.286Views1like0CommentsAccelerate Application Deployment on Google Cloud with F5 NGINXaaS
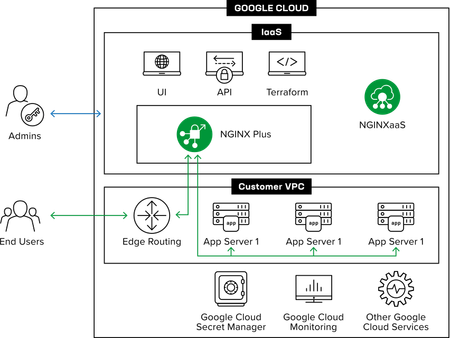
Introduction In the push for cloud-native agility, infrastructure teams often face a crossroads: settle for basic, "good enough" load balancing, or take on the heavy lifting of manually managing complex, high-performance proxies. For those building on Google Cloud (GCP), this compromise is no longer necessary. F5 NGINXaaS for Google Cloud represents a shift in how we approach application delivery. It isn’t just NGINX running in the cloud; it is a co-engineered, fully managed on-demand service that lives natively within the GCP ecosystem. This integration allows you to combine the advanced traffic control and programmability NGINX is known for with the effortless scaling and consumption model of an SaaS offering in a platform-first way. By offloading the "toil" of lifecycle management—like patching, tuning, and infrastructure provisioning—to F5, teams can redirect their energy toward modernizing application logic and accelerating release cycles. In this article, we’ll dive into how this synergy between F5 and Google Cloud simplifies your architecture, from securing traffic with integrated secret management to gaining deep operational insights through native monitoring tools. Getting Started with NGINXaaS for Google Cloud The transition to a managed service begins with a seamless onboarding experience through the Google Cloud Marketplace. By leveraging this integrated path, teams can bypass the manual "toil" of traditional infrastructure setup, such as patching and individual instance maintenance. The deployment process involves: Marketplace Subscription: Directly subscribe to the service to ensure unified billing and support. Network Connectivity: Setting up essential VPC and Network Attachments to allow NGINXaaS to communicate securely with your backend resources. Provisioning: Launching a dedicated deployment that provides enterprise-grade reliability while maintaining a cloud-native feel. Secure and Manage SSL/TLS in F5 NGINXaaS for Google Cloud Security is a foundational pillar of this co-engineered service, particularly regarding traffic encryption. NGINXaaS simplifies the lifecycle of SSL/TLS certificates by providing a centralized way to manage credentials. Key security features include: Integrated Secrets Management: Working natively with Google Cloud services to handle sensitive data like private keys and certificates securely. Proxy Configuration: Demonstrating how to set up a Google Cloud proxy network load balancer to handle incoming client traffic. Credential Deployment: Uploading and managing certificates directly within the NGINX console to ensure all application endpoints are protected by robust encryption. Enhancing Visibility in Google Cloud with F5 NGINXaaS Visibility is no longer an afterthought but a native component of the deployment, providing high-fidelity telemetry without separate agents. Native Telemetry Export: By linking your Google Cloud Project ID and configuring Workload Identity Federation (WIF), metrics and logs are pushed directly to Google Cloud Monitoring. Real-Time Dashboards: The observability demo walks through using the Metrics Explorer to visualize critical performance data, such as active HTTP connection counts and response rates. Actionable Logging: Integrated Log Analytics allow you to use the Logs Explorer to isolate events and troubleshoot application issues within a single toolset, streamlining your operational workflow. Whether you are just beginning your transition to the cloud or fine-tuning a sophisticated microservices architecture, F5 NGINXaaS provides the advanced availability, scalability, security, and visibility capabilities necessary for success in the Google Cloud environment. Conclusion The integration of F5 NGINXaaS for Google Cloud represents a significant advantage for organizations looking to modernize their application delivery without the traditional overhead of infrastructure management. By shifting to this co-engineered, managed service, teams can bridge together advanced NGINX performance and the native agility of the Google Cloud ecosystem. Through the demonstrations provided in this article, we’ve highlighted how you can: Accelerate Onboarding: Move from Marketplace subscription to a live deployment in minutes using Network Attachments. Fortify Security: Centralize SSL/TLS management within the NGINX console while leveraging Google Cloud's robust networking layer. Maximize Operational Intelligence: Harness deep, real-time observability by piping telemetry directly into Google Cloud Monitoring and Logging. Resources Accelerating app transformation with F5 NGINXaaS for Google Cloud F5 NGINXaaS for Google Cloud: Delivering resilient, scalable applications344Views2likes2CommentsF5 Container Ingress Services (CIS) and using k8s traffic policies to send traffic directly to pods
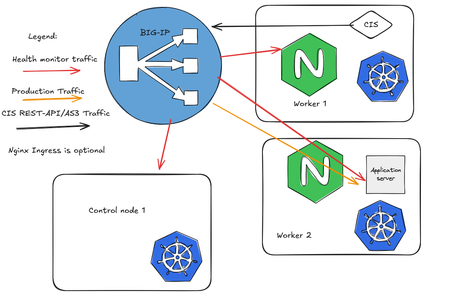
This article will take a look how you can use health monitors on the BIG-IP to solve the issue with constant AS3 REST-API pool member changes or when there is a sidecar service mesh like Istio (F5 has version called Aspen mesh of the istio mesh) or Linkerd mesh. I also have described some possible enchantments for CIS/AS3, Nginx Ingress Controller or Gateway Fabric that will be nice to have in the future. Intro Install Nginx Ingress Open source and CIS F5 CIS without Ingress/Gateway F5 CIS with Ingress F5 CIS with Gateway fabric Summary 1. Intro F5 CIS allows integration between F5 and k8s kubernetes or openshift clusters. F5 CIS has two modes and that are NodePort and ClusterIP and this is well documented at https://clouddocs.f5.com/containers/latest/userguide/config-options.html . There is also a mode called auto that I prefer as based on k8s service type NodePort or ClusterIP it knows how to configure the pool members. CIS in ClusterIP mode generally is much better as you bypass the kube-proxy as send traffic directly to pods but there could be issues if k8s pods are constantly being scaled up or down as CIS uses AS3 REST-API to talk and configure the F5 BIG-IP. I also have seen some issues where a bug or a config error that is not well validated can bring the entire CIS to BIG-IP control channel down as you then see 422 errors in the F5 logs and on CIS logs. By using NodePort and "externaltrafficpolicy: local" and if there is an ingress also "internaltrafficpolicy: local" you can also bypass the kubernetes proxy and send traffic directly to the pods and BIG-IP health monitoring will mark the nodes that don't have pods as down as the traffic policies prevent nodes that do not have the web application pods to send the traffic to other nodes. 2..Install Nginx Ingress Open source and CIS As I already have the k8s version of nginx and F5 CIS I need 3 different classes of ingress. k8s nginx is end of life https://kubernetes.io/blog/2025/11/11/ingress-nginx-retirement/ , so my example also shows how you can have in parallel the two nginx versions the k8s nginx and F5 nginx. There is a new option to use The Operator Lifecycle Manager (OLM) that when installed will install the components and this is even better way than helm (you can install OLM with helm and this is even newer way to manage nginx ingress!) but I found it still in early stage for k8s while for Openshift it is much more advanced. I have installed Nginx in a daemonset not deployment and I will mention why later on and I have added a listener config for the F5 TransportServer even if later it is seen why at the moment it is not usable. helm install -f values.yaml ginx-ingress oci://ghcr.io/nginx/charts/nginx-ingress \ --version 2.4.1 \ --namespace f5-nginx \ --set controller.kind=daemonset \ --set controller.image.tag=5.3.1 \ --set controller.ingressClass.name=nginx-nginxinc \ --set controller.ingressClass.create=true \ --set controller.ingressClass.setAsDefaultIngress=false cat values.yaml controller: enableCustomResources: true globalConfiguration: create: true spec: listeners: - name: nginx-tcp port: 88 protocol: TCP kubectl get ingressclasses NAME CONTROLLER PARAMETERS AGE f5 f5.com/cntr-ingress-svcs <none> 8d nginx k8s.io/ingress-nginx <none> 40d nginx-nginxinc nginx.org/ingress-controller <none> 32s niki@master-1:~$ kubectl get pods -o wide -n f5-nginx NAME READY STATUS RESTARTS AGE IP NODE NOMINATED NODE READINESS GATES nginx-ingress-controller-2zbdr 1/1 Running 0 62s 10.10.133.234 worker-2 <none> <none> nginx-ingress-controller-rrrc9 1/1 Running 0 62s 10.10.226.87 worker-1 <none> <none> niki@master-1:~$ The CIS config is shown below. I have used "pool_member_type" auto as this allows Cluster-IP or NodePort services to be used at the same time. helm install -f values.yaml f5-cis f5-stable/f5-bigip-ctlr cat values.yaml bigip_login_secret: f5-bigip-ctlr-login rbac: create: true serviceAccount: create: true name: namespace: f5-cis args: bigip_url: X.X.X.X bigip_partition: kubernetes log_level: DEBUG pool_member_type: auto insecure: true as3_validation: true custom_resource_mode: true log-as3-response: true load-balancer-class: f5 manage-load-balancer-class-only: true namespaces: [default, test, linkerd-viz, ingress-nginx, f5-nginx] # verify-interval: 35 image: user: f5networks repo: k8s-bigip-ctlr pullPolicy: Always nodeSelector: {} tolerations: [] livenessProbe: {} readinessProbe: {} resources: {} version: latest 3. F5 CIS without Ingress/Gateway Without Ingress actually the F5's configuration is much simpler as you just need to create nodeport service and the VirtualServer CR. As you see below the health monitor marks the control node and the worker node that do not have pod from "hello-world-app-new-node" as shown in the F5 picture below. Sending traffic without Ingresses or Gateways removes one extra hop and sub-optimal traffic patterns as when the Ingress or Gateway is in deployment mode for example there could be 20 nodes and only 2 ingress/gateway pods on 1 node each. Traffic will need to go to only those 2 nodes to enter the cluster. apiVersion: v1 kind: Service metadata: name: hello-world-app-new-node labels: app: hello-world-app-new-node spec: externalTrafficPolicy: Local ports: - name: http protocol: TCP port: 8080 targetPort: 8080 selector: app: hello-world-app-new type: NodePort --- apiVersion: "cis.f5.com/v1" kind: VirtualServer metadata: name: vs-hello-new namespace: default labels: f5cr: "true" spec: virtualServerAddress: "192.168.1.71" virtualServerHTTPPort: 80 host: www.example.com hostGroup: "new" snat: auto pools: - monitor: interval: 10 recv: "" send: "GET /" timeout: 31 type: http path: / service: hello-world-app-new-node servicePort: 8080 For Istio and Linkerd Integration an irule could be needed to send custom ALPN extensions to the backend pods that now have a sidecar. I suggest seeing my article at "the Medium" for more information see https://medium.com/@nikoolayy1/connecting-kubernetes-k8s-cluster-to-external-router-using-bgp-with-calico-cni-and-nginx-ingress-2c45ebe493a1 Keep in mind that for the new options with Ambient mesh (sidecarless) the CIS without Ingress will not work as F5 does not speak HBONE (or HTTP-Based Overlay Network Environment) protocol that is send in the HTTP Connect tunnel to inform the zTunnel (layer 3/4 proxy that starts or terminates the mtls) about the real source identity (SPIFFE and SPIRE) that may not be the same as the one in CN/SAN client SSL cert. Maybe in the future there could be an option based on a CRD to provide the IP address of an external device like F5 and the zTunnel proxy to terminate the TLS/SSL (the waypoint layer 7 proxy usually Envoy is not needed in this case as F5 will do the HTTP processing) and send traffic to the pod but for now I see no way to make F5 work directly with Ambient mesh. If the ztunnel takes the identity from the client cert CN/SAN F5 will not have to even speak HBONE. 4. F5 CIS with Ingress Why we may need an ingress just as a gateway into the k8s you may ask? Nowadays many times a service mesh like linkerd or istio or F5 aspen mesh is used and the pods talk to each other with mTLS handled by the sidecars and an Ingress as shown in https://linkerd.io/2-edge/tasks/using-ingress/ is an easy way for the client-side to be https while the server side to be the service mesh mtls, Even ambient mesh works with Ingresses as it captures traffic after them. It is possible from my tests F5 to talk to a linkerd injected pods for example but it is hard! I have described this in more detail at https://medium.com/@nikoolayy1/connecting-kubernetes-k8s-cluster-to-external-router-using-bgp-with-calico-cni-and-nginx-ingress-2c45ebe493a1 Unfortunately when there is an ingress things as much more complex! F5 has Integration called "IngressLink" but as I recently found out it is when BIG-IP is only for Layer 3/4 Load Balancing and the Nginx Ingress Controller will actually do the decryption and AppProtect WAF will be on the Nginx as well F5 CIS IngressLink attaching WAF policy on the big-ip through the CRD ? | DevCentral Wish F5 to make an integration like "IngressLink" but the reverse where each node will have nginx ingress as this can be done with demon set and not deployment on k8s and Nginx Ingress will be the layer 3/4, as the Nginx VirtualServer CRD support this and to just allow F5 in the k8s cluster. Below is how currently this can be done. I have created a Transportserver but is not used as it does not at the momemt support the option "use-cluster-ip" set to true so that Nginx does not bypass the service and to go directly to the endpoints as this will cause nodes that have nginx ingress pod but no application pod to send the traffic to other nodes and we do not want that as add one more layer of load balancing latency and performance impact. The gateway is shared as you can have a different gateway per namespace or shared like the Ingress. apiVersion: v1 kind: Service metadata: name: hello-world-app-new-cluster labels: app: hello-world-app-new-cluster spec: internalTrafficPolicy: Local ports: - name: http protocol: TCP port: 8080 targetPort: 8080 selector: app: hello-world-app-new type: ClusterIP --- apiVersion: k8s.nginx.org/v1 kind: TransportServer metadata: name: nginx-tcp annotations: nginx.org/use-cluster-ip: "true" spec: listener: name: nginx-tcp protocol: TCP upstreams: - name: nginx-tcp service: hello-world-app-new-cluster port: 8080 action: pass: nginx-tcp --- apiVersion: k8s.nginx.org/v1 kind: VirtualServer metadata: name: nginx-http spec: host: "app.example.com" upstreams: - name: webapp service: hello-world-app-new-cluster port: 8080 use-cluster-ip: true routes: - path: / action: pass: webapp The second part of the configuration is to expose the Ingress to BIG-IP using CIS. --- apiVersion: v1 kind: Service metadata: name: f5-nginx-ingress-controller namespace: f5-nginx labels: app.kubernetes.io/name: nginx-ingress spec: externalTrafficPolicy: Local type: NodePort selector: app.kubernetes.io/name: nginx-ingress ports: - name: http protocol: TCP port: 80 targetPort: http --- apiVersion: "cis.f5.com/v1" kind: VirtualServer metadata: name: vs-hello-ingress namespace: f5-nginx labels: f5cr: "true" spec: virtualServerAddress: "192.168.1.81" virtualServerHTTPPort: 80 snat: auto pools: - monitor: interval: 10 recv: "200" send: "GET / HTTP/1.1\r\nHost:app.example.com\r\nConnection: close\r\n\r\n" timeout: 31 type: http path: / service: f5-nginx-ingress-controller servicePort: 80 Only the nodes that have a pod will answer the health monitor. Hopefully F5 can make some Integration and CRD that makes this configuration simpler like the "IngressLink" and to add the option "use-cluster-ip" to the Transport server as Nginx does not need to see the HTTP traffic at all. This is on my wish list for this year 😁 Also if AS3 could reference existing group of nodes and just with different ports this could help CIS will need to push AS3 declaration of nodes just one time and then the different VirtualServers could reference it but with different ports and this will make the AS3 REST-API traffic much smaller. 5. F5 CIS with Gateway fabric This does not at the moment work as gateway-fabric unfortunately does not support "use-cluster-ip" option. The idea is to deploy the gateway fabric in daemonset and to inject it with a sidecar or even without one this will work with ambient meshes. As k8s world is moving away from an Ingress this will be a good option. Gateway fabric natively supports TCP , UDP traffic and even TLS traffic that is not HTTPS and by exposing the gateway fabric with a Cluster-IP or Node-Port service then with different hostnames the Gateway fabric will select to correct route to send the traffic to! helm install ngf oci://ghcr.io/nginx/charts/nginx-gateway-fabric --create-namespace -n nginx-gateway -f values-gateway.yaml cat values-gateway.yaml nginx: # Run the data plane per-node kind: daemonSet # How the data plane gets exposed when you create a Gateway service: type: NodePort # or NodePort # (optional) if you’re using Gateway API experimental channel features: nginxGateway: gwAPIExperimentalFeatures: enable: true apiVersion: gateway.networking.k8s.io/v1 kind: Gateway metadata: name: shared-gw namespace: nginx-gateway spec: gatewayClassName: nginx listeners: - name: https port: 443 protocol: HTTPS tls: mode: Terminate certificateRefs: - kind: Secret name: wildcard-tls allowedRoutes: namespaces: from: ALL --- apiVersion: gateway.networking.k8s.io/v1 kind: HTTPRoute metadata: name: app-route namespace: app spec: parentRefs: - name: shared-gw namespace: nginx-gateway hostnames: - app.example.com rules: - backendRefs: - name: app-svc port: 8080 F5 Nginx Fabric mesh is evolving really fast from what I see , so hopefully we see the features I mentioned soon and always you can open a github case. The documentation is at https://docs.nginx.com/nginx-gateway-fabric and as this use k8s CRD the full options can be seen at TLS - Kubernetes Gateway API 6. Summary With the release of TMOS 21 F5 now supports much more health monitors and pool members, so this way of deploying CIS with NodePort services may offer benefits with TMOS 21.1 that will be the stable version as shown in https://techdocs.f5.com/en-us/bigip-21-0-0/big-ip-release-notes/big-ip-new-features.html With auto mode some services can still be directly exposed to BIG-IP as the CIS config changes are usually faster to remove a pool member pod than BIG-IP health monitors to mark a node as down. The new version of CIS that will be CIS advanced may take of the concerns of hitting a bug or not well validated configuration that could bring the control channel down and TMOS 21.1 may also handle AS3 config changes better with less cpu/memory issue, so there could be no need in the future of using trafficpolicies and NodePort mode and k8s services of this type. For ambient mesh my example with Ingress and Gateway seems the only option for direct communication at the moment. We will see what the future holds!1.7KViews6likes2CommentsImplementing F5 NGINX STIGs: A Practical Guide to DoD Security Compliance
Introduction In today’s security-conscious environment, particularly within federal and DoD contexts, Security Technical Implementation Guides (STIGs) have become the gold standard for hardening systems and applications. For organizations deploying NGINX—whether as a web server, reverse proxy, or load balancer—understanding and implementing NGINX STIGs is critical for maintaining compliance and securing your infrastructure. This guide walks through the essential aspects of NGINX STIG implementation, providing practical insights for security engineers and system administrators tasked with meeting these stringent requirements. Understanding STIGs and Their Importance STIGs are configuration standards created by the Defense Information Systems Agency (DISA) to enhance the security posture of DoD information systems. These guides provide detailed technical requirements for securing software, hardware, and networks against known vulnerabilities and attack vectors. For NGINX deployments, STIG compliance ensures: Protection against common web server vulnerabilities Proper access controls and authentication mechanisms Secure configuration of cryptographic protocols Comprehensive logging and auditing capabilities Defense-in-depth security posture Key NGINX STIG Categories Access Control and Authentication Critical Controls: The STIG mandates strict access controls for NGINX configuration files and directories. All NGINX configuration files should be owned by root (or the designated administrative user) with permissions set to 600 or more restrictive. # Verify permissions sudo chmod 600 /etc/nginx/nginx.conf Client Certificate Authentication: For environments requiring mutual TLS authentication, NGINX must be configured to validate client certificates: # Include the following lines in the server {} block of nginx.conf: ssl_certificate /etc/nginx/ssl/server_cert.pem; ssl_certificate_key /etc/nginx/ssl/server_key.pem; # Enable client certificate verification ssl_client_certificate /etc/nginx/ca_cert.pem; ssl_verify_client on; # Optional: Set verification depth for client certificates ssl_verify_depth 2; location / { proxy_pass http://backend_service; # Restrict access to valid PIV credentials if ($ssl_client_verify != SUCCESS) { return 403; } } Certificate Management: All certificates must be signed by a DoD-approved Certificate Authority Private keys must be protected with appropriate file permissions (400) Certificate expiration dates must be monitored and renewed before expiry Cryptographic Protocols and Ciphers One of the most critical STIG requirements involves configuring approved cryptographic protocols and cipher suites. Approved TLS Versions: STIGs typically require TLS 1.2 as a minimum, with TLS 1.3 preferred: ssl_protocols TLSv1.2 TLSv1.3; FIPS-Compliant Cipher Suites: When operating in FIPS mode, NGINX must use only FIPS 140-2 validated cipher suites: ssl_ciphers 'TLS_AES_256_GCM_SHA384:TLS_AES_128_GCM_SHA256:ECDHE-ECDSA-AES256-GCM-SHA384:ECDHE-RSA-AES256-GCM-SHA384:ECDHE-ECDSA-AES128-GCM-SHA256:ECDHE-RSA-AES128-GCM-SHA256'; ssl_prefer_server_ciphers on; Logging and Auditing Comprehensive logging is mandatory for STIG compliance, enabling security monitoring and incident response. Required Log Formats: log_format security_log '$remote_addr - $remote_user [$time_local] ' '"$request" $status $body_bytes_sent ' '"$http_referer" "$http_user_agent" ' '$request_time $upstream_response_time ' '$ssl_protocol/$ssl_cipher'; access_log /var/log/nginx/access.log security_log; error_log /var/log/nginx/error.log info; Key Logging Requirements: Log all access attempts (successful and failed) Capture client IP addresses and authentication details Record timestamps in UTC or local time consistently Ensure logs are protected from unauthorized modification (600 permissions) Implement log rotation and retention policies Pass Security Attributes via a Proxy STIGs require implementation of security attributes to implement security policy for access control and flow control for users, data, and traffic: # Include the "proxy_pass" service as well as the "proxy_set_header" values as required: proxy_pass http://backend_service; proxy_set_header X-Security-Classification "Confidential"; proxy_set_header X-Data-Origin "Internal-System"; proxy_set_header X-Access-Permissions "Read,Write"; Request Filtering and Validation Protecting against malicious requests is a core STIG requirement: # Limit request methods if ($request_method !~ ^(GET|POST|PUT|DELETE|HEAD)$) { return 405; } # Request size limits client_max_body_size 10m; client_body_buffer_size 128k; # Timeouts to prevent slowloris attacks client_body_timeout 10s; client_header_timeout 10s; keepalive_timeout 5s 5s; send_timeout 10s; # Rate limiting limit_req_zone $binary_remote_addr zone=req_limit:10m rate=10r/s; limit_req zone=req_limit burst=20 nodelay; SIEM Integration Forward NGINX logs to SIEM platforms for centralized monitoring: # Syslog integration error_log syslog:server=siem.example.com:514,facility=local7,tag=nginx,severity=info; access_log syslog:server=siem.example.com:514,facility=local7,tag=nginx NGINX Plus Specific STIG Considerations Organizations using NGINX Plus have additional capabilities to meet STIG requirements: Active Health Checks upstream backend { zone backend 64k; server backend1.example.com; server backend2.example.com; } match server_ok { status 200-399; header Content-Type ~ "text/html"; body ~ "Expected Content"; } server { location / { proxy_pass http://backend; health_check match=server_ok; } } JWT Authentication For API security, NGINX Plus can validate JSON Web Tokens: location /api { auth_jwt "API Authentication"; auth_jwt_key_file /etc/nginx/keys/jwt_public_key.pem; auth_jwt_require exp iat; } Dynamic Configuration API The NGINX Plus API must be secured and access-controlled: location /api { api write=on; allow 10.0.0.0/8; # Management network only deny all; # Require client certificate ssl_verify_client on; } Best Practices for STIG Implementation Start with Baseline Configuration: Use DISA's STIG checklist as your starting point and customize for your environment. Implement Defense in Depth: STIGs are minimum requirements; layer additional security controls where appropriate. Automate Validation: Use configuration management and automated scanning to maintain continuous compliance. Document Deviations: When technical controls aren't feasible, document risk acceptances and compensating controls. Regular Updates: STIGs are updated periodically; establish a process to review and implement new requirements. Testing Before Production: Validate STIG configurations in development/staging before deploying to production. Monitor and Audit: Implement continuous monitoring to detect configuration drift and security events. Conclusion Achieving and maintaining NGINX STIG compliance requires a comprehensive approach combining technical controls, process discipline, and ongoing vigilance. While the requirements can seem daunting initially, properly implemented STIGs significantly enhance your security posture and reduce risk exposure. By treating STIG compliance as an opportunity to improve security rather than merely a checkbox exercise, organizations can build robust, defensible NGINX deployments that meet the most stringent security requirements while maintaining operational efficiency. Remember: security is not a destination but a journey. Regular reviews, updates, and continuous improvement are essential to maintaining compliance and protecting your infrastructure in an ever-evolving threat landscape. Additional Resources DISA STIG Library: https://public.cyber.mil/stigs/ NGINX Security Controls: https://docs.nginx.com/nginx/admin-guide/security-controls/ NIST Cybersecurity Framework: https://www.nist.gov/cyberframework Have questions about implementing NGINX STIGs in your environment? Share your challenges and experiences in the comments below.510Views1like0Comments