management
1098 TopicsAPI Discovery and Enforcement with API Security Local Edition
API Security Local Edition is a self-hosted platform that discovers APIs from BIG-IP traffic insights, builds and maintains an inventory with risk scoring, and pushes enforcement back to BIG-IP. This article covers the architecture, the data flows between components, and the operator workflow from discovery to enforcement. 335Views5likes3Comments
F5 Insight for ADSP - A Closer Look
Introduction F5 Insight for ADSP, a key component of the F5 Application Delivery and Security Platform (ADSP), helps teams monitor and secure apps that are spread across hybrid, multi-cloud and AI environments. In this article, I’ll highlight some of the key features and use cases addressed by F5 Insight. Demo Video Demo Video: F5 Insight for ADSP - A Closer Look The F5 Insight Home Screen The F5 Insight Home Screen provides comprehensive monitoring for your F5 infrastructure, applications, and security posture. It features intelligent anomaly detection and performance optimization tools, giving administrators and users a centralized view of their BIG-IP fleet health and operational status. System Report Cards The System Report Cards display health indicators ranked Good, Warning, and Critical for the following: Anomaly Detection Monitors the connection count, pool availability, CPU utilization, and memory usage. Application Performance Monitors application-level health based on response time, 4xx, and 5xx error codes. Security Monitors the expiration of SSL/TLS certificates and BIG-IP WAF events. BIG-IP Metrics Monitors for BIG-IP health issues with device resources and operational status. Fleet Status Displays a summary of all BIG-IP devices and their operational status. The Fleet Status shows all the BIG-IP devices with a status of Up, Down or Degraded. Ask AI Assistant Allows you to type queries in plain English to retrieve device statistics, configuration information, security events, device health, application performance and much more. The AI Assistant connects to a configurable Large Language Model (LLM) backend. Supported providers include OpenAI, Anthropic, or a customer provided LLM. An example query: Have there been any outages in the past 24 hours for all devices in all data centers? The AI Assistant understands the question and has identified all the data centers. The AI Assistant then checks the device statistics for any outages or issues. The AI Assistant compiles a detailed summary report of the query. Configuration of Large Language Model (LLM) Large language model (LLM) Insights bring natural language intelligence to F5 Insight, enabling you to query your BIG-IP configurations and logs conversationally. Instead of manually searching through configurations or parsing log files, you can ask questions like “Why is pool member X marked down?” or “Show me all virtual IPs (VIPs) with SSL offloading enabled” and receive immediate, contextualized, clear answers. In the toolbar on the left under Manage, select LLM Insights. Select your LLM Provider Enter your API Token/Key Enter your Enterprise API URL Click Test Connection to verify it’s working Click Save Configuration when the connection is validated. Conclusion F5 Insight for ADSP offers customizable visualizations and dashboards to help you surface metrics and KPIs tailored to your organization. It provides access to useful telemetry data for a deeper understanding of your environment, application behaviors, and complex BIG-IP deployments, all centralized in a single location. Identification of root causes during outages/tickets. Solves issues and struggles with Day 2 analysis of your BIG-IP Fleet and the applications therein. Mitigates the problem of a lack of detailed visual information on your BIG-IP Fleet. Set a foundation for the utilization of open-source tools and their benefits. Related Content Introducing F5 Insight for ADSP F5 Insight for ADSP Documentation F5 Insight Product Page 610Views5likes0Comments
What’s New in BIG-IQ v8.4.1?
Introduction F5 BIG-IQ Centralized Management, a key component of the F5 Application Delivery and Security Platform (ADSP), helps teams maintain order and streamline administration of BIG-IP app delivery and security services. In this article, I’ll highlight some of the key features, enhancements, and use cases introduced in the BIG-IQ v8.4.1 release and cover the value of these updates. Effective management of this complex application landscape requires a single point of control that combines visibility, simplified management and automation tools. Demo Video New Features in BIG-IQ 8.4.1 Support for F5 BIG-IP v17.5.1.X and BIG-IP v21.0 BIG-IQ 8.4.1 provides full support for the latest versions of BIG-IP (BIG-IP 17.5.1.X and 21.0) ensuring seamless discovery and compatibility across all modules. Users who upgrade to BIG-IP 17.5.1.X+ or 21.0 retain the same functionality without disruptions, maintaining consistency in their management operations. As you look to upgrade BIG-IP instances to the latest versions, our recommendation is to use BIG-IQ. By leveraging the BIG-IQ device/software upgrade workflows, teams get a repeatable, standardized, and auditable process for upgrades in a single location. In addition to upgrades, BIG-IQ also enables teams to handle backups, licensing, and device certificate workflows in the same tool—creating a one-stop shop for BIG-IP device management. Note that BIG-IQ works with BIG-IP appliances and Virtual Editions (VEs). Updated TMOS Layer In the 8.4.1 release, BIG-IQ's underlying TMOS version has been upgraded to v17.5.1.2, which will enhance the control plane performance, improve security efficacy, and enable better resilience of the BIG-IQ solution. MCP Support BIG-IP v21.0 introduced MCP Profile support—enabling teams to support AI/LLM workloads with BIG-IP to drive better performance and security. Additionally, v21.0 also introduces support for S3-optimized profiles, enhancing the performance of data delivery for AI workloads. BIG-IQ 8.4.1 and its interoperability with v21.0 helps teams streamline and scale management of these BIG-IP instances—enabling them to support AI adoption plans and ensure fast and secure data delivery. Enhanced BIG-IP and F5OS Visibility and Management BIG-IQ 8.4.1 introduces the ability to provision, license, configure, deploy, and manage the latest BIG-IP devices and app services (v17.5.1.X and v21.0). In 8.4, BIG-IQ introduced new visibility fields—including model, serial numbers, count, slot tenancy, and SW version—to help teams effectively plan device strategy from a single source of truth. These enhancements also improved license visibility and management workflows, including exportable reports. BIG-IQ 8.4.1 continues to offer this enhanced visibility and management experience for the latest BIG-IP versions. Better Security Administration BIG-IQ 8.4.1 includes general support for SSL Orchestrator 13.0 to help teams manage encrypted traffic and potential threats. BIG-IQ includes dedicated dashboards and management workflows for SSL Orchestrator. In BIG-IQ 8.4, F5 introduced support and management for Venafi Trust Protection Platform v22.x-24.x, a leading platform for certificate management and certificate authority services. This integration enables teams to automate and centrally manage BIG-IP SSL device certificates and keys. BIG-IQ 8.4.1 continues this support. Finally, BIG-IQ 8.4.1 continues to align with AWS security protocols so customers can confidently partner with F5. In BIG-IQ 8.4, F5 introduced support for IMDSv2, which uses session-oriented authentication to access EC2 instance metadata, as opposed to the request/response method of IMDSv1. This session/token-based method is more secure as it reduces the likelihood of attackers successfully using application vulnerabilities to access instance metadata. Enhanced Automation Integration & Protocol Support BIG-IQ 8.4.1 continues with BIG-IQ's support for the latest version of AS3 and templates (v3.55+). By supporting the latest Automation Toolchain (AS3/DO) BIG-IQ is aligned with current BIG‑IP APIs and schemas, enabling reliable, repeatable app and device provisioning. It reduces deployment failures from version mismatches, improves security via updated components, and speeds operations through standardized, CI/CD-friendly automation at scale. BIG-IQ 8.4 (and 8.4.1) provides support for IPv6. IPv6 provides vastly more IP addresses, simpler routing, and end‑to‑end connectivity as IPv4 runs out. BIG‑IQ’s IPv6 profile support centralizes configuration, visibility, and policy management for IPv6 traffic across BIG‑IP devices—reducing errors and operational overhead while enabling consistent, secure IPv6 adoption. Upgrading to v8.4.1 You can upgrade from BIG-IQ 8.X to BIG-IQ 8.4.1. BIG-IQ Centralized Management Compatibility Matrix Refer to Knowledge Article K34133507 BIG-IQ Virtual Edition Supported Platforms BIG-IQ Virtual Edition Supported Platforms provides a matrix describing the compatibility between the BIG-IQ VE versions and the supported hypervisors and platforms. Conclusion Effective management—orchestration, visibility, and compliance—relies on consistent app services and security policies across on-premises and cloud deployments. Easily control all your BIG-IP devices and services with a single, unified management platform, F5® BIG-IQ®. F5® BIG-IQ® Centralized Management reduces complexity and administrative burden by providing a single platform to create, configure, provision, deploy, upgrade, and manage F5® BIG-IP® security and application delivery services. Related Content Boosting BIG-IP AFM Efficiency with BIG-IQ: Technical Use Cases and Integration Guide Five Key Benefits of Centralized Management F5 BIG-IQ What's New in v8.4.0? 603Views5likes0Comments
Automatic Certificate Management with ACMEv2 in F5 BIG-IP
One of the most anticipated features of F5 BIG-IP is integration with ACMEv2. With the General Availability of BIG-IP 21.1.0 on May/26, this feature came into being. In this tutorial, we are going to configure it, using Let's Encrypt as the CA. The domain for which we are generating/renewing certificates is carlosf5lab.lat. The official docs for this feature are located in SSL Certificate Management | BIG-IP Documentation. Pre-requisite 1: DNS Resolver that can reach the internet (at least the CA endpoints). In this case, we are using the native DNS Resolver that comes with BIG-IP. Pre-requisite 2: The internal proxy that will make the connection with the CA. Pre-requisite 3: a self signed SSL certificate that the ACMEv2 protocol uses as the identifier for a device account. You don't have to fill the Subject Alternative Name. For the Common Name, an e-mail contact is advised. Now, we are going to create the ACME Provider object. Give it a name, and select the internal proxy previously created. For the CA Certificate to enable the secure connection with the Directory URL, you can use the default ca-bundle.crt. The Directory URL is the endpoint for the ACMEv2 protocol. In Let's Encrypt case, it is https://acme-v02.api.letsencrypt.org/directory For the Account Key, choose the previously created self-signed certificate. For the trickier part of all, the field "Contacts" is mandatory, and it must be an URL. That’s why you must use the format mailto:email_address. Check the Terms and Conditions, and the Create Account boxes. After a while, the Account Status must read as "Valid". To prove you own the domain whose certificate Let's Encrypt is going to create/renew, it must be pointing to an IP (A Record) where you must have your Virtual Server listening on Port 80 configured to respond to the ACMEv2 Challenge. (In this specific lab, the domain carlosf5lab.lat points to a Public IP mapped to an internal IP). Now you can order your first certificate via ACMEv2 on BIG-IP: After a while, the Key tab should read something like: Which means your certificate was generated: To track the ACME Provider, you can check its statistics: That's it, my friend! If it helped you, give a thumbs up to this post!477Views4likes7CommentsCertificate Automation for BIG-IP using CyberArk Certificate Manager, Self-Hosted
The issue of reduced lifetimes of TLS certificates is top of mind today. This topic touches upon reducing the risks associated with human day-to-day management tasks for such critical components of secure enterprise communications. Allowing a TLS certificate to expire, by simple operator error often, can preclude the bulk of human or automated transactions from ever completing. In the context of e-commerce, as only one single example, such an outage could be financially devastating. Questions abound: why are certificate lifetimes being lowered; how imminent is this change; will it affect all certificates? An industry association composed of interested parties, including many certificate authority (CA) operators, is the CA/Browser Forum. In a 29-0 vote in 2025, it was agreed public TLS certificates should rapidly evolve from the current 398 day de-facto lifetime standard to a phased arrival at a 47 day limit by March 2029. An ancillary requirement, demonstrating the domain is properly owned, known as Domain Control Validation (DCV) will drop to ten days. Although the governance of certificate lifecycles overtly pertains to public certificates, the reality is enterprise-managed, so called private CAs, likely need to fall in lock step with these requirements. Pervasive client-side software elements, such as Google Chrome, are used transparently by users with certificates that may be public or enterprise issued, and having a single set of criteria for accepting or rejecting a certificate is reasonable. Why Automated Certificate Management on BIG-IP, Now More than Ever? A principal driver for shortening certificate (cert) lifetimes; the first phase will reduce public certs to 200-day durations this coming March 15, 2026, is simply to lessen the exposure window should the cert be compromised and mis-used by an adversary. Certificates, and their corresponding private keys, can be manually maintained using human-touch. The BIG-IP TMUI interface has a click-ops path for tying certificates and keys to SSL profiles, for virtual servers that project HTTPS web sites and services to consumers. However, this requires something valuable, head count, and diligence to ensure a certificate is refreshed, perhaps through an enterprise CA solution like Microsoft Certificate Authority. It is critical this is done, always and without fail, well in advance of expiry. An automated solution that can take a “set it and forget it” approach to maintain both initial certificate deployment and the critical task of timely renewals is now more beneficial than ever. Lab Testing to Validate BIG-IP with CyberArk Trusted Protection Platform (TPP) A test bed was created that involved, at first, a BIG-IP in front of an HTTP/HTTPS server fleet, a Windows 2019 domain controller and a Windows 10 client to test BIG-IP virtual servers with. Microsoft Certificate Authority was installed on the server to allow for the issuance of enterprise certs for any of the HTTPS virtual servers created on the BIG-IP. Here is the lab layout, where virtual machines were leveraged to create the elements, including BIG-IP virtual edition (VE). The lab is straight forward; upon the Windows 2019 domain controller the Microsoft Certificate Authority component was installed. Microsoft SQL server 2019 was also installed, along with SQL Management Studio. In an enterprise production environment, these components would likely never share the domain controller host platform but are fine for this lab setup. Without an offering to shield the complexity and various manual processes of key and cert management, an operator will need to be well-versed with an enterprise CA solution like Microsoft’s. A typical launching sequence from Server Manager is shown below, with the sample lab CA and a representative list of issued certificates with various end dates. Unequipped with a solution like that from CyberArk, a typical workflow might be to install the web interface, in addition to the Microsoft CA and generate web server certificates for each virtual server (also frequently called “each application”) configured on the BIG-IP. A frequent approach is to create a unique web server template in Microsoft CA, with all certificates generated manually following the fixed, user specified certificate lifetime. As seen below, we are not installing anything but the core server role of Certificate Authority, the web interface for requesting certificates is not required and is not installed as a role. CyberArk Certificate Manager, Self-Hosted – Three High-Value Use Cases The self-hosted certificate and key management solution from CyberArk is a mature, tested offering having gained a significant user base and still may be known by previous names such as Venafi TLS Protect, or Venafi Trust Protection Platform (TPP). CyberArk acquired Venafi in 2024. Three objectives were sought in the course of the succinct proof-of-concept lab exercise that represented expected use cases: 1. Discover all existing BIG-IP virtual server TLS certificates 2. Renew certificates and change self-signed instances to enterprise PKI-issued certificates 3. Create completely new certificates and private keys and assign to BIG-IP new virtual servers The following diagram reflects the addition of CyberArk Certificate Manager, or Venafi TPP if you have long-term experience with the solution, to the Windows Server 2019 instance. Use Case One – Discover all BIG-IP Existing Certificates Already Deployed In our lab solution, to re-iterate the pivotal role of CyberArk Certificate Manager (Venafi TPP) in certificate issuance, we have created a “PolicyTree” policy called “TestingCertificates”. This will be where we will discover all of our BIG-IP virtual servers and their corresponding SSL Client and SSL server profiles. An SSL Client profile, for example, dictates how TLS will behave when a client first attempts a secure connection, including the certificate, potentially a certificate chain if signage was performed with an intermediate CA, and protocol specific features like support for TLS 1.3 and PQC NIST FIPS 203 support. Here are the original contents of the TestingCertificates folder, before running an updated discovery, notice how both F5 virtual servers (VS) are listed and the certificates used by a given VS. This is an example of the traditional CyberArk GUI look and feel. A simple workflow exists within the CyberArk platform to visually set up a virtual server and certificate discovery job, it can be run manually once, when needed, or set to operate on a regular schedule. This screenshot shows the fields required for the discovery job, and also provides an example of the evolved, streamlined approach to the user interface, referred to as the newer “Aperture” style view. Besides the enormous time savings of the first-time discovery of BIG-IP virtual servers, and certificates and keys they use in the form of SSL profiles, we can also look for new applications stood up on the BIG-IP through on-going CyberArk discovery runs. In the above example, we see a new web service implemented at the FQDN of www.twotitans.com has just been discovered. Clicking the certificate, one thing to note is the certificate is self-signed. In real enterprise environments, there may be a need to re-issue such a certificate with the enterprise CA, as part of a solid security posture. Another, even more impactful use case is when all enterprise certificates need to be easily and quickly switched from a legacy CA to a new CA the enterprise wants to move to quickly and painlessly. We see with one click on a certificate discovered that some key information is imparted. On this one screen, an operator might note that this particular certificate may warrant some improvements. It is seen that only 2048 bits are used in the certificate; the key is not making use of advanced storage and on, such as a NetHSM, and the certificate itself has not been built to support revocation mechanisms such as Content Revocation Lists (CRLs) or Online Certificate Status Protocol (OCSP). Use Case Two - Renew Certificates and Change Self-signed Instance to Enterprise PKI-Issued Certificates The automated approach of a solution like CyberArk’s likely means manual interactive certificate renewal is not going to be prevalent. However, for the purpose of our demonstration, we can examine a current certificate, alive and active on a BIG-IP supporting the application, s3.example.com. This is the “before” situation (double-click image for higher resolution). The result upon clicking the “Renew Now” button is a new policy-specific updated 12-month lifetime will be applied to a newly minted certificate. As seen in the following diagram, the certificate and its corresponding private key are automatically installed on the SSL Client Profile on the BIG-IP that houses the certificate. The s3.example.com application seamlessly continues to operate, albeit with a refreshed certificate. A tactical usage of this automatic certificate renewal and touchless installation is grabbing any virtual servers running with self-signed certificates and updating these certificates to be signed by the enterprise PKI CA or intermediate CA. Another toolkit feature now available is to switch out the entire enterprise PKI from one CA to another CA, quickly. In our lab setup, we have a Microsoft CA configured; it is named “vlab-SERVERDC1-ca”. The following certificate, ingested through discovery by CyberArk from the BIG-IP, is self-signed. Such certificates can be created directly within the BIG-IP TMUI GUI, although frequently they are quickly generated with the OpenSSL utility. Being self-signed, traffic through into this virtual will typically cause browser security risk pop-ups. They may be clicked through by users in many cases, or the certificate may even be downloaded from the browser and installed in the client’s certificate store to get around a perceived annoyance. This, however, can be troublesome in more locked-down enterprise environments where an Active Directory group policy object (GPO) can be pushed to domain clients, precluding any self-signed certificates being resolved with a few clicks around a pop-up. It is more secure and more robust to have authorized web services, vetted, and then incorporated into the enterprise PKI environment. This is the net result of using CyberArk Certificate Manager, coupled with something like the Microsoft enterprise CA, to re-issue the certificate (double-click). Use Case Three - Create Completely New Certificates and Private Keys and Assign to BIG-IP New Virtual Servers Through the CyberArk GUI, the workflows to create new certificates are intuitive. Per the following image, right-click on a policy and follow the “+Add” menu. We will add a server certificate and store it on the BIG-IP certificate and key list for future usage. A basic set of steps that were followed: Through the BIG-IP GUI, setup the application on the BIG-IP as per a normal configuration, including the origin pool, the client SSL profile, and a virtual server on port 443 that ties these elements together. Create, on CyberArk, the server certificate with the details congruent with the virtual server, such as common name, subject alternate name list, key length desired. On CyberArk, create a virtual server entry that binds the certificate just created to the values defined on the BIG-IP. The last step will look like this. Once the certificate is selected for “Renewal” the necessary elements will automatically be downloaded to the BIG-IP. As seen, the client’s SSL profile has now been updated with the new certificate and key signed by the enterprise CA. Summary This article demonstrated an approach to TLS certificate and key management for applications of all types, which harnesses the F5 BIG-IP for both secure and scalable delivery. With the rise in the number of applications that require TLS security, including advanced features enabled by BIG-IP, like TLS1.3 and PQC, coupled with the industry’s movement towards very short certificate lifecycle, the automation discussed will become indispensable to many organizations. The ability to both discover existing applications, switch out entire enterprise PKI offerings smoothly, and to agilely create new BIG-IP centered applications was touched upon.708Views4likes0CommentsHow I did it - "F5 BIG-IP Observability with Dynatrace and F5 Telemetry Streaming"
Welcome back to another edition of “How I Did It.” It’s been a while since we looked at observability… Oh wait, I just said that. Anyway, in this post I’ll walk through how I integrated F5 Telemetry Streaming with Dynatrace. To show the results, I’ve included sample dashboards that highlight how the ingested telemetry data can be visualized effectively. Let’s dive in before I repeat myself again.1.4KViews4likes0CommentsF5 Distributed Cloud Customer Edge Sites: Deploy rapidly and easily to most platforms and providers
Businesses need secure, reliable, and scalable infrastructure to manage their network edge effectively. Secure Mesh Site v2 (SMSv2) on F5 Distributed Cloud brings a robust, next-generation approach to deploying Customer Edge (CE) devices, enabling organizations to streamline operations, boost resilience, and ensure secure communications across distributed environments. Using SMSv2 to deploy CE’s at edge locations in hybrid and multicloud environments significantly reduces the number of clicks and the time it takes to get new sites online. Distributed Cloud supports the following on-prem hypervisors, virtualized platforms, and public cloud providers for rapidly deploying CE images: VMWare, AWS, Azure, GCP, OCI, Nutanix, OpenStack, Equinix, Baremetal, KVM, and OpenShift Virtualization To use SMSv2 you’ll need to have the Distributed Cloud service and an account. In the Distributed Cloud Console, navigate to the Multi-Cloud Network Connect workspace, then go to Site Management > Secure Mesh Sites v2. Now Add Secure Mesh Site, give the site a name and choose your provider. All remaining options can be used as-is with the default values, and can be changed as needed to meet your organization’s networking and business requirements. Demo The following video overview shows how to use Distributed Cloud to deploy CE's on VMware, RedHat OpenShift Virtualization, and Nutanix, using the new SMSv2 capability. Comprehensive Resources and Guides For a deeper dive, comprehensive guides and materials are available at F5 DevCentral. These resources provide step-by-step instructions and best practices for deploying and managing app delivery and security in hybrid environments. The following guides provide step-by-step details for using SMSv2 to deploy CE’s. VMware Setup Example #1:https://github.com/f5devcentral/f5-xc-terraform-examples/tree/main/workflow-guides/smcn/application-dmz#12-create-secure-mesh-site-in-distributed-cloud-services Setup Example #2: https://github.com/f5devcentral/f5-xc-terraform-examples/blob/main/workflow-guides/application-delivery-security/workload/workload-deployments-on-vmware.rst Nutanix https://github.com/f5devcentral/f5-xc-terraform-examples/blob/main/workflow-guides/smsv2-ce/Secure_Mesh_Site_v2_in_Nutanix/secure_mesh_site_v2_in_nutanix.rst OpenShift Virtualization https://github.com/f5devcentral/f5-xc-terraform-examples/blob/main/workflow-guides/application-delivery-security/workload/workload-deployments-on-ocp.rst Azure https://github.com/f5devcentral/f5-xc-terraform-examples/blob/main/workflow-guides/application-delivery-security/workload/workload-deployments-on-azure.rst Looking at the larger picture, using Distributed Cloud to expand or migrate apps across platforms has never been easier. The following technical articles illustrate how Distributed Cloud can leverage multiple platforms and providers to expand and migrate applications hosted in many locations and on a mix of platforms. Distributed Cloud for App Delivery & Security for Hybrid Environments App Migration across Heterogeneous Environments using F5 Distributed Cloud Conclusion By leveraging SMSv2, businesses can enjoy enhanced network scalability, minimized downtime through intelligent failover, and advanced security protocols designed to protect critical data in transit. Whether deploying in multi-cloud, hybrid, or edge-driven architectures, SMSv2 delivers the adaptability, performance, and security necessary to meet the demands of today’s digital-first enterprises. 378Views3likes0Comments
What’s New in F5 BIG-IQ v8.4.2?
Introduction F5 BIG-IQ Centralized Management, a key component of the F5 Application Delivery and Security Platform (ADSP), helps teams maintain order and streamline administration of BIG-IP app delivery and security services. In this article, I’ll highlight some of the key features, enhancements, and use cases introduced in the BIG-IQ v8.4.2 release and cover the value of these updates. Effective management of this complex application landscape requires a single point of control that combines visibility, simplified management and automation tools. Demo Video New Features in BIG-IQ 8.4.2 Support for Red Hat OpenShift BIG-IQ v8.4.2 provides full support and validation for standalone deployments in Red Hat Open Shift (please note that HA deployments are not yet supported). Red Hat OpenShift virtualization is a popular, flexible, and lower-cost alternative to VMware virtual machines. This KVM-based virtualization platform ensures easy, simple migration of application workloads and deployments and works seamlessly with BIG-IP and BIG-IQ 8.4.2+. The qcow2 image available for download from F5.com is now supported on Red Hat OpenShift: Sample yaml file: New Third-Party CA Management: CyberArk BIG-IQ v8.4.2 has been updated to support CyberArk Certificate Manager for 3 rd -Party CA Management. CyberArk, now the parent company for the Venafi TLS Protect certificate management product, offers a cloud/SaaS version of Venafi (rather than deployable software). This new product form factor is fully supported in BIG-IQ, making it easy and more flexible to assign, manage, and renew device certificates as part of your BIG-IP management workflows. AFM Policy Deployment Control BIG-IQ v8.4.2 introduces per-device AFM Deployment Controls. Only devices with AFM discovered and enabled for Policy Deployment can have policies deployed. This allows you to disable Policy Deployment to specific devices or device groups/clusters without needing to remove AFM Services. For devices imported with the AFM module selected, this enhancement introduces a toggle button labeled Disable Firewall Policy Deployment. If the AFM module is not discovered, the Properties Tab will not display this toggle, as firewall deployment is inherently disabled for such devices. This enhancement helps the team more granularly deploy and manage network firewalls via the user interface or API. Additionally, per-device AFM management helps teams maintain consistency for device clusters by applying changes to all devices or single instances. This enhancement also adheres to any roles or user policies, helping ensure enforcement of RBAC—only admins can make changes to AFM policies while other roles are read-only. In short, this new feature enables teams to build consistent and resilient AFM policies and deployments—even during device re-import and re-discovery. Support for F5 BIG-IP v21.1 BIG-IQ v8.4.2 has been updated for interoperability with BIG-IP up to v21.1, including full support for SSL Orchestrator v14. With this interoperability, teams can: Manage the latest versions of BIG-IP (17.5.X and 21.1) including both device/instance management as well as services running on these instances Configure and deploy BIG-IP devices and services in a repeatable and consistent manner at enterprise scale Provision, license, configure, and deploy the latest BIG-IP VEs, HW instances (including VELOS and rSeries), and the app services running on them Effectively troubleshoot issues with infrastructure, policies, configurations, app services, or apps themselves Updated TMOS Layer In the v8.4.2 release, BIG-IQ's underlying TMOS version has been upgraded to v17.5.1.4, which will enhance the control plane performance, improve security efficacy, and enable better resilience of the BIG-IQ solution. Upgrading to v8.4.2 You can upgrade from BIG-IQ v8.X to BIG-IQ v8.4.2. BIG-IQ Centralized Management Compatibility Matrix Refer to Knowledge Article K34133507 BIG-IQ Virtual Edition supported platforms BIG-IQ Virtual Edition Supported Platforms provides a matrix describing the compatibility between the BIG-IQ VE versions and the supported hypervisors and platforms. Conclusion Effective management—orchestration, visibility, and compliance—relies on consistent app services and security policies across on-premises and cloud deployments. Easily control all your BIG-IP devices and services with a single, unified management platform, F5® BIG-IQ®. F5® BIG-IQ® Centralized Management reduces complexity and administrative burden by providing a single platform to create, configure, provision, deploy, upgrade, and manage F5® BIG-IP® security and application delivery services. Related Content F5 BIG-IQ Centralized Management Boosting BIG-IP AFM Efficiency with BIG-IQ: Technical Use Cases and Integration Guide Five Key Benefits of Centralized Management What’s New in BIG-IQ v8.4.1?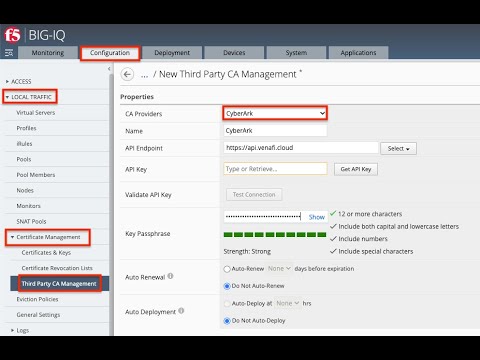 137Views2likes0Comments
Design for resiliency and protect against cloud outages with F5 DNS and application monitoring
How to reduce DNS recovery time and know when a provider, region, or control plane is having a bad day. Why DNS resiliency matters Major outages happen more often than many architectures assume. The most painful part is frequently not the incident itself, but the operational loss of control that comes from tightly coupling critical functions (like DNS) to a single platform or provider. When that platform is impaired, workarounds become limited and recovery slows. Design principle: fail safely and recover fast A useful way to frame resiliency is failures will occur, so the architecture should prioritize rapid, low-risk recovery. That typically means eliminating single points of dependency, automating failover where practical, and ensuring you can change traffic direction even when one control plane is degraded. The DNS failure mode: what breaks and how long it takes When authoritative DNS is hosted with a single vendor, a DNS incident can translate into recovery times on the order of 30 minutes to 3 hours (depending on the failure domain, TTLs, and operational procedures). With an automated, multi-provider design, recovery can be reduced dramatically, down to ~60 seconds in some scenarios. Solution overview This article describes an end-to-end resiliency pattern that combines (1) multi-provider authoritative DNS, using F5 BIG-IP DNS (commonly deployed on-prem or in IaaS) with F5 Distributed Cloud DNS as an additional authoritative provider, and (2) application assurance via F5 Distributed Cloud Synthetic Monitoring. The DNS design helps keep applications reachable during cloud-service impairments or regional failures by enabling automated failover and preserving the ability to shift control when a dependency is degraded. Synthetic DNS/HTTP checks then continuously validate external reachability and performance, so you can detect issues early and triage faster when incidents occur. What you get from multi-provider authoritative DNS Higher availability: a second authoritative provider reduces the blast radius of a single-vendor outage. Lower query latency: globally distributed anycast networks can shorten resolver-to-authoritative RTT for many users. Built-in DDoS resistance: distributed networks can absorb and disperse volumetric attacks more effectively than a small on-prem footprint. Elastic capacity: the service can scale during traffic spikes without pre-provisioning appliances for peak usage. Better visibility: per-query metrics and synthetic checks help validate reachability from multiple regions. Example: improving availability and latency for Acme Bank Acme Bank, whose name has been changed for the purposes of this article, struggled with higher DNS latency and periodic downtime when their on-prem DNS appliances failed. They also had to plan for peak capacity in advance to handle traffic spikes, an approach that can be expensive and still leave gaps when demand exceeds forecasts. By adding Distributed Cloud DNS as an additional authoritative DNS provider alongside BIG-IP DNS, Acme Bank extended DNS serving closer to end users on a globally distributed network. This improved DNS availability and reduced query latency, while providing a platform that can scale to meet demand. Reference architecture (high-level) At a minimum, you are operating two authoritative DNS providers for the same zone: Primary authoritative: BIG-IP DNS serving the zone (often integrated with existing on-prem or cloud-adjacent infrastructure). Secondary/additional authoritative: Distributed Cloud DNS hosting the same zone data (via zone transfer and/or secondary zone configuration). Delegation: Your registrar/parent zone publishes NS records so recursive resolvers can reach either provider. Configuration walkthrough Step 1: Enable zone transfers from BIG-IP DNS Configure BIG-IP DNS to allow zone transfers (AXFR/IXFR) to the Distributed Cloud DNS name servers for the zones you want to protect. Validate transfers and ensure TSIG and IP-based allowlists (as applicable) are in place to prevent unauthorized replication. Step 2: Add the zone as secondary in Distributed Cloud DNS Add your domain as a secondary DNS zone in Distributed Cloud DNS and point it to BIG-IP DNS for transfers. Once the initial transfer completes, verify the zone is online and that records (including SOA/NS) match expectations. Use the console to inspect zone content and confirm refresh/retry timers align with your operational goals. Step 3: Update delegation at the registrar (planned cutover) Update the domain delegation at your DNS registrar/parent zone to publish the desired authoritative name servers (for example, shifting primary delegation from BIG-IP DNS to Distributed Cloud DNS, or publishing both sets depending on your strategy). Plan for propagation by lowering TTLs ahead of time when feasible, and document a rollback procedure (e.g., reverting NS to the previous set) before making changes. Monitoring and app assurance with synthetic checks Once secondary DNS is active, use DNS and HTTP synthetic monitoring from multiple geographies to validate end-to-end reachability. Track query success rate, response codes, and latency, and alert on anomalies that indicate partial outages (e.g., a single region failing, increased NXDOMAIN/SERVFAIL rates, or unexpected record changes). Application assurance (synthetic monitoring) Even with resilient DNS, application incidents still happen and the worst-case operational pattern is learning about them from users first. Synthetic monitoring helps you detect externally visible failures early (often before customer reports), so response starts with evidence rather than guesswork. F5 Distributed Cloud Synthetic Monitoring continuously simulates DNS lookups and HTTP requests to validate the external health and performance of your applications. Over time, you can establish a baseline for availability and latency, i.e., “what normal looks like,” which makes deviations easier to detect and triage. Global vantage points: run checks from multiple regions to avoid a single-location “false negative.” Multiple providers: compare results across providers to separate internet-path issues from app/origin issues. Actionable alerts: alert on latency spikes, elevated error rates (e.g., HTTP 5xx), and DNS resolution failures. Fast drill-down: pivot from an alert to region-level breakdowns, timelines, and event tables to isolate where the failure is occurring. Example triage workflow: an alert flags a critical payroll application. In the console, you can correlate a single-region degradation (for example, West US) with a sharp increase in HTTP latency and a burst of HTTP 500 responses. A regional timing breakdown can further indicate whether time is being spent in network connect, TLS negotiation, or server processing, helping you route the incident to the correct owning team (e.g., origin/app servers for that region) without hours of cross-team war-room triage. The practical outcome is reduced mean time to detect (MTTD) and faster “mean time to innocence” by quickly narrowing down which component is failing and which team should engage. Video Demonstration The following video reviews each of the challenges described in this article and how F5 solves this by providing cloud resiliency with DNS services and app assurance with synthetic monitoring. Conclusion DNS is a critical dependency, and a common amplification point during outages, so a multi-provider authoritative DNS design (BIG-IP DNS plus Distributed Cloud DNS) helps preserve reachability and control when a vendor, region, or control plane is degraded. But resiliency is strongest when DNS failover is paired with application assurance: synthetic DNS/HTTP checks provide early, external detection and rapid triage signals that shorten both MTTD and time to mitigation. Together, DNS resiliency with app assurance form an end-to-end resiliency solution, keeping users routed to healthy endpoints while simultaneously proving what is (and isn’t) failing, so teams can respond faster with less guesswork. Next, validate your zone-transfer security model, define failover/runbook procedures, instrument synthetic checks and alert thresholds, and test delegation changes in a lower environment before production cutover. Additional Resources F5 DNS Products Distributed Cloud Synthetic Monitoring Related Technical Articles Accelerate Your Initiatives: Secure & Scale Hybrid Cloud Apps on F5 BIG-IP & Distributed Cloud DNS The Power of &: F5 Hybrid DNS solution Use F5 Distributed Cloud to control Primary and Secondary DNS Using F5 Distributed Cloud DNS Load Balancer health checks and DNS observability Demo Guide: F5 Distributed Cloud DNS (SaaS Console) 208Views2likes0Comments
A Guide to Cohesive and Purpose-Built Security
Have you ever been to a concert? Think of all the security involved just for somebody to sing you a few songs. You can’t just have one person at the entrance to check your ticket and that’s it. You need security personnel, bag checkers, security cameras, etc. You can’t use a bag checker to monitor security cameras. In the same way, you can’t use a WAF to prevent sophisticated bots. If a concert needs purpose-driven solutions for individual concerns, so does your company and its applications. Each attack vector requires a purpose-built solution- yet all these solutions need to work together in a cohesive manner. Customers commonly hear this and ask, is it really all vital? Do I need it all? Do these solutions work together? The answer is yes. It’s all vital in different ways, purpose-built problems require purpose-built solutions. L7 Web Application Firewall - WAF Many Web Application Firewalls (WAF) are focused on protecting against known L7 attacks that trigger various signatures to block malicious traffic, including things like the OWASP Top 10, Cross-Site Scripting, Malicious File Upload, etc. A WAF generally looks at malicious events occurring in the moment and blocks based on triggered signatures or detections. But to be more specific, a Layer 7 WAF scrutinizes all incoming web traffic, protecting your web application from malicious requests and ensuring that only legitimate traffic is allowed in. Bot Mitigation Now let’s look at bot mitigation as a strategy. A bot mitigation strategy needs to include a solution able to identify known bot networks while also providing strategies to accurately identify and prevent attackers with malicious intentions. Benign bots exist as well, but they include things like site crawlers or chatbots that people typically don’t care to protect against. Due to this, the bot mitigation strategy will not discuss these types of bots and instead focus on malicious bots. These types of attacks are incredibly difficult to detect since the attack is designed to interact with the application and emulate human behavior, utilizing automation to appear as though the application is being used as it is intended. Due to the nature of human-emulating and automated attacks, a purpose-built solution is necessary to analyze various pieces of telemetry to evaluate whether a user’s behavior is of human or automated origin. Examples of these malicious intentions include account takeovers, card cracking, or fraudulent purchases. These events can result in exposed PII, latency, and can cause your customers to lose faith in your company’s ability to handle their information. Having both a WAF and a bot mitigation strategy work well together because a WAF blocks attackers trying to break into your application, whereas a bot mitigation strategy focuses on the other side of that coin, attackers using your application as it’s intended but with malicious intentions. Behavioral Analysis Another solution that should be in every security stack is a behavioral analysis-based solution. What does it pair well with? WAF and a bot mitigation strategy. As previously mentioned, a WAF typically blocks based on signatures, whereas a bot mitigation strategy blocks people using your application as it’s intended, but with malicious intent. A solution that utilizes machine learning to perform behavioral analysis is doing something else entirely. It uses the aforementioned machine learning to look at a variety of vectors to generate a baseline of your traffic and identify outliers based on the keys that you specify. From there, it can block and recognize when something malicious appears outside of the baseline. Utilizing that baseline, the solution can also look at events over time and catch attackers that might stop for now but come back later. API Security Next up, securing your API (Application Programming Interface) endpoints. APIs make requests to your application for information. But what happens when that API endpoint is unsecured? What happens when it contains sensitive data? It results in things like stolen credentials, unauthorized access, and data leaks, among other things. (The OWASP API Top 10 references some areas of concern as well) APIs are accessing data in your application all day long; therefore, your APIs need to be known and secured. Some people like to think of API Protection and WAF as the same thing and only requiring one solution. Personally, I do not. A WAF is typically looking at signatures, and yes, some API traffic might match those signatures, but not always. What if you’re expecting a POST, but you instead see a GET? Is a WAF signature going to catch that? Not likely. But a purpose-built API Protection solution with schema enforcement can certainly aid in solving that problem. API Security and WAF go hand in hand because they solve for vulnerabilities in different yet similar attack vectors, but they’re not the same. Let’s recap. Do you need all the different security solutions? Can we create a cohesive picture of security? The answer is undoubtedly, yes. Let’s go back to our concert. Concert - Security Personnel Concert Security Personnel (Web Application Firewall): Throughout the venue, from the entrance to the concert floor, security personnel constantly watch the venue, keeping a lookout for disruptive behavior. If they spot something or someone that could disrupt the event, they step in to handle the situation. Think of a person walking in with a prohibited item like a weapon. We’d want to remove them because they had something matching the description of an item we do not allow at the concert. Similarly, a web application firewall (WAF) acts as security personnel for your web application, filtering out malicious traffic through the ability to look at a variety of signatures and ensuring nobody at the concert is matching those signatures and violations a WAF uses to mitigate threats. Concert - Entrance Security Entrance Security Personnel (Bot Mitigation Strategy): Concert security personnel are stationed at the entrance of the arena, checking everyone who comes in. They ensure that only the actual ticketed attendees are allowed inside. Bot mitigation works similarly by identifying application traffic with highly efficient signal sets, accurately thwarting automated threats, impersonations, account takeovers, and other automation-based threat vectors. Accurately blocking malicious automated traffic ensures only real users/humans get through. We only want to let ticketed people through the door. Concert - Initial Screening Initial Screening (Malicious User Mitigation): In many concerts today, pre-screening occurs where security scanners, bag checks, ID checks (depending on the venue) are performed. Those who are exhibiting non-compliance are turned away. This could even be screening for people who have had non-compliant behavior at prior concerts, letting the team know to keep an eye on them in case they might go back to their trouble causing ways. This way, if they cause problems for us later, we catch them quickly because we already know they could be troublemakers. Similarly, malicious user mitigation acts first. It involves monitoring your traffic and creating a baseline to identify and mitigate any users who exhibit malicious or suspicious behavior. This identification, driven by machine learning across various security signals, enforces a first-line defense strategy to block malicious activity. Concert - Access Control Access Control for Special Areas (API Security): There are other concert entrances where the band may enter or all the involved work to put on a concert flows through. These are further controlled and restricted areas within the venue such as backstage or the sound booths, that require special access passes. These passes are carefully controlled to ensure that only authorized personnel can enter these areas. API protection does the same thing for your web application’s interfaces, ensuring that only authorized systems and users can interact with your APIs, therefore protecting sensitive data and functionalities from unauthorized access. Just like you need all the security personnel at a concert to feel secure, you need it all to keep your applications secure. Summary Each solution in your security stack should have a specific purpose and protect all the portions of your application, hence requiring a purpose-built solution for each. Without these protections, you’re leaving yourself vulnerable. In creating such a stack, a robust defense is created that covers a variety of attack vectors, such as preventing malicious access, managing automated threats, mitigating harmful behavior, and protecting sensitive data. F5 Distributed Cloud brings all the tools into focus in a single interface, giving you the ability to secure your applications, including the most critical ones, efficiently and effectively. Here are a few quick points about what F5 offers to help provide the aforementioned: comprehensive security stack. F5 Distributed Cloud WAAP (Web App and API Protection) F5 addresses the WAF and API Protection under one title, but they are different solutions. Our F5 Distributed Cloud WAF has over 8,000 robust signatures that have been built up over the last 20 years. It is also incredibly easy to implement and opt-out-based to make that easy implementation even easier. Regarding the F5 Distributed Cloud API Protection portion, our API protection sits in line to perform both discovery and protection, in a single dashboard that provides per-endpoint rate limiting and protections alongside incredible visibility. F5 Distributed Cloud Bot Defense F5 addresses having a bot mitigation strategy through 4 different tiers of bot defense, one of which is included in the WAF that has over 8,000 robust signatures. The other tiers use a variety of signals, including environmental signals, behavioral signals, and network signals. The F5 Distributed Cloud Bot Defense aids in protecting your environment from automated threats that bots may cause. Protecting your application, and your customers’ information. F5 Malicious User Detection and Mitigation On the F5 platform, we can provide a machine-learning-based solution that generates a baseline of your traffic and based on a user identifier you specify, you’re able to see what a user comes outside of that baseline and maybe isn’t who they say they are. F5 Distributed Cloud brings all these tools into focus in a single SaaS-driven Console, giving you the ability to secure your applications, including the most critical ones (yes even AI apps!), efficiently and effectively.188Views2likes0Comments


