management
1094 TopicsF5 BIG-IP eBPF Observability (EOB) Deployment walkthrough
Introduction F5 BIG-IP eBPF Observability (EOB) gives you kernel-level visibility into your Kubernetes cluster without modifying a single workload. It's certified on Red Hat OpenShift, deployable on vanilla Kubernetes via Helm, and streams rich telemetry to NATS, Kafka, Splunk, or any open message bus your team already uses. This article covers a Day 1 BIG-IP EOB deployment from prerequisites to first telemetry: Image credentials, Helm chart configuration, DaemonSet verification, and a sanity check that data is flowing. The focus is getting something working and understood. Installing the Tawon operator from OperatorHub Using OpenShift OperatorHub, a built-in catalog of operators that you install with a few clicks, so you don't need to fetch any manifests by hand. Step 1: Open OperatorHub In the OpenShift web console, Expand Operators in the sidebar and click OperatorHub. The OperatorHub page shows every operator available to your cluster, broken down by category along the left (AI/Machine Learning, Big Data, Networking, etc.). In the Filter by keyword search box at the top of the catalog, type: Tawon If your cluster has previously installed the operator, you will see an Installed check-mark on the tile (as shown in the screenshot below). Step 2: Install the operator Click the Tawon tile. A side panel slides in with details: provider, version, channels, capability level, supported install modes, and the source CatalogSource. Click Install at the top of the panel. The Install Operator form opens. For a beginner, the defaults are correct, but here is what each field means and what you should pick: Field Recommended value Why Update channel fast-v2 The current GA channel for Tawon v2.x. Each major Tawon version has its own channel; fast-v2 tracks the latest 2.x release. Installation mode All namespaces on the cluster (default) Tawon's ClusterDirective is cluster-scoped, and Directive can be deployed in any namespace. Installing cluster-wide is the only mode that makes both flavors usable. Installed Namespace default (or tawon-operator if your cluster's docs say so) Where the operator pod itself runs. The cluster used in this guide installs into default. Update approval Automatic New patch versions install themselves. Pick Manual only if you have a change-control policy that requires an admin to approve every upgrade. Click Install at the bottom of the form. OpenShift creates a Subscription, an InstallPlan, and (once the plan completes) a ClusterServiceVersion (CSV). The whole process usually finishes in 30–60 seconds. Step 3: What got installed The operator install registers six custom resource definitions (CRDs) under the API group tawon.mantisnet.com: CRD What it represents streamstores The NATS JetStream backend that stores captured data streams Individual message buffers inside a StreamStore directives Namespaced capture work orders clusterdirectives Cluster-scoped capture work orders topologyaggregators Builds service maps from Streams dashboards The user-facing web UI How the CRDs work in order, Step 4: Deploying the dashboard Before deploying anything new, make sure the Tawon operator is actually running. You should see something like: oc get csv -n default | grep tawon tawon-operator.v2.40.0 Tawon 2.40.0 Succeeded oc get pods -A | grep tawon-operator-eob-controller-manager Expect 2/2 Running. If it shows 0/2 or CrashLoopBackOff, restart it with oc delete pod -n default <pod-name> and wait 30 seconds. Step 5: Create your first Dashboard The Tawon operator watches for a custom resource called Dashboard. When you create one, the operator builds everything you need: a deployment, a service, an OAuth-protected route, and TLS certificates. You don't have to configure any of that yourself. The simplest possible Dashboard is a five-line manifest. Save this as my-first-dashboard.yaml: apiVersion: tawon.mantisnet.com/v1alpha1 kind: Dashboard metadata: name: tawon-dashboard namespace: tawon-operator spec: {} That empty spec: {} is intentional — every field is optional. The operator fills in safe defaults (image, ports, OAuth proxy, route hostname). Apply it: oc apply -f my-first-dashboard.yaml dashboard.tawon.mantisnet.com/tawon-dashboard created Alternative: create the Dashboard from the OpenShift web console You can do exactly the same thing from the OpenShift web console. The operator registers a tab in Installed Operators for every CRD it manages, including a Dashboard tab with a Create Dashboard button. Step by step: In the left sidebar (Administrator perspective), go to Operators → Installed Operators. At the top, set the Project dropdown to All Projects (or to tawon-operator if you prefer to filter). Click the Tawon entry (provided by Mantisnet, version 2.40.0). Across the top of the operator detail page you will see one tab per managed CRD: Details, YAML, Subscription, Events, All instances, Cluster Tawon Directive, Dashboard, Tawon Directive, Stream, Stream Store, Tawon Topology Aggregator. Click Dashboard. Otherwise, click Create Dashboard (top-right, blue button). The console offers two editors: Form view — a guided UI with sane defaults for every field. For a first dashboard, just set Name to tawon-dashboard and leave everything else alone. Click Create. YAML view — equivalent to applying the manifest from the previous section. Paste the five-line manifest from above and click Create. You will be redirected back to the Dashboards list. The new tawon-dashboard row should reach Condition: Ready within 20 seconds. Within about 20 seconds the operator creates four things. You can watch them appear: oc get dashboard,pod,svc,route -n tawon-operator -l app.kubernetes.io/instance=tawon-dashboard NAME READY dashboard.tawon.mantisnet.com/tawon-dashboard True NAME READY STATUS RESTARTS pod/tawon-dashboard-79cbd6df75-zvfb4 2/2 Running 0 NAME TYPE CLUSTER-IP PORT(S) service/tawon-dashboard ClusterIP 172.30.211.156 8888/TCP NAME HOST/PORT route.route.openshift.io/tawon-dashboard tawon.apps.<your-cluster-domain> Ask OpenShift for the public URL in one line: oc get route tawon-dashboard -n tawon-operator -o jsonpath='https://{.spec.host}{"\n"}' https://tawon.apps.ocp1.f5-udf.com That is the URL you give to your users. Note the https:// the route is configured with reencrypt TLS termination, so HTTP traffic is automatically redirected to HTTPS. Paste the URL into a browser. You will be redirected through a login flow: OpenShift login page — enter the same credentials you'd use for the OpenShift web console (kubeadmin, an IDP user, etc.). Authorization page — the first time each user logs in, OpenShift asks them to grant the dashboard permission to read their identity. Click Allow selected permissions. Tawon dashboard home page — you're in. That's it. No separate user database, no extra password, no API key. Anyone who can log in to your OpenShift cluster can be granted access to the dashboard. Our first Capture Let's try our first capture, naming it coredns apiVersion: tawon.mantisnet.com/v1alpha1 kind: ClusterDirective metadata: name: capture-coredns spec: condition: equal: field: process.name value: coredns streams: - name: coredns maxage: 6h0m0s maxmsgs: 1000 retentionPolicy: Delete tasks: - task: capture config: filter: port 53 - task: publish config: name: coredns type: stream From GUI, click Play icon Observe the capture in the dashboard Now switch over to the dashboard you deployed in Part 1 (https://tawon.apps.<your-cluster-domain>). The top navigation has three tabs: Directives, Cluster Directives, Streams. Click Streams. You should see one row for the coredns stream. Each piece of information on that row tells you something specific about the capture: Field Example value What it means LIVE badge (green) LIVE The Stream is currently Ready=True and actively accepting messages from a publisher. If it shows red or grey, the directive's publish task can't connect — go check the directive pod logs. Stream name coredns Matches spec.streams[*].name on your ClusterDirective. This is also what the dashboard uses to find the data. NS tawon-operator The namespace where the underlying JetStream stream actually lives (always the StreamStore's namespace, not the directive's). STORE tawon-streamstore Which StreamStore CR is backing this stream's persistence. Message count 1,000 msgs / MAX 1,000 How many captured events are buffered right now, and the ceiling from spec.streams[*].maxmsgs. When full, the oldest message is evicted (because retentionPolicy: Delete). Byte count 1.91 MB / MAX 1Gi Buffered byte size vs. the StreamStore's per-stream byte ceiling. Useful for sizing capacity. Rate over 30s ~2.6 msg/s Rolling average of incoming messages. This is your fastest "is it working?" check — if it drops to 0 while traffic should be flowing, the eBPF program stopped emitting. MAX AGE 6h Comes straight from spec.streams[*].maxage. Messages older than this are dropped regardless of count. Conclusion You now have a complete, working BIG-IP EOB observability stack on OpenShift. The Tawon operator is installed, a Dashboard is serving a live UI behind OpenShift OAuth, and a ClusterDirective is running eBPF probes on every node in your cluster, capturing DNS traffic, publishing it into a durable JetStream stream, and surfacing it in real time through the Stream Inspector. The CoreDNS example in this guide was intentionally simple: a single condition, two tasks, one stream. It also demonstrates the pattern that every more complex deployment follows. Every Directive you will ever write, regardless of target workload or capture depth, is the same four-part structure: A condition that selects events. A task pipeline that processes them A stream declaration that controls retention A lifecycle knob that keeps you in control. In our coming articles, we will go through more diverse integrations with different cloud-native solutions including BIG-IP Next for Kubernetes (BNK) and Cloud-Native Network Functions (CNFs)40Views1like0CommentsWhat’s New in F5 BIG-IQ v8.4.2?
Introduction F5 BIG-IQ Centralized Management, a key component of the F5 Application Delivery and Security Platform (ADSP), helps teams maintain order and streamline administration of BIG-IP app delivery and security services. In this article, I’ll highlight some of the key features, enhancements, and use cases introduced in the BIG-IQ v8.4.2 release and cover the value of these updates. Effective management of this complex application landscape requires a single point of control that combines visibility, simplified management and automation tools. Demo Video New Features in BIG-IQ 8.4.2 Support for Red Hat OpenShift BIG-IQ v8.4.2 provides full support and validation for standalone deployments in Red Hat Open Shift (please note that HA deployments are not yet supported). Red Hat OpenShift virtualization is a popular, flexible, and lower-cost alternative to VMware virtual machines. This KVM-based virtualization platform ensures easy, simple migration of application workloads and deployments and works seamlessly with BIG-IP and BIG-IQ 8.4.2+. The qcow2 image available for download from F5.com is now supported on Red Hat OpenShift: Sample yaml file: New Third-Party CA Management: CyberArk BIG-IQ v8.4.2 has been updated to support CyberArk Certificate Manager for 3 rd -Party CA Management. CyberArk, now the parent company for the Venafi TLS Protect certificate management product, offers a cloud/SaaS version of Venafi (rather than deployable software). This new product form factor is fully supported in BIG-IQ, making it easy and more flexible to assign, manage, and renew device certificates as part of your BIG-IP management workflows. AFM Policy Deployment Control BIG-IQ v8.4.2 introduces per-device AFM Deployment Controls. Only devices with AFM discovered and enabled for Policy Deployment can have policies deployed. This allows you to disable Policy Deployment to specific devices or device groups/clusters without needing to remove AFM Services. For devices imported with the AFM module selected, this enhancement introduces a toggle button labeled Disable Firewall Policy Deployment. If the AFM module is not discovered, the Properties Tab will not display this toggle, as firewall deployment is inherently disabled for such devices. This enhancement helps the team more granularly deploy and manage network firewalls via the user interface or API. Additionally, per-device AFM management helps teams maintain consistency for device clusters by applying changes to all devices or single instances. This enhancement also adheres to any roles or user policies, helping ensure enforcement of RBAC—only admins can make changes to AFM policies while other roles are read-only. In short, this new feature enables teams to build consistent and resilient AFM policies and deployments—even during device re-import and re-discovery. Support for F5 BIG-IP v21.1 BIG-IQ v8.4.2 has been updated for interoperability with BIG-IP up to v21.1, including full support for SSL Orchestrator v14. With this interoperability, teams can: Manage the latest versions of BIG-IP (17.5.X and 21.1) including both device/instance management as well as services running on these instances Configure and deploy BIG-IP devices and services in a repeatable and consistent manner at enterprise scale Provision, license, configure, and deploy the latest BIG-IP VEs, HW instances (including VELOS and rSeries), and the app services running on them Effectively troubleshoot issues with infrastructure, policies, configurations, app services, or apps themselves Updated TMOS Layer In the v8.4.2 release, BIG-IQ's underlying TMOS version has been upgraded to v17.5.1.4, which will enhance the control plane performance, improve security efficacy, and enable better resilience of the BIG-IQ solution. Upgrading to v8.4.2 You can upgrade from BIG-IQ v8.X to BIG-IQ v8.4.2. BIG-IQ Centralized Management Compatibility Matrix Refer to Knowledge Article K34133507 BIG-IQ Virtual Edition supported platforms BIG-IQ Virtual Edition Supported Platforms provides a matrix describing the compatibility between the BIG-IQ VE versions and the supported hypervisors and platforms. Conclusion Effective management—orchestration, visibility, and compliance—relies on consistent app services and security policies across on-premises and cloud deployments. Easily control all your BIG-IP devices and services with a single, unified management platform, F5® BIG-IQ®. F5® BIG-IQ® Centralized Management reduces complexity and administrative burden by providing a single platform to create, configure, provision, deploy, upgrade, and manage F5® BIG-IP® security and application delivery services. Related Content F5 BIG-IQ Centralized Management Boosting BIG-IP AFM Efficiency with BIG-IQ: Technical Use Cases and Integration Guide Five Key Benefits of Centralized Management What’s New in BIG-IQ v8.4.1?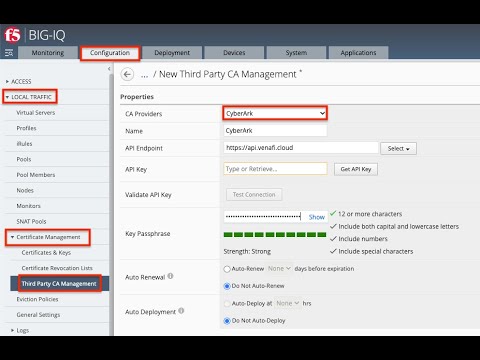 99Views1like0Comments
F5 BIG-IQ Centralized Management
Introduction A big part of effective application delivery and security is ensuring visibility and control of your hybrid and multicloud app and API deployments. F5 BIG-IQ Centralized Management—a key component of F5 Application Delivery and Security Platform (ADSP)—helps teams maintain order and streamline administration of BIG-IP app delivery and security services. Combining data-rich dashboards, intuitive configuration workflows, and powerful automation, BIG-IQ creates a single interface for holistic management of your BIG-IP investment. In this article, I’ll highlight some of the key features and use cases in F5 BIG-IQ Centralized Management. Effective management of this complex application landscape requires a single point of control that combines visibility, simplified management and automation tools. Demo Video What is BIG-IQ? F5 BIG-IQ Centralized Management reduces complexity and administrative burden by providing a single platform to create, configure, provision, deploy, upgrade, and manage F5 BIG-IP security and application delivery services. BIG-IQ supports BIG-IP end-to-end, including BIG-IP Virtual Edition (VE), F5 rSeries appliances, and F5 VELOS, managing policies, licenses, SSL certificates, images, and configurations for F5 appliances and modules. BIG-IQ saves you time and money by providing a single point of management for all your BIG-IP devices—whether they are on premises or in a public or private cloud. It can manage any physical or virtual BIG-IP device so long as it can establish layer 3 connectivity for management, either by GUI or through APIs. You can run BIG-IQ on AWS, Microsoft Azure, and most private cloud architectures. Why is BIG-IQ important? Effective management—orchestration, visibility, and compliance—relies on consistent app services and security policies across on-premises and cloud deployments. Easily control all your BIG-IP devices and services with a single, unified management platform. Core Capabilities of BIG-IQ: Application analytics Simplify troubleshooting and assess health and performance at a glance with big-picture and application-specific dashboards. Advanced application templates Powerful AS3 templates make it easy for app teams to spin-up applications with appropriate security and network services. Central policy management Ensure compliance and security with centrally managed configurations for devices and applications. Holistic security dashboard Reduce blind spots and mitigate risks with a birds-eye view of your security posture. End-to-end device lifecycle management Create, configure, deploy, upgrade, patch, certify, and manage up to 1000 BIG-IP devices from an intelligent, centralized platform. Cert-management Keep BIG-IP device certificates compliant and up to date via seamless integrations with popular third-party certificate management platforms. License management Automatically apply and remove licenses as you add or remove BIG-IP devices. Backup and restore Backup and restore images, software, and configuration files. Role-based access control Use standard roles or create custom ones to provide development teams with the tools they need to deliver applications. How does BIG-IQ work? BIG-IQ manages all your BIG-IP products regardless of how they are deployed. BIG-IQ also manages your F5 rSeries and VELOS appliances. It allows you to edit policies and quickly deploy it to one or more BIG-IPs. You can use it to back up and restore your BIG-IPs. You can use it to monitor the health of applications managed by BIG-IPs Add your BIG-IPs to BIG-IQ Use BIG-IQ to upgrade your BIG-IP software version. Schedule daily backups. Use BIG-IQ to upgrade your BIG-IQ software version. Conclusion Effective management—orchestration, visibility, and compliance—relies on consistent app services and security policies across on-premises and cloud deployments. Easily control all your BIG-IP devices and services with a single, unified management platform, F5 BIG-IQ. Related Content Five Key Benefits of Centralized Management F5 BIG-IQ Solution Overview Boosting BIG-IP AFM Efficiency with BIG-IQ: Technical Use Cases and Integration Guide F5 BIG-IQ What's New in v8.4.0? F5 BIG-IQ What's New in v8.4.1? 234Views1like1Comment
Single-click CDN Experience for F5 Distributed Cloud Load Balancers
Fundamentals The modern CDN has evolved well beyond cache and serve. Today’s platforms are intelligent edge fabrics that combine performance optimization, layered security, multicloud routing, and even workload execution at the edge. Few products embody this evolution more completely than F5 Distributed Cloud CDN, and this post explores both why CDNs matter and what sets F5’s newest approach apart. At its core, a CDN is a globally distributed system of edge servers, called PoPs or Regional Edges (RE), that cache content and handle user requests on behalf of the server origin. When a user requests a resource, DNS resolution routes them to the nearest PoP. If the resource is cached there (a “cache hit”), it’s returned immediately. If not (a “cache miss”), the PoP fetches it from the origin, stores it, and returns it to the user. The speed improvement isn’t just perceptual. Reduced Round-Trip Time (RTT) correlates directly with business outcomes. Every page load shaved makes a difference for search rankings, checkout completion, and ad viewability all improve with lower latency. CDNs don’t just make things faster; they make digital businesses more competitive. To put the difference in concrete terms, here’s how a typical 200KB page might deliver across different scenarios. Platform deep dive Traditional CDNs optimize for one thing: getting cached bytes to users fast. Distributed Cloud CDN starts there but doesn’t stop, it's engineered as a unified platform where content delivery, application security, multicloud connectivity, and edge compute converge under a single operational surface. F5’s approach is architecturally distinct Most CDNs are standalone services that organizations integrate with separate security tools, load balancers, and observability stacks. The operational overhead of stitching these together and keeping policies consistent across them is substantial. F5 takes a different approach: CDN is one capability within the broader Distributed Cloud Platform, meaning it inherits the platform’s DNS, load balancing, WAF, observability, and multicloud networking services. The practical result, noted by enterprise users, is that WAF rules, DDoS policies, and CDN configurations all live in the same console. There’s no context switching between vendors, no policy drift between your security tool and your delivery tool, and no blind spots at the handoff between them. In the newest product update, anyone already using a Distributed Cloud Load Balancer can enable CDN acceleration with a single click: no rearchitecting, no new deployments. Built-in cacheability insights estimate performance improvement and cost savings before activation, so teams can make informed decisions without guesswork. Target use cases: Where F5 Distributed Cloud CDN fits best There are three primary use-case families for enabling an integrated CDN: Secure apps everywhere (WAAP + CDN): Organizations that need comprehensive web app and API protection with WAF, DDoS, bot defense, unified content delivery under a single policy plane and management console. Modern digital experiences: Dynamic, personalized applications spanning multiple public clouds, edge locations, and on-premises infrastructure that need consistent delivery regardless of where origin workloads live. Multicloud & edge initiatives: Enterprises migrating workloads across cloud providers or deploying edge compute who need a platform that bridges delivery, security, and service mesh without re-platforming for each environment. Visibility & Control: You can’t optimize what you can’t see F5’s Distributed Cloud Platform ships with unified observability that spans delivery performance and security posture. Real-time dashboards expose traffic patterns, cache efficiency metrics, origin health, and security event timelines, all from the same interface used to configure policies. Cache efficiency isn’t a static attribute either. Distributed Cloud CDN provides granular control over cache keys, TTL values, and path or header-based caching rules, enabling teams to optimize hit rates for specific content types and access patterns. Cacheability insights indicate which web apps are candidates for acceleration. For security operations, the edge generates rich telemetry: request rates, blocked attack types, geographic traffic distribution, and bot classification outcomes. This feeds into the same observability layer as performance data, giving teams a single pane of glass rather than separate dashboards for CDN and security. The recently announced F5 Insight capability extends this further, bringing OpenTelemetry-powered observability across BIG-IP, NGINX, and Distributed Cloud Services, consolidating performance and security intelligence across an organization’s entire F5 footprint into actionable, unified visibility. Demo Walkthrough Final thoughts A CDN is no longer an optimization. It’s table stakes for any organization serving digital experiences to a geographically distributed audience. The question isn’t whether to deploy one, but which platform best aligns with the complexity of your architecture and the ambition of your security posture. For organizations operating at the intersection of multicloud delivery, API-driven applications, and enterprise security requirements, Distributed Cloud CDN represents a compelling architectural choice: a platform that treats performance and security not as separate concerns to be stitched together, but as integrated properties of the same edge fabric. The bytes will always need to get from somewhere to your users. F5 makes that journey faster, safer, and smarter. Additional Resources Product information: https://www.f5.com/products/distributed-cloud-services/cdn Technical documentation: https://docs.cloud.f5.com/docs-v2/content-delivery-network/how-to/cdn-mgmt/conf-cache-lb Feature announcement blog: https://www.f5.com/company/blog/f5-distributed-cloud-cdn-faster-apps-one-click-enablement-lower-costs 244Views1like0Comments
Design for resiliency and protect against cloud outages with F5 DNS and application monitoring
How to reduce DNS recovery time and know when a provider, region, or control plane is having a bad day. Why DNS resiliency matters Major outages happen more often than many architectures assume. The most painful part is frequently not the incident itself, but the operational loss of control that comes from tightly coupling critical functions (like DNS) to a single platform or provider. When that platform is impaired, workarounds become limited and recovery slows. Design principle: fail safely and recover fast A useful way to frame resiliency is failures will occur, so the architecture should prioritize rapid, low-risk recovery. That typically means eliminating single points of dependency, automating failover where practical, and ensuring you can change traffic direction even when one control plane is degraded. The DNS failure mode: what breaks and how long it takes When authoritative DNS is hosted with a single vendor, a DNS incident can translate into recovery times on the order of 30 minutes to 3 hours (depending on the failure domain, TTLs, and operational procedures). With an automated, multi-provider design, recovery can be reduced dramatically, down to ~60 seconds in some scenarios. Solution overview This article describes an end-to-end resiliency pattern that combines (1) multi-provider authoritative DNS, using F5 BIG-IP DNS (commonly deployed on-prem or in IaaS) with F5 Distributed Cloud DNS as an additional authoritative provider, and (2) application assurance via F5 Distributed Cloud Synthetic Monitoring. The DNS design helps keep applications reachable during cloud-service impairments or regional failures by enabling automated failover and preserving the ability to shift control when a dependency is degraded. Synthetic DNS/HTTP checks then continuously validate external reachability and performance, so you can detect issues early and triage faster when incidents occur. What you get from multi-provider authoritative DNS Higher availability: a second authoritative provider reduces the blast radius of a single-vendor outage. Lower query latency: globally distributed anycast networks can shorten resolver-to-authoritative RTT for many users. Built-in DDoS resistance: distributed networks can absorb and disperse volumetric attacks more effectively than a small on-prem footprint. Elastic capacity: the service can scale during traffic spikes without pre-provisioning appliances for peak usage. Better visibility: per-query metrics and synthetic checks help validate reachability from multiple regions. Example: improving availability and latency for Acme Bank Acme Bank, whose name has been changed for the purposes of this article, struggled with higher DNS latency and periodic downtime when their on-prem DNS appliances failed. They also had to plan for peak capacity in advance to handle traffic spikes, an approach that can be expensive and still leave gaps when demand exceeds forecasts. By adding Distributed Cloud DNS as an additional authoritative DNS provider alongside BIG-IP DNS, Acme Bank extended DNS serving closer to end users on a globally distributed network. This improved DNS availability and reduced query latency, while providing a platform that can scale to meet demand. Reference architecture (high-level) At a minimum, you are operating two authoritative DNS providers for the same zone: Primary authoritative: BIG-IP DNS serving the zone (often integrated with existing on-prem or cloud-adjacent infrastructure). Secondary/additional authoritative: Distributed Cloud DNS hosting the same zone data (via zone transfer and/or secondary zone configuration). Delegation: Your registrar/parent zone publishes NS records so recursive resolvers can reach either provider. Configuration walkthrough Step 1: Enable zone transfers from BIG-IP DNS Configure BIG-IP DNS to allow zone transfers (AXFR/IXFR) to the Distributed Cloud DNS name servers for the zones you want to protect. Validate transfers and ensure TSIG and IP-based allowlists (as applicable) are in place to prevent unauthorized replication. Step 2: Add the zone as secondary in Distributed Cloud DNS Add your domain as a secondary DNS zone in Distributed Cloud DNS and point it to BIG-IP DNS for transfers. Once the initial transfer completes, verify the zone is online and that records (including SOA/NS) match expectations. Use the console to inspect zone content and confirm refresh/retry timers align with your operational goals. Step 3: Update delegation at the registrar (planned cutover) Update the domain delegation at your DNS registrar/parent zone to publish the desired authoritative name servers (for example, shifting primary delegation from BIG-IP DNS to Distributed Cloud DNS, or publishing both sets depending on your strategy). Plan for propagation by lowering TTLs ahead of time when feasible, and document a rollback procedure (e.g., reverting NS to the previous set) before making changes. Monitoring and app assurance with synthetic checks Once secondary DNS is active, use DNS and HTTP synthetic monitoring from multiple geographies to validate end-to-end reachability. Track query success rate, response codes, and latency, and alert on anomalies that indicate partial outages (e.g., a single region failing, increased NXDOMAIN/SERVFAIL rates, or unexpected record changes). Application assurance (synthetic monitoring) Even with resilient DNS, application incidents still happen and the worst-case operational pattern is learning about them from users first. Synthetic monitoring helps you detect externally visible failures early (often before customer reports), so response starts with evidence rather than guesswork. F5 Distributed Cloud Synthetic Monitoring continuously simulates DNS lookups and HTTP requests to validate the external health and performance of your applications. Over time, you can establish a baseline for availability and latency, i.e., “what normal looks like,” which makes deviations easier to detect and triage. Global vantage points: run checks from multiple regions to avoid a single-location “false negative.” Multiple providers: compare results across providers to separate internet-path issues from app/origin issues. Actionable alerts: alert on latency spikes, elevated error rates (e.g., HTTP 5xx), and DNS resolution failures. Fast drill-down: pivot from an alert to region-level breakdowns, timelines, and event tables to isolate where the failure is occurring. Example triage workflow: an alert flags a critical payroll application. In the console, you can correlate a single-region degradation (for example, West US) with a sharp increase in HTTP latency and a burst of HTTP 500 responses. A regional timing breakdown can further indicate whether time is being spent in network connect, TLS negotiation, or server processing, helping you route the incident to the correct owning team (e.g., origin/app servers for that region) without hours of cross-team war-room triage. The practical outcome is reduced mean time to detect (MTTD) and faster “mean time to innocence” by quickly narrowing down which component is failing and which team should engage. Video Demonstration The following video reviews each of the challenges described in this article and how F5 solves this by providing cloud resiliency with DNS services and app assurance with synthetic monitoring. Conclusion DNS is a critical dependency, and a common amplification point during outages, so a multi-provider authoritative DNS design (BIG-IP DNS plus Distributed Cloud DNS) helps preserve reachability and control when a vendor, region, or control plane is degraded. But resiliency is strongest when DNS failover is paired with application assurance: synthetic DNS/HTTP checks provide early, external detection and rapid triage signals that shorten both MTTD and time to mitigation. Together, DNS resiliency with app assurance form an end-to-end resiliency solution, keeping users routed to healthy endpoints while simultaneously proving what is (and isn’t) failing, so teams can respond faster with less guesswork. Next, validate your zone-transfer security model, define failover/runbook procedures, instrument synthetic checks and alert thresholds, and test delegation changes in a lower environment before production cutover. Additional Resources F5 DNS Products Distributed Cloud Synthetic Monitoring Related Technical Articles Accelerate Your Initiatives: Secure & Scale Hybrid Cloud Apps on F5 BIG-IP & Distributed Cloud DNS The Power of &: F5 Hybrid DNS solution Use F5 Distributed Cloud to control Primary and Secondary DNS Using F5 Distributed Cloud DNS Load Balancer health checks and DNS observability Demo Guide: F5 Distributed Cloud DNS (SaaS Console) 193Views2likes0Comments
Integrating External Connectors in Distributed Cloud: IPSec, BGP, & Routing Policy with AWS & Cisco
Introduction As multi‑cloud architectures continue to grow, organizations increasingly need consistent, secure, and efficient connectivity between disparate environments. Linking private data centers, cloud VPC's, third‑party virtual routers, enterprise SD‑WAN domains and partner networks, hybrid connectivity must be reliable, automated, and operationally simple to manage. In this technical article, we’ll explore F5’s new external segment connector specifically designed for edge networks. We’ll focus on the setup process, connectivity testing, and explore the benefits of this solution with a robust example deployment. External Connectors bridge Customer Edge (CE) sites with third‑party edge devices such as Cisco CSR and 8000v routers, using standards‑based IPSec VPN and BGP. This simplifies multi‑cloud and hybrid routing in complex environments and can also be used to integrate enterprise SD‑WAN routing domains and to securely connect to partner networks. This article provides an overview of building IPSec and BGP connections between a F5 CE instance in AWS and a Cisco 8000v router to connect VPC A to VPC B without using VPC peering or a Transit Gateway (TGW). We’ll then share an example of applying BGP routing policy for inbound route control. Solution: External Connectors At a high level, the goal of the solution is to: Establish IPSec VPN between a F5 CE site and a Cisco 8000v router. Bring up BGP peering over the IPSec tunnel. Apply and validate routing policy for inbound route filtering. This example topology has a CE in AWS VPC A located on the right, with two interfaces: Site Local Outside (SLO) and Site Local Inside (SLI). There is a workload behind the CE for end-to-end connectivity tests. The third-party device is a Cisco 8000v router that lives on AWS in VPC B. This device also has two interfaces, and there is a virtual machine behind the Cisco router. To summarize, this includes: CE AWS Site in VPC A, with SLO and SLI interfaces and a workload behind it. Cisco 8000v router in VPC B, with GigabitEthernet1 and GigabitEthernet2, plus a VM behind it. Traffic between the two VPCs must traverse a public IP path due to the absence of VPC peering or a TGW with attachments. This solution uses a Streamlined IPSec Configuration, F5 CE’s support pre‑built IKEv2 Phase 1 and Phase 2 profiles, drastically reducing the setup time for standard IPSec tunnels. While administrators retain the freedom to define custom profiles, the default templates accelerate configuration and limit the risk of mismatch‑related failures. With Consistent Multi‑Cloud Routing running BGP directly over IPSec, the CE’s ensure dynamic routes exchange across hybrid environments, replacing static routing with scalable and distributed control. Enabling visibility with built-in troubleshooting, the following observability features accelerate change validation and incident resolution. CE’s support deep diagnostic tools and include the following: Tunnel and BGP status dashboards Node‑level status granularity CLI tools for BGP (show ip bgp, summaries, advertised routes) Route tables filtered by protocol source Real‑time tunnel throughput metrics Administrators can now enforce consistent inbound and outbound routing behavior across distributed sites. New BGP Routing Policies allow fine‑grained control including: IP Prefix‑lists, Community tags, AS‑path matching, and Actions including allow, deny, MED, local-preference, etc. Demo Highlights 1. Establish IPSec VPN Connectivity Utilize the pre-created default IKE Phase 1 and Phase 2 profiles for streamlined configuration. Both CE and Cisco configurations rely on correctly matching the following: IKEv2 Phase 1 settings IKEv2 Phase 2 transform sets Diffe‑Hellman groups Encryption algorithms (AES‑GCM‑256, AES‑GCM‑192, AES‑GCM‑128) Pre‑shared keys Local/Remote IKE IDs Tunnel source/destination IPs BGP peer addresses CE sites use the tunnel source interface (ens50 in the demo) and assign internal tunnel IPs (172.16.0.X/24). The remote gateway IP (44.212.3.180) represents the Cisco router’s public elastic IP. On the Cisco side, the tunnel interface uses the corresponding internal tunnel address and applies the IPSec profile. Correct IKE ID matching is critical, and with these elements aligned, Phase 1 and Phase 2 negotiations complete successfully. CE local ID = Cisco remote ID CE remote ID = Cisco local ID 2. BGP Configuration - routing policy use case A significant part of this solution is the use of a BGP routing policy for inbound filtering. With the ability to match specific prefixes and apply route filtering actions, this feature enables sophisticated traffic management strategies. Importantly, the demo illustrates the importance of having an allow rule to ensure desired prefixes remain accessible. Configuration on CE: Peer type: External Remote AS: 65001 Peer interface: External Connector IPv4 unicast enabled No authentication used in the demo Passive mode disabled (CE actively initiates sessions) Configuration on Cisco: router bgp 65001 Neighbor = CE tunnel IP IPv4 family activated A few sample networks advertised Once configured, the CE dashboard shows: Tunnel state: UP BGP state: Established Per‑node health status (important for multi‑node sites) Use the CE Site CLI commands show ip bgp neighbors and show ip bgp summary to confirm learned prefixes. 3. Routing Policy: Inbound Route Filtering Our solution implements the following simple inbound filter: First rule: Match exact prefix 10.222.120.0/24 Action: deny Second rule: Match any prefix (0.0.0.0/0 ge 0) Action: allow Rule ordering is critical: Deny‑then‑allow = correct Allow‑then‑deny = deny rule is shadowed After applying the policy to the BGP peer in the inbound direction, CE routing tables show only the permitted routes. If rule #2 is omitted, all routes disappear, an important operational lesson. Video Demonstration F5 ADSP Value Proposition: Delivering Intent‑Based Connectivity F5's Application Delivery and Security Platform (ADSP) stands out by combining quick deployment, high configurability, and robust security features. By leveraging external connectors, users experience enhanced network delivery and protection, ensuring their infrastructure efficiently supports dynamic business applications. In the context of hybrid-edge routing and IPSec/BGP integration, ADSP provides key delivery‑focused advantages. The platform's ability to integrate and manage traffic across complex network environments solidifies F5's role as a leader in secure cloud networking solutions. Key Takeaways 1. Consistent Application Delivery Across Hybrid Architectures ADSP abstracts underlying differences between environments—public cloud, private cloud, on‑prem networks—ensuring applications are reachable, secure, and responsive regardless of where components live. 2. Automated, Policy‑Driven Network Behavior With intent‑based configuration and centralized policy definition, delivery engineers can: Push consistent routing policies to multiple CE sites Automate IPSec and BGP deployment workflows Ensure predictable route propagation and traffic paths 3. High‑Performance, Distributed Data Plane By deploying CE nodes close to workloads and connecting them via the ADSP fabric, organizations achieve: Lower latencies Resilient multi‑node routing Efficient east–west and north–south traffic delivery 4. Integrated Observability for Delivery Teams ADSP offers operational visibility aligned with delivery outcomes: Tunnel throughput Per‑node health BGP routing changes Endpoint reachability This supports rapid validation and troubleshooting of app delivery pipelines. 5. Extensible Connectivity to Third‑Party Edges The External Connector capability extends ADSP’s delivery fabric to: Cisco routers Firewalls Non‑F5 VPN endpoints Carrier devices Third‑party cloud network appliances This ensures that app delivery services follow workloads—no matter where they move. Conclusion This solution illustrates how Distributed Cloud CE External Connectors streamline hybrid connectivity using industry‑standard IPSec and BGP, with the added power of intuitive configuration, deep visibility, and flexible routing policy. The same approach can be used in enterprise SD‑WAN integrations and for securely connecting to partner networks, with consistent routing policy and operational tooling across domains. By combining this capability with the broader F5 ADSP platform, organizations gain a consistent, automated, and delivery‑focused approach to connecting, securing, and scaling applications across distributed cloud architectures. Additional Resources Product information: https://f5.com/hybrid-multicloud-management Product documentation: https://docs.cloud.f5.com/docs-v2/multi-cloud-network-connect/how-tos/networking/external-connectors 114Views1like0Comments
F5 Insight for ADSP - A Closer Look
Introduction F5 Insight for ADSP, a key component of the F5 Application Delivery and Security Platform (ADSP), helps teams monitor and secure apps that are spread across hybrid, multi-cloud and AI environments. In this article, I’ll highlight some of the key features and use cases addressed by F5 Insight. Demo Video Demo Video: F5 Insight for ADSP - A Closer Look The F5 Insight Home Screen The F5 Insight Home Screen provides comprehensive monitoring for your F5 infrastructure, applications, and security posture. It features intelligent anomaly detection and performance optimization tools, giving administrators and users a centralized view of their BIG-IP fleet health and operational status. System Report Cards The System Report Cards display health indicators ranked Good, Warning, and Critical for the following: Anomaly Detection Monitors the connection count, pool availability, CPU utilization, and memory usage. Application Performance Monitors application-level health based on response time, 4xx, and 5xx error codes. Security Monitors the expiration of SSL/TLS certificates and BIG-IP WAF events. BIG-IP Metrics Monitors for BIG-IP health issues with device resources and operational status. Fleet Status Displays a summary of all BIG-IP devices and their operational status. The Fleet Status shows all the BIG-IP devices with a status of Up, Down or Degraded. Ask AI Assistant Allows you to type queries in plain English to retrieve device statistics, configuration information, security events, device health, application performance and much more. The AI Assistant connects to a configurable Large Language Model (LLM) backend. Supported providers include OpenAI, Anthropic, or a customer provided LLM. An example query: Have there been any outages in the past 24 hours for all devices in all data centers? The AI Assistant understands the question and has identified all the data centers. The AI Assistant then checks the device statistics for any outages or issues. The AI Assistant compiles a detailed summary report of the query. Configuration of Large Language Model (LLM) Large language model (LLM) Insights bring natural language intelligence to F5 Insight, enabling you to query your BIG-IP configurations and logs conversationally. Instead of manually searching through configurations or parsing log files, you can ask questions like “Why is pool member X marked down?” or “Show me all virtual IPs (VIPs) with SSL offloading enabled” and receive immediate, contextualized, clear answers. In the toolbar on the left under Manage, select LLM Insights. Select your LLM Provider Enter your API Token/Key Enter your Enterprise API URL Click Test Connection to verify it’s working Click Save Configuration when the connection is validated. Conclusion F5 Insight for ADSP offers customizable visualizations and dashboards to help you surface metrics and KPIs tailored to your organization. It provides access to useful telemetry data for a deeper understanding of your environment, application behaviors, and complex BIG-IP deployments, all centralized in a single location. Identification of root causes during outages/tickets. Solves issues and struggles with Day 2 analysis of your BIG-IP Fleet and the applications therein. Mitigates the problem of a lack of detailed visual information on your BIG-IP Fleet. Set a foundation for the utilization of open-source tools and their benefits. Related Content Introducing F5 Insight for ADSP F5 Insight for ADSP Documentation F5 Insight Product Page 561Views5likes0Comments
A Guide to Cohesive and Purpose-Built Security
Have you ever been to a concert? Think of all the security involved just for somebody to sing you a few songs. You can’t just have one person at the entrance to check your ticket and that’s it. You need security personnel, bag checkers, security cameras, etc. You can’t use a bag checker to monitor security cameras. In the same way, you can’t use a WAF to prevent sophisticated bots. If a concert needs purpose-driven solutions for individual concerns, so does your company and its applications. Each attack vector requires a purpose-built solution- yet all these solutions need to work together in a cohesive manner. Customers commonly hear this and ask, is it really all vital? Do I need it all? Do these solutions work together? The answer is yes. It’s all vital in different ways, purpose-built problems require purpose-built solutions. L7 Web Application Firewall - WAF Many Web Application Firewalls (WAF) are focused on protecting against known L7 attacks that trigger various signatures to block malicious traffic, including things like the OWASP Top 10, Cross-Site Scripting, Malicious File Upload, etc. A WAF generally looks at malicious events occurring in the moment and blocks based on triggered signatures or detections. But to be more specific, a Layer 7 WAF scrutinizes all incoming web traffic, protecting your web application from malicious requests and ensuring that only legitimate traffic is allowed in. Bot Mitigation Now let’s look at bot mitigation as a strategy. A bot mitigation strategy needs to include a solution able to identify known bot networks while also providing strategies to accurately identify and prevent attackers with malicious intentions. Benign bots exist as well, but they include things like site crawlers or chatbots that people typically don’t care to protect against. Due to this, the bot mitigation strategy will not discuss these types of bots and instead focus on malicious bots. These types of attacks are incredibly difficult to detect since the attack is designed to interact with the application and emulate human behavior, utilizing automation to appear as though the application is being used as it is intended. Due to the nature of human-emulating and automated attacks, a purpose-built solution is necessary to analyze various pieces of telemetry to evaluate whether a user’s behavior is of human or automated origin. Examples of these malicious intentions include account takeovers, card cracking, or fraudulent purchases. These events can result in exposed PII, latency, and can cause your customers to lose faith in your company’s ability to handle their information. Having both a WAF and a bot mitigation strategy work well together because a WAF blocks attackers trying to break into your application, whereas a bot mitigation strategy focuses on the other side of that coin, attackers using your application as it’s intended but with malicious intentions. Behavioral Analysis Another solution that should be in every security stack is a behavioral analysis-based solution. What does it pair well with? WAF and a bot mitigation strategy. As previously mentioned, a WAF typically blocks based on signatures, whereas a bot mitigation strategy blocks people using your application as it’s intended, but with malicious intent. A solution that utilizes machine learning to perform behavioral analysis is doing something else entirely. It uses the aforementioned machine learning to look at a variety of vectors to generate a baseline of your traffic and identify outliers based on the keys that you specify. From there, it can block and recognize when something malicious appears outside of the baseline. Utilizing that baseline, the solution can also look at events over time and catch attackers that might stop for now but come back later. API Security Next up, securing your API (Application Programming Interface) endpoints. APIs make requests to your application for information. But what happens when that API endpoint is unsecured? What happens when it contains sensitive data? It results in things like stolen credentials, unauthorized access, and data leaks, among other things. (The OWASP API Top 10 references some areas of concern as well) APIs are accessing data in your application all day long; therefore, your APIs need to be known and secured. Some people like to think of API Protection and WAF as the same thing and only requiring one solution. Personally, I do not. A WAF is typically looking at signatures, and yes, some API traffic might match those signatures, but not always. What if you’re expecting a POST, but you instead see a GET? Is a WAF signature going to catch that? Not likely. But a purpose-built API Protection solution with schema enforcement can certainly aid in solving that problem. API Security and WAF go hand in hand because they solve for vulnerabilities in different yet similar attack vectors, but they’re not the same. Let’s recap. Do you need all the different security solutions? Can we create a cohesive picture of security? The answer is undoubtedly, yes. Let’s go back to our concert. Concert - Security Personnel Concert Security Personnel (Web Application Firewall): Throughout the venue, from the entrance to the concert floor, security personnel constantly watch the venue, keeping a lookout for disruptive behavior. If they spot something or someone that could disrupt the event, they step in to handle the situation. Think of a person walking in with a prohibited item like a weapon. We’d want to remove them because they had something matching the description of an item we do not allow at the concert. Similarly, a web application firewall (WAF) acts as security personnel for your web application, filtering out malicious traffic through the ability to look at a variety of signatures and ensuring nobody at the concert is matching those signatures and violations a WAF uses to mitigate threats. Concert - Entrance Security Entrance Security Personnel (Bot Mitigation Strategy): Concert security personnel are stationed at the entrance of the arena, checking everyone who comes in. They ensure that only the actual ticketed attendees are allowed inside. Bot mitigation works similarly by identifying application traffic with highly efficient signal sets, accurately thwarting automated threats, impersonations, account takeovers, and other automation-based threat vectors. Accurately blocking malicious automated traffic ensures only real users/humans get through. We only want to let ticketed people through the door. Concert - Initial Screening Initial Screening (Malicious User Mitigation): In many concerts today, pre-screening occurs where security scanners, bag checks, ID checks (depending on the venue) are performed. Those who are exhibiting non-compliance are turned away. This could even be screening for people who have had non-compliant behavior at prior concerts, letting the team know to keep an eye on them in case they might go back to their trouble causing ways. This way, if they cause problems for us later, we catch them quickly because we already know they could be troublemakers. Similarly, malicious user mitigation acts first. It involves monitoring your traffic and creating a baseline to identify and mitigate any users who exhibit malicious or suspicious behavior. This identification, driven by machine learning across various security signals, enforces a first-line defense strategy to block malicious activity. Concert - Access Control Access Control for Special Areas (API Security): There are other concert entrances where the band may enter or all the involved work to put on a concert flows through. These are further controlled and restricted areas within the venue such as backstage or the sound booths, that require special access passes. These passes are carefully controlled to ensure that only authorized personnel can enter these areas. API protection does the same thing for your web application’s interfaces, ensuring that only authorized systems and users can interact with your APIs, therefore protecting sensitive data and functionalities from unauthorized access. Just like you need all the security personnel at a concert to feel secure, you need it all to keep your applications secure. Summary Each solution in your security stack should have a specific purpose and protect all the portions of your application, hence requiring a purpose-built solution for each. Without these protections, you’re leaving yourself vulnerable. In creating such a stack, a robust defense is created that covers a variety of attack vectors, such as preventing malicious access, managing automated threats, mitigating harmful behavior, and protecting sensitive data. F5 Distributed Cloud brings all the tools into focus in a single interface, giving you the ability to secure your applications, including the most critical ones, efficiently and effectively. Here are a few quick points about what F5 offers to help provide the aforementioned: comprehensive security stack. F5 Distributed Cloud WAAP (Web App and API Protection) F5 addresses the WAF and API Protection under one title, but they are different solutions. Our F5 Distributed Cloud WAF has over 8,000 robust signatures that have been built up over the last 20 years. It is also incredibly easy to implement and opt-out-based to make that easy implementation even easier. Regarding the F5 Distributed Cloud API Protection portion, our API protection sits in line to perform both discovery and protection, in a single dashboard that provides per-endpoint rate limiting and protections alongside incredible visibility. F5 Distributed Cloud Bot Defense F5 addresses having a bot mitigation strategy through 4 different tiers of bot defense, one of which is included in the WAF that has over 8,000 robust signatures. The other tiers use a variety of signals, including environmental signals, behavioral signals, and network signals. The F5 Distributed Cloud Bot Defense aids in protecting your environment from automated threats that bots may cause. Protecting your application, and your customers’ information. F5 Malicious User Detection and Mitigation On the F5 platform, we can provide a machine-learning-based solution that generates a baseline of your traffic and based on a user identifier you specify, you’re able to see what a user comes outside of that baseline and maybe isn’t who they say they are. F5 Distributed Cloud brings all these tools into focus in a single SaaS-driven Console, giving you the ability to secure your applications, including the most critical ones (yes even AI apps!), efficiently and effectively.172Views2likes0CommentsWhat’s New in BIG-IQ v8.4.1?
Introduction F5 BIG-IQ Centralized Management, a key component of the F5 Application Delivery and Security Platform (ADSP), helps teams maintain order and streamline administration of BIG-IP app delivery and security services. In this article, I’ll highlight some of the key features, enhancements, and use cases introduced in the BIG-IQ v8.4.1 release and cover the value of these updates. Effective management of this complex application landscape requires a single point of control that combines visibility, simplified management and automation tools. Demo Video New Features in BIG-IQ 8.4.1 Support for F5 BIG-IP v17.5.1.X and BIG-IP v21.0 BIG-IQ 8.4.1 provides full support for the latest versions of BIG-IP (BIG-IP 17.5.1.X and 21.0) ensuring seamless discovery and compatibility across all modules. Users who upgrade to BIG-IP 17.5.1.X+ or 21.0 retain the same functionality without disruptions, maintaining consistency in their management operations. As you look to upgrade BIG-IP instances to the latest versions, our recommendation is to use BIG-IQ. By leveraging the BIG-IQ device/software upgrade workflows, teams get a repeatable, standardized, and auditable process for upgrades in a single location. In addition to upgrades, BIG-IQ also enables teams to handle backups, licensing, and device certificate workflows in the same tool—creating a one-stop shop for BIG-IP device management. Note that BIG-IQ works with BIG-IP appliances and Virtual Editions (VEs). Updated TMOS Layer In the 8.4.1 release, BIG-IQ's underlying TMOS version has been upgraded to v17.5.1.2, which will enhance the control plane performance, improve security efficacy, and enable better resilience of the BIG-IQ solution. MCP Support BIG-IP v21.0 introduced MCP Profile support—enabling teams to support AI/LLM workloads with BIG-IP to drive better performance and security. Additionally, v21.0 also introduces support for S3-optimized profiles, enhancing the performance of data delivery for AI workloads. BIG-IQ 8.4.1 and its interoperability with v21.0 helps teams streamline and scale management of these BIG-IP instances—enabling them to support AI adoption plans and ensure fast and secure data delivery. Enhanced BIG-IP and F5OS Visibility and Management BIG-IQ 8.4.1 introduces the ability to provision, license, configure, deploy, and manage the latest BIG-IP devices and app services (v17.5.1.X and v21.0). In 8.4, BIG-IQ introduced new visibility fields—including model, serial numbers, count, slot tenancy, and SW version—to help teams effectively plan device strategy from a single source of truth. These enhancements also improved license visibility and management workflows, including exportable reports. BIG-IQ 8.4.1 continues to offer this enhanced visibility and management experience for the latest BIG-IP versions. Better Security Administration BIG-IQ 8.4.1 includes general support for SSL Orchestrator 13.0 to help teams manage encrypted traffic and potential threats. BIG-IQ includes dedicated dashboards and management workflows for SSL Orchestrator. In BIG-IQ 8.4, F5 introduced support and management for Venafi Trust Protection Platform v22.x-24.x, a leading platform for certificate management and certificate authority services. This integration enables teams to automate and centrally manage BIG-IP SSL device certificates and keys. BIG-IQ 8.4.1 continues this support. Finally, BIG-IQ 8.4.1 continues to align with AWS security protocols so customers can confidently partner with F5. In BIG-IQ 8.4, F5 introduced support for IMDSv2, which uses session-oriented authentication to access EC2 instance metadata, as opposed to the request/response method of IMDSv1. This session/token-based method is more secure as it reduces the likelihood of attackers successfully using application vulnerabilities to access instance metadata. Enhanced Automation Integration & Protocol Support BIG-IQ 8.4.1 continues with BIG-IQ's support for the latest version of AS3 and templates (v3.55+). By supporting the latest Automation Toolchain (AS3/DO) BIG-IQ is aligned with current BIG‑IP APIs and schemas, enabling reliable, repeatable app and device provisioning. It reduces deployment failures from version mismatches, improves security via updated components, and speeds operations through standardized, CI/CD-friendly automation at scale. BIG-IQ 8.4 (and 8.4.1) provides support for IPv6. IPv6 provides vastly more IP addresses, simpler routing, and end‑to‑end connectivity as IPv4 runs out. BIG‑IQ’s IPv6 profile support centralizes configuration, visibility, and policy management for IPv6 traffic across BIG‑IP devices—reducing errors and operational overhead while enabling consistent, secure IPv6 adoption. Upgrading to v8.4.1 You can upgrade from BIG-IQ 8.X to BIG-IQ 8.4.1. BIG-IQ Centralized Management Compatibility Matrix Refer to Knowledge Article K34133507 BIG-IQ Virtual Edition Supported Platforms BIG-IQ Virtual Edition Supported Platforms provides a matrix describing the compatibility between the BIG-IQ VE versions and the supported hypervisors and platforms. Conclusion Effective management—orchestration, visibility, and compliance—relies on consistent app services and security policies across on-premises and cloud deployments. Easily control all your BIG-IP devices and services with a single, unified management platform, F5® BIG-IQ®. F5® BIG-IQ® Centralized Management reduces complexity and administrative burden by providing a single platform to create, configure, provision, deploy, upgrade, and manage F5® BIG-IP® security and application delivery services. Related Content Boosting BIG-IP AFM Efficiency with BIG-IQ: Technical Use Cases and Integration Guide Five Key Benefits of Centralized Management F5 BIG-IQ What's New in v8.4.0? 549Views5likes0Comments
Fine-Tuning F5 NGINX WAF Policy with Policy Lifecycle Manager and Security Dashboard
Introduction Traditional WAF management often relies on manual, error-prone editing of JSON or configuration files, resulting in inconsistent security policies across distributed applications. F5 NGINX One Console and NGINX Instance Manager address this by providing intuitive Graphical User Interfaces (GUIs) that replace complex text editors with visual controls. This visual approach empowers SecOps teams to manage security at all three distinct levels precisely: Broad Protection: Rapidly enabling or disabling entire signature sets to cover fast but broad categories of attacks. Targeted Tuning: Fine-tuning security by enabling or disabling signatures for a specific attack type. Granular Control: Defining precise actions for specific user-defined URLs, cookies, or parameters, ensuring that security does not break legitimate application functionality. Centralized Policy Management (F5 NGINX One Console) This video illustrates the shift from manually managing isolated NGINX WAF configurations to a unified, automated approach. With NGINX One Console, you can establish a robust "Golden Policy" and enforce it consistently across development, staging, and production environments from a single SaaS interface. The platform simplifies complex security tasks through a visual JSON editor that makes advanced protection accessible to the entire team, not just deep experts. It also prioritizes operational safety; the "Diff View" allows you to validate changes against the active configuration side-by-side before going live. This enables a smooth workflow where policies are tested in "Transparent Mode" and seamlessly toggled to "Blocking Mode" once validated, ensuring security measures never slow down your release cycles. Operational Visibility & Tuning (F5 NGINX Instance Manager) This video highlights how NGINX Instance Manager transforms troubleshooting from a tedious log-hunting exercise into a rapid, visual investigation. When a user is blocked, support teams can simply paste a Support ID into the dashboard to instantly locate the exact log entry, eliminating the need to grep through text files on individual servers. The console’s new features allow for surgical precision rather than blunt force; instead of turning off entire security signatures, you can create granular exceptions for specific patterns—like a semicolon in a URL—while keeping the rest of your security wall intact. Combined with visual dashboards that track threat campaigns and signature status, this tool drastically reduces Mean-Time-To-Resolution (MTTR) and ensures security controls don’t degrade the application experience. Conclusion The F5 NGINX One Console and F5 NGINX Instance Manager go beyond simplifying workflows—they unlock the full potential of your security stack. With a clear, visual interface, they enable you to manage and resolve the entire range of WAF capabilities easily. These tools make advanced security manageable by allowing you to create and fine-tune policies with precision, whether adjusting broad signature sets or defining rules for specific URLs and parameters. By streamlining these tasks, they enable you to handle complex operations that were once roadblocks, providing a smooth, effective way to keep your applications secure. Resources Devcentral Article: https://community.f5.com/kb/technicalarticles/introducing-f5-waf-for-nginx-with-intuitive-gui-in-nginx-one-console-and-nginx-i/343836 NGINX One Documentation: https://docs.nginx.com/nginx-one-console/waf-integration/overview/ NGINX Instance Manager Documentation: https://docs.nginx.com/nginx-instance-manager/waf-integration/overview/220Views2likes0Comments

