Better together - F5 Container Ingress Services and NGINX Plus Ingress Controller Integration
Introduction The F5 Container Ingress Services (CIS) can be integrated with the NGINX Plus Ingress Controllers (NIC) within a Kubernetes (k8s) environment. The benefits are getting the best of both worlds, with the BIG-IP providing comprehensive L4 ~ L7 security services, while leveraging NGINX Plus as the de facto standard for micro services solution. This architecture is depicted below. The integration is made fluid via the CIS, a k8s pod that listens to events in the cluster and dynamically populates the BIG-IP pool pointing to the NIC's as they scale. There are a few components need to be stitched together to support this integration, each of which is discussed in detail over the proceeding sections. NGINX Plus Ingress Controller Follow this (https://docs.nginx.com/nginx-ingress-controller/installation/building-ingress-controller-image/) to build the NIC image. The NIC can be deployed using the Manifests either as a Daemon-Set or a Service. See this ( https://docs.nginx.com/nginx-ingress-controller/installation/installation-with-manifests/ ). A sample Deployment file deploying NIC as a Service is shown below, apiVersion: apps/v1 kind: Deployment metadata: name: nginx-ingress namespace: nginx-ingress spec: replicas: 3 selector: matchLabels: app: nginx-ingress template: metadata: labels: app: nginx-ingress #annotations: #prometheus.io/scrape: "true" #prometheus.io/port: "9113" spec: serviceAccountName: nginx-ingress imagePullSecrets: - name: abgmbh.azurecr.io containers: - image: abgmbh.azurecr.io/nginx-plus-ingress:edge name: nginx-plus-ingress ports: - name: http containerPort: 80 - name: https containerPort: 443 #- name: prometheus #containerPort: 9113 securityContext: allowPrivilegeEscalation: true runAsUser: 101 #nginx capabilities: drop: - ALL add: - NET_BIND_SERVICE env: - name: POD_NAMESPACE valueFrom: fieldRef: fieldPath: metadata.namespace - name: POD_NAME valueFrom: fieldRef: fieldPath: metadata.name args: - -nginx-plus - -nginx-configmaps=$(POD_NAMESPACE)/nginx-config - -default-server-tls-secret=$(POD_NAMESPACE)/default-server-secret - -ingress-class=sock-shop #- -v=3 # Enables extensive logging. Useful for troubleshooting. #- -report-ingress-status #- -external-service=nginx-ingress #- -enable-leader-election #- -enable-prometheus-metrics Notice the ‘- -ingress-class=sock-shop’ argument, it means that the NIC will only work with an Ingress that is annotated with ‘sock-shop’. The absence of this annotation makes NIC the default for all Ingress created. Below shows the counterpart Ingress with the ‘sock-shop’ annotation. apiVersion: extensions/v1beta1 kind: Ingress metadata: name: sock-shop-ingress annotations: kubernetes.io/ingress.class: "sock-shop" spec: tls: - hosts: - socks.ab.gmbh secretName: wildcard.ab.gmbh rules: - host: socks.ab.gmbh http: paths: - path: / backend: serviceName: front-end servicePort: 80 This Ingress says if hostname is socks.ab.gmbh and path is ‘/’, send traffic to a service named ‘front-end’, which is part of the socks application itself. The above concludes Ingress configuration with the NIC. F5 Container Ingress Services The next step is to leverage the CIS to dynamically populate the BIG-IP pool with the NIC addresses. Follow this ( https://clouddocs.f5.com/containers/v2/kubernetes/kctlr-app-install.html ) to deploy the CIS. A sample Deployment file is shown below, apiVersion: extensions/v1beta1 kind: Deployment metadata: name: k8s-bigip-ctlr-deployment namespace: kube-system spec: # DO NOT INCREASE REPLICA COUNT replicas: 1 template: metadata: name: k8s-bigip-ctlr labels: app: k8s-bigip-ctlr spec: # Name of the Service Account bound to a Cluster Role with the required # permissions serviceAccountName: bigip-ctlr containers: - name: k8s-bigip-ctlr image: "f5networks/k8s-bigip-ctlr" env: - name: BIGIP_USERNAME valueFrom: secretKeyRef: # Replace with the name of the Secret containing your login # credentials name: bigip-login key: username - name: BIGIP_PASSWORD valueFrom: secretKeyRef: # Replace with the name of the Secret containing your login # credentials name: bigip-login key: password command: ["/app/bin/k8s-bigip-ctlr"] args: [ # See the k8s-bigip-ctlr documentation for information about # all config options # https://clouddocs.f5.com/products/connectors/k8s-bigip-ctlr/latest "--bigip-username=$(BIGIP_USERNAME)", "--bigip-password=$(BIGIP_PASSWORD)", "--bigip-url=https://x.x.x.x:8443", "--bigip-partition=k8s", "--pool-member-type=cluster", "--agent=as3", "--manage-ingress=false", "--insecure=true", "--as3-validation=true", "--node-poll-interval=30", "--verify-interval=30", "--log-level=INFO" ] imagePullSecrets: # Secret that gives access to a private docker registry - name: f5-docker-images # Secret containing the BIG-IP system login credentials - name: bigip-login Notice the following arguments below. They tell the CIS to consume AS3 declaration to configure the BIG-IP. According to PM, CCCL(Common Controller Core Library) – used to orchestrate F5 BIG-IP, is getting removed this sprint for the CIS 2.0 release. '--manage-ingress=false' means CIS is not doing anything for Ingress resources defined within the k8s, this is because that CIS is not the Ingress Controller, NGINX Plus is, as far as k8s is concerned. The CIS will create a partition named k8s_AS3 on the BIG-IP, this is used to hold L4~7 configuration relating to the AS3 declaration. The best practice is also to manually create a partition named 'k8s' (in our example), where networking info will be stored (e.g., ARP, FDB). "--bigip-url=https://x.x.x.x:8443", "--bigip-partition=k8s", "--pool-member-type=cluster", "--agent=as3", "--manage-ingress=false", "--insecure=true", "--as3-validation=true", To apply AS3, the declaration is embedded within a ConfigMap applied to the CIS pod. kind: ConfigMap apiVersion: v1 metadata: name: as3-template namespace: kube-system labels: f5type: virtual-server as3: "true" data: template: | { "class": "AS3", "action": "deploy", "persist": true, "declaration": { "class": "ADC", "id":"1847a369-5a25-4d1b-8cad-5740988d4423", "schemaVersion": "3.16.0", "Nginx_IC": { "class": "Tenant", "Nginx_IC_vs": { "class": "Application", "template": "https", "serviceMain": { "class": "Service_HTTPS", "virtualAddresses": [ "10.1.0.14" ], "virtualPort": 443, "redirect80": false, "serverTLS": { "bigip": "/Common/clientssl" }, "clientTLS": { "bigip": "/Common/serverssl" }, "pool": "Nginx_IC_pool" }, "Nginx_IC_pool": { "class": "Pool", "monitors": [ "https" ], "members": [ { "servicePort": 443, "shareNodes": true, "serverAddresses": [] } ] } } } } } They are telling the BIG-IP to create a tenant called ‘Nginx_IC’, a virtual named ‘Nginx_IC_vs’ and a pool named ‘Nginx_IC_pool’. The CIS will update the serverAddresses with the NIC addresses dynamically. Now, create a Service to expose the NIC’s. apiVersion: v1 kind: Service metadata: name: nginx-ingress namespace: nginx-ingress labels: cis.f5.com/as3-tenant: Nginx_IC cis.f5.com/as3-app: Nginx_IC_vs cis.f5.com/as3-pool: Nginx_IC_pool spec: type: ClusterIP ports: - port: 443 targetPort: 443 protocol: TCP name: https selector: app: nginx-ingress Notice the labels, they match with the AS3 declaration and this allows the CIS to populate the NIC’s addresses to the correct pool. Also notice the kind of the manifest ‘Service’, this means only a Service is created, not an Ingress, as far as k8s is concerned. On the BIG-IP, the following should be created. The end product is below. Please note that this article is focused solely on control plane, that is, how to get the CIS to populate the BIG-IP with NIC's addresses. The specific mechanisms to deliver packets from the BIG-IP to the NIC's on the data plane is not discussed, as it is decoupled from control plane. For data plane specifics, please take a look here ( https://clouddocs.f5.com/containers/v2/ ). Hope this article helps to lift the veil on some integration mysteries.5.1KViews11likes27CommentsAgility sessions announced
Good news, everyone! This year's virtual Agilitywill have over 100 sessions for you to choose from, aligned to 3 pillars. There will be Breakouts (pre-recorded 25 minutes, unlimited audience) Discussion Forums (live content up to 45 minutes, interactive for up to 75 attendees) Quick Hits (pre-recorded 10 minutes, unlimited audience) So, what kind of content are we talking about? If you'd like to learn more about how to Simplify Delivery of Legacy Apps, you might be interested in Making Sense of Zero Trust: what’s required today and what we’ll need for the future (Discussion Forum) Are you ready for a service mesh? (breakout) BIG-IP APM + Microsoft Azure Active Directory for stronger cybersecurity defense (Quick Hits) If you'd like to learn more about how to Secure Digital Experiences, you might be interested in The State of Application Strategy 2022: A Sneak Peak (Discussion Forum) Security Stack Change at the Speed of Business (Breakout) Deploy App Protect based WAF Solution to AWS in minutes (Quick Hits) If you'd like to learn more about how to Enable Modern App Delivery at Scale, you might be interested in Proactively Understanding Your Application's Vulnerabilities (Discussion Forum Is That Project Ready for you? Open Source Maturity Models (Breakout) How to balance privacy and security handling DNS over HTTPS (Quick Hits) The DevCentral team will be hosting livestreams, and the DevCentral lounge where we can hang out, connect, and you can interact directly with session presenters and other technical SMEs. Please go to https://agility2022.f5agility.com/sessions.html to see the comprehensive list, and check back with us for more information as we get closer to the conference.438Views7likes1Comment2021 DevCentral MVP Announcement
Congratulations to the 2021 DevCentral MVPs! The DevCentral MVP Award is given annually to an exclusive group of expert users in the technical community who go out of their way to engage with the community by sharing their experience and knowledge with others. This is our way of recognizing their significant contributions, because while all of our users collectively make DevCentral one of the top community sites around and a valuable resource for everyone, MVPs regularly go above and beyond in assisting fellow F5 users both on- and offline.We understand that 2020 was difficult for everyone, and we are extra-grateful to this year's MVPs for going out of their ways to help others. MVPs get badges in their DevCentral profiles so everyone can see that they are recognized experts (you'll also see this if you hover over their name in a thread). This year’s MVPs will receive a glass award, certificate, exclusive thank-you gifts, and invitations to exclusive webinars and behind-the-scenes looks at things like roadmaps and new product sneak-previews. The 2021 DevCentral MVPs (by username) are: ·Andy McGrath ·Austin Geraci ·Amine Kadimi ·Boneyard ·Dario Garrido ·EAA ·FrancisD ·Hamish Marson ·Iaine ·Jad Tabbara (JTI) ·jaikumar_f5 ·JG ·JuniorC · Kai Wilke ·Kees van den Bos ·Kevin Davies ·Leonardo Souza ·lidev ·Manthey ·Mayur Sutare ·Nathan Britton ·Niels van Sluis ·Patrik Jonsson ·Philip Jönsson ·Piotr Lewandowski ·Rob_carr ·Samir Jha ·Sebastian Maniak ·TimRiker ·Vijay ·What Lies Beneath ·Yann Desmaret ·Youssef763Views6likes3CommentsModern Application Architecture - Cloud-Native Architecture Platform - Part 1 of 3
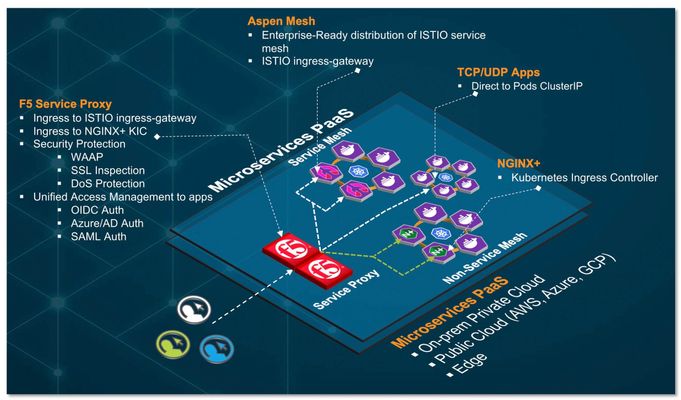
Overview In this multi part series of articles, I will be sharing with you on how to leverage F5’s BIG-IP (BIG-IP), Aspen Mesh service mesh and NGINX ingress controller to create a cloud-agnostic, resilient and secure cloud-native architecture platform to support your cloud-native applications requirement. Cloud-native is a term used to describe container-based environment. Microservices is an architectural pattern/approach/style where application are structured into multiple loosely couple, independent services delivered in a containerized form factor. Hence, for simplicity, in this series of articles, cloud-native architecture and microservices architecture platform (cPaaS) are use interchangeably. Note: Although BIG-IP is not in the category of a cloud-native apps (in comparison with F5's Service Proxy for Kubernetes (SPK) - which is cloud-native), currently, BIG-IP is feature rich and play a key role in this reference architecture pattern. For existing customer who has BIG-IP, this could be a first step for an organic transition from existing BIG-IP to cloud-native SPK. Part 1 – Cloud-Native Architecture Platform Formulate a cloud-agnostic architecture pattern. Architect/Build Kubernetes Platform for development (based on k3d with k3s). Architect and integrate keys technologies for this pattern. BIG-IP Aspen Mesh Service Mesh + Jaeger distributed tracing NGINX Ingress Controller Container Ingress Services (CIS) Application Services v3 (AS3) Grafana/Prometheus Monitoring Part 2 – Traffic Management, Security and Observability Establish common ingress/egress architecture pattern For HTTP based application (e.g., http/http2 web application) For non-HTTP (e.g. TCP/UDP) based application (e.g., MQTT) Uplift cloud-native apps protection with Web Application Firewall. Aspen Mesh Service Mesh Bookinfo apps Httpbin apps NGINX Ingress controller Grafana apps Grafana and Prometheus monitoring for Aspen Mesh and NGINX Part 3 – Unified Authentication (AuthN) and Authorization (AuthZ) for cloud-native apps. OAUTH authentication (Azure AD and Google) Legacy Windows AD Authentication Why cloud-native architecture platform? The proliferation of Internet based applications, software and usage on mobile devices has grown substantially over the years. It is no longer a prediction. It is a fact. According to 2021 Global Digital suite of reports from “We Are Social” and “Hootsuite”, there are over 5 billion unique mobile users and over 4 billion users actively connected to the Internet. This excludes connected devices such as Internet of Things, servers that power the internet and etc. With COVID-19 and the rise of 5G rollout, edge and cloud computing, connected technologies became and event more important and part of people’s lives. As the saying goes, “Application/Software powered the Internet and Internet is the backbone of the world economy”. Today organization business leaders require their IT and digital transformation teams to be more innovative by supporting the creation of business-enabling applications, which means they are no longer just responsible for availability of the networks and servers, but also building a robust platform to support the software development and application delivery that are secure, reliable and innovative.To support that vision, organization need a robust platform to support and deliver application portfolio that are able to support the business.Because a strong application portfolio is crucial for the success of the business and increase market value,IT or Digital transformation team may need to ask: "What can we do to embrace and support the proliferation of applications, empower those with creative leadership, foster innovative development, and ultimately help create market value?" Robust and secure cloud-native platform for modern application architecture and frictionless consumption of application services are some of the requirement for success. As of this writing (April 2021), cloud-native / microservices architecture is an architecture pattern of choice for modern developer and Kubernetes Platform is the industry de-facto standard for microservices/containers orchestration. What is the GOAL in this series of articles? Strategies, formulate and build a common, resilient and scalable cloud-native reference architecture and Platform as a Service to handle modern applications workload. This architecture pattern is modular and cloud-agnostic and deliver a consistent security and application services. To established the reference architecture, we are leveraging an open source upstream Kubernetes platform on a single Linux VM with multitude of open source and commercial tools and integrate that with F5's BIG-IP as the unified Ingress/Egress and unified access to cloud-native application hosted on the following type of workload:- Service Mesh workload Non-Service Mesh workload TCP/UDP workload Note: We can leverage F5's Service Proxy for Kubernetes (SPK) as the unified ingress/egress. However, F5's BIG-IP will be used in this article. You can skip steps of building Kubernetes cluster if you already have an existing multi-node Kubernetes cluster, minikube or any public cloud hosted Kubernetes (e.g. EKS/AKS/GKE) Requirement 1 x Ubuntu VM (ensure you have a working Ubuntu 20.x with docker installed) vCPU: 8 (can runs with 4 or 6 vCPU with reduce functionality) HDD: Ideal 80G. (Only required for persistent storage. Can run with 40G). Need to update persistent volume size appropriately. Modern Application Architecture (cPaaS) - Reference Architecture BIG-IP - Service Proxy Central ingress and/or egress for cloud-native workload. For applications deployed in service mesh namespaces, F5 service proxy, proxied ingress traffic to Aspen Mesh ingressgateway. For applications deployed in non-service mesh namespaces, F5 service proxy, proxied ingress traffic to NGINX ingress controller. For applications that required bypass of ingress (e.g. TCP/UDP apps), F5 service proxy, proxied directly to those pods IP. F5 Service Proxy provides centralized security protection by enforcing Web Application and API Protection (WAAP) firewall policy on cloud-native workloads. F5 Service Proxy provided SSL inspection (SSL bridge and/or offload) to Aspen Mesh ingressgateway and/or NGINX ingress controller. F5 Service Proxy can be deploy to send to multiple Kubernetes cluster - for inter and/or intra cluster resiliency. Global Server Load Balancing (F5's DNS) can be enabled on F5 Service Proxy to provides geo-redundancy for multi-cloud workload. F5 Service Proxy act as the unified access management with F5's Access Policy Manager (APM). Cloud-native application can delegate AuthN to F5 Service Proxy (multiple AuthN mechanism such as OIDC/OAuth/NTLM/SAML and etc) and cloud-native application perform AuthZ. F5 Service-Proxy ingress are only need to setup once. Cloud-native apps FQDN are all mapped to the same ingress. Aspen Mesh Service Mesh Centralized ingress for service mesh namespaces Enterprise ready, hardened and fully supported Istio-based service mesh by F5. Provides all capabilities delivered by Istio (Connect, Secure, Control and Observe). Provide traffic management and security for East-West communication. Reduce operational complexities of managing service mesh Aspen Mesh Rapid Resolve / MTTR - Mean Time To Resolution - quickly detect and identify causes of cluster and application errors. Service and Health indicator Graph for service visibility and observability. ISTIO Vet Enhance security Secure by Default with zero trust policy Secure Ingress Enhance RBAC Carrier-grade feature Aspen Mesh Packet Inspector NGINX Ingress Controller Centralized ingress for non-service mesh namespaces Works with both NGINX and NGINX Plus and supports the standard ingress features - content-based routing and TLS/SSL termination Support load balancing WebSocket, gRPC, TCP and UDP applications Container Ingress Services (CIS) Works with container orchestration environment (e.g. Kubernetes) to dynamically create L4/L7 services on BIG-IP and load balance network traffic across those services. It monitor the orchestration API server (e.g. lifecycle of Kubernetes pods) and dynamically update BIG-IP configuration based on changes made on containerized application. In this setup, it monitor Aspen Mesh ingressgateway, NGINX ingress controller and TCP/UDP based apps and dynamically updates BIG-IP configuration. AS3 Application Services 3 extension is a flexible, low-overhead mechanism for managing application-specific configuration on BIG-IP system. Leveraging a declarative model with a single JSON declaration. High Resiliency Cloud-Native Apps The reference architecture above can be treated as an "atomic" unit or a "repeatable pattern". This "atomic" unit can be deploy in multiple public cloud (e.g. EKS/AKS/GKE and etc) or private cloud. Multiple "atomic" unit can be constructed to form a high service resiliency clusters. F5 DNS/GSLB can be deploy to monitor health of each individual cloud-native apps inside each individual "atomic" cluster and dynamically redirect user to a healthy apps. Each cluster can runs as active-active and application can be distributed to both clusters. How applications achieve high resiliency with F5 DNS. Multi-Cloud, Multi-Cluster Service Resiliency Conceptual view on how an "atomic" unit / cPaaS can be deployed in multi-cloud and each of this clusters can be constructed to form a service resiliency mesh by leveraging F5 DNS and F5 BIG-IP. Note: Subsequent section will be a hands-on guide to build the reference architecture describe above (the "atomic" unit) with the exception of multi-cloud, multi-cluster service resiliency mesh. K3D + K3S will be use for the sole purpose of development and testing. Conceptual Architecture for this setup Note: The following instructions are use as a quick start guide. Please refer to respective installation guide for details. Scripts use in this setup can be found on github Install Docker sudo apt-get update sudo apt-get -y install \ apt-transport-https \ ca-certificates \ curl \ gnupg-agent \ software-properties-common curl -fsSL https://download.docker.com/linux/ubuntu/gpg | sudo apt-key add - sudo add-apt-repository \ "deb [arch=amd64] https://download.docker.com/linux/ubuntu \ $(lsb_release -cs) \ stable" sudo apt-get update -y sudo apt-get install docker-ce=5:19.03.15~3-0~ubuntu-focal docker-ce-cli=5:19.03.15~3-0~ubuntu-focal -y fbchan@sky:~$ docker ps CONTAINER ID IMAGE COMMAND CREATED STATUS PORTS NAMES fbchan@sky:~$ sudo systemctl enable --now docker.service Install Helm curl -fsSL -o get_helm.sh https://raw.githubusercontent.com/helm/helm/master/scripts/get-helm-3 chmod 700 get_helm.sh ./get_helm.sh Install calico binary curl -O -L https://github.com/projectcalico/calicoctl/releases/download/v3.15.0/calicoctl chmod u+x calicoctl sudo mv calicoctl /usr/local/bin/ Install kubectl binary curl -LO https://dl.k8s.io/release/v1.19.9/bin/linux/amd64/kubectl chmod u+x kubectl sudo mv kubectl /usr/local/bin Install supporting tools sudo apt install jq -y sudo apt install net-tools -y Install k9s This component is optional. It is a terminal based UI to interact with Kubernetes clusters. wget https://github.com/derailed/k9s/releases/download/v0.24.2/k9s_Linux_x86_64.tar.gz tar zxvf k9s_Linux_x86_64.tar.gz sudo mv k9s /usr/local/bin/ Ensure Linux volume group expanded Depend on your setup, by default, your Ubuntu 20.x VM may not expand all your allocated volume. Hence, this setup is to expand all allocated disk space. fbchan@sky:~$ sudo lvm lvm> lvextend -l +100%FREE /dev/ubuntu-vg/ubuntu-lv Size of logical volume ubuntu-vg/ubuntu-lv changed from 39.50 GiB (10112 extents) to <79.00 GiB (20223 extents). Logical volume ubuntu-vg/ubuntu-lv successfully resized. lvm> quit Exiting. fbchan@sky:~$ sudo resize2fs /dev/ubuntu-vg/ubuntu-lv resize2fs 1.45.5 (07-Jan-2020) Filesystem at /dev/ubuntu-vg/ubuntu-lv is mounted on /; on-line resizing required old_desc_blocks = 5, new_desc_blocks = 10 The filesystem on /dev/ubuntu-vg/ubuntu-lv is now 20708352 (4k) blocks long. fbchan@sky:~$ df -kh Filesystem Size Used Avail Use% Mounted on udev 7.8G 0 7.8G 0% /dev tmpfs 1.6G 1.2M 1.6G 1% /run /dev/mapper/ubuntu--vg-ubuntu--lv 78G 7.1G 67G 10% / .. Disable Ubuntu Firewall sudo ufw disable sudo apt-get remove ufw -y Ubuntu VM fbchan@sky:~$ ip a 1: lo: <LOOPBACK,UP,LOWER_UP> mtu 65536 qdisc noqueue state UNKNOWN group default qlen 1000 link/loopback 00:00:00:00:00:00 brd 00:00:00:00:00:00 inet 127.0.0.1/8 scope host lo valid_lft forever preferred_lft forever inet6 ::1/128 scope host valid_lft forever preferred_lft forever 2: ens160: <BROADCAST,MULTICAST,UP,LOWER_UP> mtu 1500 qdisc mq state UP group default qlen 1000 link/ether 00:0c:29:6c:ab:0b brd ff:ff:ff:ff:ff:ff inet 10.10.2.10/24 brd 10.10.2.255 scope global ens160 valid_lft forever preferred_lft forever inet6 fe80::20c:29ff:fe6c:ab0b/64 scope link valid_lft forever preferred_lft forever 3: docker0: <NO-CARRIER,BROADCAST,MULTICAST,UP> mtu 1500 qdisc noqueue state DOWN group default link/ether 02:42:4c:15:2e:1e brd ff:ff:ff:ff:ff:ff inet 172.17.0.1/16 brd 172.17.255.255 scope global docker0 valid_lft forever preferred_lft forever fbchan@sky:~$ ip r default via 10.10.2.1 dev ens160 proto static 10.10.2.0/24 dev ens160 proto kernel scope link src 10.10.2.10 172.17.0.0/16 dev docker0 proto kernel scope link src 172.17.0.1 linkdown Install k3d + k3s K3D in a nutshell. K3D is a lightweight wrapper to run k3s (Rancher Lab's minimal Kubernetes distribution) in docker. K3D makes it very easy to create single- and multi-node K3S clusters in docker, e.g. for local development on Kubernetes. For details please refer to here Install k3d wget -q -O - https://raw.githubusercontent.com/rancher/k3d/main/install.sh | TAG=v4.2.0 bash Create k3s cluster Spin up 1 x server/master and 3 x agent/worker nodes Disable traefik and service load balancer as we don't need it as we are leveraging BIG-IP as the unified ingress/egress. Replace with calico CNI instead of default flannel CNI Setup TLS SAN certificate so that we can access K3S api remotely. k3d cluster create cpaas1 --image docker.io/rancher/k3s:v1.19.9-k3s1 \ --k3s-server-arg "--disable=servicelb" \ --k3s-server-arg "--disable=traefik" \ --k3s-server-arg --tls-san="10.10.2.10" \ --k3s-server-arg --tls-san="k3s.foobz.com.au" \ --k3s-server-arg '--flannel-backend=none' \ --volume "$(pwd)/calico-k3d.yaml:/var/lib/rancher/k3s/server/manifests/calico.yaml" \ --no-lb --servers 1 --agents 3 ### Run above command or cluster-create.sh script provided ### ############################################################## fbchan@sky:~/Part-1$ ./cluster-create.sh WARN[0000] No node filter specified INFO[0000] Prep: Network INFO[0000] Created network 'k3d-cpaas1' INFO[0000] Created volume 'k3d-cpaas1-images' INFO[0001] Creating node 'k3d-cpaas1-server-0' INFO[0001] Creating node 'k3d-cpaas1-agent-0' INFO[0001] Creating node 'k3d-cpaas1-agent-1' INFO[0001] Creating node 'k3d-cpaas1-agent-2' INFO[0001] Starting cluster 'cpaas1' INFO[0001] Starting servers... INFO[0001] Starting Node 'k3d-cpaas1-server-0' INFO[0014] Starting agents... INFO[0014] Starting Node 'k3d-cpaas1-agent-0' INFO[0024] Starting Node 'k3d-cpaas1-agent-1' INFO[0034] Starting Node 'k3d-cpaas1-agent-2' INFO[0045] Starting helpers... INFO[0045] (Optional) Trying to get IP of the docker host and inject it into the cluster as 'host.k3d.internal' for easy access INFO[0052] Successfully added host record to /etc/hosts in 4/4 nodes and to the CoreDNS ConfigMap INFO[0052] Cluster 'cpaas1' created successfully! INFO[0052] --kubeconfig-update-default=false --> sets --kubeconfig-switch-context=false INFO[0052] You can now use it like this: kubectl config use-context k3d-cpaas1 kubectl cluster-info ### Docker k3d spun up multi-node Kubernetes using docker ### ############################################################# fbchan@sky:~/Part-1$ docker ps CONTAINER ID IMAGE COMMAND CREATED STATUS PORTS NAMES 2cf40dca2b0a rancher/k3s:v1.19.9-k3s1 "/bin/k3s agent" About a minute ago Up 52 seconds k3d-cpaas1-agent-2 d5c49bb65b1a rancher/k3s:v1.19.9-k3s1 "/bin/k3s agent" About a minute ago Up About a minute k3d-cpaas1-agent-1 6e5bb6119b61 rancher/k3s:v1.19.9-k3s1 "/bin/k3s agent" About a minute ago Up About a minute k3d-cpaas1-agent-0 ea154b36e00b rancher/k3s:v1.19.9-k3s1 "/bin/k3s server --d…" About a minute ago Up About a minute 0.0.0.0:37371->6443/tcp k3d-cpaas1-server-0 ### All Kubernetes pods are in running states ### ################################################# fbchan@sky:~/Part-1$ kubectl get pod -A NAMESPACE NAME READY STATUS RESTARTS AGE kube-system calico-node-95gqb 1/1 Running 0 5m11s kube-system calico-node-fdg9f 1/1 Running 0 5m11s kube-system calico-node-klwlq 1/1 Running 0 5m6s kube-system local-path-provisioner-7ff9579c6-mf85f 1/1 Running 0 5m11s kube-system metrics-server-7b4f8b595-7z9vk 1/1 Running 0 5m11s kube-system coredns-66c464876b-hjblc 1/1 Running 0 5m11s kube-system calico-node-shvs5 1/1 Running 0 4m56s kube-system calico-kube-controllers-5dc5c9f744-7j6gb 1/1 Running 0 5m11s Setup Calico on Kubernetes For details please refer to another devcentral article. Note: You do not need to setup calico for Kubernetes in EKS, AKS (Azure CNI with advance networking mode) or GKE deployment. Cloud Provider managed Kubernetes underlay will provides the required connectivity from BIG-IP to Kubernetes pods. sudo mkdir /etc/calico sudo vi /etc/calico/calicoctl.cfg Content of calicoctl.cfg. (replace /home/xxxx/.kube/config with the location of you kubeconfig file) --------------------------------------- apiVersion: projectcalico.org/v3 kind: CalicoAPIConfig metadata: spec: datastoreType: "kubernetes" kubeconfig: "/home/xxxx/.kube/config" -------------------------------------- fbchan@sky:~/Part-1$ sudo calicoctl create -f 01-bgpconfig.yml Successfully created 1 'BGPConfiguration' resource(s) fbchan@sky:~/Part-1$ sudo calicoctl create -f 02-bgp-peer.yml Successfully created 1 'BGPPeer' resource(s) fbchan@sky:~/Part-1$ sudo calicoctl get node -o wide NAME ASN IPV4 IPV6 k3d-cpaas1-agent-1 (64512) 172.19.0.4/16 k3d-cpaas1-server-0 (64512) 172.19.0.2/16 k3d-cpaas1-agent-2 (64512) 172.19.0.5/16 k3d-cpaas1-agent-0 (64512) 172.19.0.3/16 On BIG-IP Setup BGP peering with Calico Ensure you enabled Advance Networking on BIG-IP (Network >> Route Domains >> 0, under "Dynamic Routing Protocol", Enabled: BGP) [root@mel-prod:Active:Standalone] config # [root@mel-prod:Active:Standalone] config # imish mel-prod.foobz.com.au[0]>en mel-prod.foobz.com.au[0]#config t Enter configuration commands, one per line. End with CNTL/Z. mel-prod.foobz.com.au[0](config)#router bgp 64512 mel-prod.foobz.com.au[0](config-router)#bgp graceful-restart restart-time 120 mel-prod.foobz.com.au[0](config-router)#neighbor calico-k8s peer-group mel-prod.foobz.com.au[0](config-router)#neighbor calico-k8s remote-as 64512 mel-prod.foobz.com.au[0](config-router)#neighbor 172.19.0.2 peer-group calico-k8s mel-prod.foobz.com.au[0](config-router)#neighbor 172.19.0.3 peer-group calico-k8s mel-prod.foobz.com.au[0](config-router)#neighbor 172.19.0.4 peer-group calico-k8s mel-prod.foobz.com.au[0](config-router)#neighbor 172.19.0.5 peer-group calico-k8s mel-prod.foobz.com.au[0](config-router)#wr Building configuration... [OK] mel-prod.foobz.com.au[0](config-router)#end mel-prod.foobz.com.au[0]#show running-config ! no service password-encryption ! router bgp 64512 bgp graceful-restart restart-time 120 neighbor calico-k8s peer-group neighbor calico-k8s remote-as 64512 neighbor 172.19.0.2 peer-group calico-k8s neighbor 172.19.0.3 peer-group calico-k8s neighbor 172.19.0.4 peer-group calico-k8s neighbor 172.19.0.5 peer-group calico-k8s ! line con 0 login line vty 0 39 login ! end Validate Calico pod network advertised to BIG-IP via BGP Calico pod network routes advertised onto BIG-IP routing table. Because BIG-IP route every pods network to single Ubuntu VM (10.10.2.10) , we need to ensure that Ubuntu VM route those respective pod networks to the right docker container agent/worker nodes. In an environment where master/worker on a dedicated VM/physical host with different IP, BIG-IP BGP will send to the designated host. Hence, the following only require for this setup, where all Kubernetes nodes running on the same VM. Base on my environment, here are the additional route I need to add on my Ubuntu VM. fbchan@sky:~/Part-1$ sudo ip route add 10.53.68.192/26 via 172.19.0.4 fbchan@sky:~/Part-1$ sudo ip route add 10.53.86.64/26 via 172.19.0.3 fbchan@sky:~/Part-1$ sudo ip route add 10.53.115.0/26 via 172.19.0.5 fbchan@sky:~/Part-1$ sudo ip route add 10.53.194.192/26 via 172.19.0.2 If everything working properly, from BIG-IP, you should be able to ping Kubernetes pods IP directly. You can find those pods network IP via 'kubectl get pod -A -o wide' root@(mel-prod)(cfg-sync Standalone)(Active)(/Common)(tmos)# ping -c 2 10.53.86.66 PING 10.53.86.66 (10.53.86.66) 56(84) bytes of data. 64 bytes from 10.53.86.66: icmp_seq=1 ttl=62 time=1.59 ms 64 bytes from 10.53.86.66: icmp_seq=2 ttl=62 time=1.33 ms --- 10.53.86.66 ping statistics --- 2 packets transmitted, 2 received, 0% packet loss, time 1000ms rtt min/avg/max/mdev = 1.336/1.463/1.591/0.133 ms root@(mel-prod)(cfg-sync Standalone)(Active)(/Common)(tmos)# ping -c 2 10.53.86.65 PING 10.53.86.65 (10.53.86.65) 56(84) bytes of data. 64 bytes from 10.53.86.65: icmp_seq=1 ttl=62 time=1.03 ms 64 bytes from 10.53.86.65: icmp_seq=2 ttl=62 time=24.5 ms --- 10.53.86.65 ping statistics --- 2 packets transmitted, 2 received, 0% packet loss, time 1001ms rtt min/avg/max/mdev = 1.036/12.786/24.537/11.751 ms Note: Do not persist those Linux route on the VM. The routing will change when you reboot or restart your VM. You required to query the new route distribution and re-create the Linux route whenever you reboot your VM. Summary on Part-1 What we achieved so far: Basic understanding on why cloud-native architecture platform so important. Established a cloud-agnostic and cloud-native reference architecture and understand those key components and it roles. Have a working environment for our Part 2 series - Traffic Management, Security and Observability.1.1KViews6likes0CommentsAccelerating Digital Transformation in Banking and Financial Services
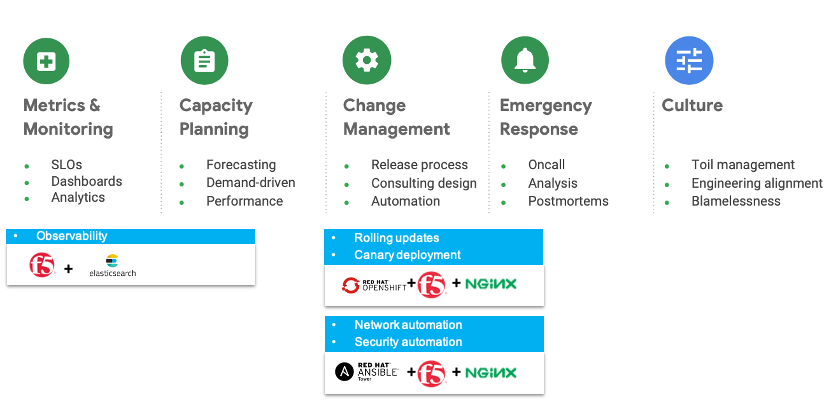
Introduction A recent survey from Forrester’s Business Technographics shows that 33% of BFSI tech leaders are currently undertaking a digital transformation within their organizations. That’s 13 points ahead of the average across industries. Still, many enterprises worry that they aren't moving fast enough. For banking and financial services organizations, there is intense pressure to transform their enterprises to remain more competitive in an age of disruption. Evolving regulatory requirements, rapidly advancing technology, increasing customer demands, COVID-19 and competition from fintech’s are all forcing financial services firms to rethink the way they operate. Digital Transformation Challenges This digital transformation imperative requires banking and financial services organizations to improve their technical capabilities. But true transformation demands more than just new technologies. It requires strategic vision and commitment from the top of the organization to rethink and retool its culture, its processes, and its technology. Admittedly, the financial industry has a long history of not collaborating, lack of transparency, and resistance to adaptability, favoring instead confidentiality, siloed organizational structures, and risk aversion. For many years, that heritage enabled financial services firms to succeed. Existing cultural, behavioral, and organizational hurdles can be hard to overcome because they are so entrenched. New processes and technology are also necessary for digital transformation. Traditional development practices are common in the industry and are built on segmented and monolithic team structures that lack the agility required to achieve transformation. Additionally, very few possess the infrastructure and application architectures required to rapidly innovate. The Benefits of an Open Approach Digital transformation is not merely about adopting new technologies but also establishing new cultural practices and ‘ways of working’ within the IT organization.By taking an open approach to architecture, process, and culture, you can transform the way your entire organization operates. Modular architecture To create a more modular environment, banking and financial services institutions will require integration across the entire legacy network, as well as integration with partner systems, networks, and other external services such as Software-as-a-Service (SaaS) solutions. An open and composablearchitecture gives customers access to a growing range of ‘Best of Breed’ technologies from industry leaders, consumable in a frictionless “single-stack” feel. Agile process In the open organization model, collaboration is key. Modern, agile practices establish common goals and empower teams to move forward together. According to the Harvard Business Review article “Reassessing Digital Transformation:The Culture and Process Change Imperative”, financial services were more apt to say that DevOps was important than other industries, and were also more likely to have implemented agile development, project management processes, CI/CD, and DevOps. These new processes are necessary as financial services firms seek faster time to value and leverage microservices to effect this change. Open culture Open organizations are more transparent, inclusive, adaptive, collaborative, and community focused.When you view digital transformation as a continuous process—and emphasize the importance of culture in parallel to, not at the expense of, technology and process— you’re positioning your organization for a successful transformation. Technologies that Enable Digital Transformation The pandemic has accelerated the need for digital transformation in the BFSI segment.Not only have workforces become remote, but person to person contact has become less frequent.Financial organizations have not only had to scale up infrastructure and security to support a remote workforce but have also had to simultaneously scale to support a fully remote customer base. Inherent in this approach is a hybrid cloud strategy that allows the ability to scale up or down resources to meet application needs.Architectural design and practices must also align with these new cloud infrastructures.There is a need to balance the requirements for speed with the absolute necessity for security and availability.There are a few key best practices that BFSI organizations have used to balance these competing demands: ·Establish a foundation of resilience by adopting site reliability engineering (SRE) concepts. ·Rapidly deploy new services quickly based on market demand. ·Consolidated, consistent, and controlled security and access, including identity management, intrusion protection, anti-virus, predictive threat capabilities ·Application performance (response time and latency), on-demand scalability, and disaster recovery and backup •Automation for efficiency and to speed delivery, with consistency in operations and tools, continuous integration and continuous delivery (CI/CD) •System-wide business monitoring, reporting, and alerting. An Open Architecture with F5 and Red Hat Now that we have established the open approach for implementing a financial service platform and the capabilities needed for a successful digital transformation, we can examine the architecture needed to support it. It starts on the path toward site reliability engineering (SRE). In the SRE model, the operations team and the business give developers free rein to deploy new code—but only until the error budget is exceeded. At that point, development stops, and all efforts are redirected to technical debt. As shown in Figure 1, it boils down to 5 areas that an SRE team should be doing to achieve the balancing goal. Figure 1. Enabling SRE Best Practices Together, F5, Red Hat, Elasticsearch, and other ecosystem partners can deliver a suite of technologies to fulfill the extension and transformation of existing architecture to an agile financial service platform. Figure 2. SRE Microservice Architecture with F5, Red Hat, and Elasticsearch The following describes the most fundamental components of Figure 2 in more detail, to enable the SRE best practices: 1.Red Hat OpenShift Container Platform (container PaaS) provides a modular, scalable, cloud-ready, enterprise open-source platform. It includes a rich set of features to build and deploy containerized solutions and a comprehensive PaaS management portal that together extend the underlying Kubernetes platform. 2.Combining BIG-IP and NGINX, this architecture allows SRE to optimize the balance between agility and stability, by implementing blue-green and targeted canary deployment. It’s a good way to release beta features to users and gather their feedback, and test your ideas in a production environment, with reduced risk. 3.BIG-IP combined NGINX Plus also gives SRE the flexibility to adapt to the changing conditions of the application environments, address the needs of NetOps, DevOps, DevSecOps, and app developers 4.ELK is utilized to analyze and visualize application performance through a centralized dashboard. A dashboard enables end-users to easily correlate North-South traffic with East-West traffic for end-to-end performance visibility. 5.F5’s WAF offerings, including F5 Advanced WAF and NGINX App Protect, deployed across hybrid clouds, protect OpenShift clusters against exploits of web application vulnerabilities as well as malware attempting to move laterally. 6.Equally important is integration with Red Hat Ansible that enables the automated configuration of security policy enforcement for immediate remediation. 7.Built intoCI/CD pipeline so that any future changes to the application are built and deployed automatically. Conclusion Digital transformation has been accelerated by the dual challenges of Covid and the emergence of Fintech.Traditional BFSI organizations have had to respond to these enormous challenges by accelerating their deployment timelines and adopting agile processes without compromising security and availability. These practices also dovetail with the greater adoption of microservices architectures that allow for scale up and scale out of application services.F5 & NGINX helps aid this transformation by providing world class performance and security combined with a flexible microservices ADC (NGINX+). This hybrid architecture allows for Kubernetes deployments to become ‘production grade’.1.9KViews3likes0Comments
What is NGINX?
Introduction NGINX started out as a high performance web-server and quickly expanded adding more functionality in an integrated manner. Put simply, NGINX is an open source web server, reverse proxy server, cache server, load balancer, media server and much more. The enterprise version of NGINX has exclusive production ready features on top of what's available, including status monitoring, active health checks, configuration API, and live dashboard for metrics. Think of this article as a quick introduction to each product but more importantly, as our placeholder for NGINX articles on DevCentral. If you're interested in NGINX, you can use this article as the place to find DevCentral articles broken down by functionality in the near future. By the way, this article here has also links to a bunch of interesting articles published on AskF5 and some introductory NGINX videos. NGINX as a Webserver The most basic use case of NGINX. It can handle hundreds of thousandsof requests simultaneously by using an event-drive architecture (as opposed to process-driven one) to handle multiple requests within one thread. NGINX as a Reverse Proxy and Load Balancer Both NGINX and NGINX+ provide load balancing functionality and work as reverse-proxy by sitting in front of back-end servers: Similar to F5, traffic comes in, NGINX load balances the requests to different back-end servers. In NGINX Plus version, it can even do session persistence and health check monitoring. Published Content: Server monitoring - some differences between BIG-IP and NGINX NGINX as Caching Server NGINX content caching improves efficiency, availability and capacity of back end servers. When caching is on, NGINX checks if content exists in its cache and if that's the case, content is served to client without the need to contact back end server. Otherwise, NGINX reaches out to backend server to retrieve content. A content cache sits between a client and back-end server and saves copies of pre-defined cacheable content. Caching improves performance as strategically, content cache is supposed to be closer to client. It also has the benefit of offloads requests from back-end servers. NGINX Controller NGINX controller is a piece of software that centralises and simplifies configuration, deployment and monitoring of NGINX Plus instances such as load balancers, API gateway and even web server. By the way, NGINX Controller 3.0 has just been released. Published Content: Introducing NGINX Controller 3.0 Setting up NGINX Controller Use of NGINX Controller to Authenticate API Calls Publishing an API using NGINX Controller NGINX as Kubernetes Ingress Controller NGINX Kubernetes Ingress Controller is a software that manages all Kubernetes ingress resources within a Kubernetes cluster. It monitors and retrieves all ingress resources running in a cluster and configure the corresponding L7 proxy accordingly. There are 2 versions of NGINX Ingress Controllers. One is maintained by the community and the other by NGINX itself. Published Content: Lightboard Lesson: NGINX Kubernetes Ingress Controller Overview NGINX as API Gateway An API Gateway is a way of abstracting application services interaction from client by providing a single entry-point into the system. Clients may issue a simple request to the application, for example, by requesting to load some information from a specific product. In the background, API gateway may contact several different services to bundle up the information requested and fulfil client's request. NGINX API management module for NGINX Controller can do request routing, composition, applying rate limiting to prevent overloading, offloading TLS traffic to improve performance, authentication, and real-time monitoring and alerting. NGINX as Application Server (Unit) NGINX Unit provides all sorts of functionalities to integrate applications and even to migrate and split services out of older monolithic applications. A key feature of Unit is that we don't need to reload processes once they're reconfigured. Unit only changes part of the memory associated to the changes we made. In later versions, NGINX Unit can also serve as intermediate node within a web framework, accepting all kinds of traffic and maintaining dynamic configuration and acting as a reverse proxy for back-end servers. NGINX as WAF NGINX uses ModSecurity module to protect applications from L7 attacks. NGINX as Sidecar Proxy Container We can also use NGINX as side car proxy container in Service Mesh architecture deployment (e.g. using Istio with NGINX as sidecar proxy container). A service mesh is an infrastructure layer that is supposed to be configurable and fast for the purposes of network-based interprocess communication using APIs. NGINX can be configured as a Sidecar proxy to handle inter-service communication, monitoring and security-related features. This is a way of ensuring developers only handle development, support and maintenance while platform engineers (ops team) can handle the service mesh maintenance.1.6KViews3likes2CommentsF5 TIC3.0 Capability Mappings
About The information below lists how F5 products address TIC 3.0 capability requirements (Dec 2023/Version 3.1) from the context of how F5 can help the broader agency. Important Note: Prior to reading this please read each capability as defined in https://www.cisa.gov/sites/default/files/2023-12/CISA%20TIC%203.0%20Security%20Capabilities%20Catalog_508c.pdf If a capability is not explicitly listed it should be assumed the F5 product does not meet the requirement. At the core the security provided by TIC 3.0 is based on Zero Trust. If you would like to learn more about how F5 can help your agency meet its Zero Trust requirements, please contact your local account team for additional detail. F5 Products Background F5 BIG-IP is a reverse proxy with web application security and authentication capabilities. BIG-IP provides these capabilities for traditional applications. F5 BIG-IP delivers applications securely, efficiently and at scale. BIG-IP Web Application Firewall protects applications from the ever-evolving security threat landscape. Specific BIG-IP software modules are matched to certain capabilities below where applicable. F5 NGINX Plusis a reverse proxy with web application security and authentication capabilities in a containerized format. NGINX+ typical use cases is to provide these protections for modern containerized applications. F5 Distributed Cloud is a SaaS offering that provides Application Delivery, WAAP, DNS, DDOS to applications as an edge service. F5 Distributed Cloud also offers a “Customer Edge” CE that provides many of these same capabilities on-prem or in a Cloud Service Provider. F5 Distributed Cloud will be referred to as “F5 XC” below. TIC 3.0 Capabilities Universal Security Capabilities Central Log Management with Analysis BIG-IP BIG-IP provides application security and telemetry logging enterprise wide to a centralized log store. NGINX Plus NGINX Plus provides application security and telemetry logging enterprise wide to a centralized log store. F5 XC F5 XC provides application security and telemetry logging enterprise wide to a centralized log store. Configuration Management BIG-IP BIG-IP configuration and capabilities can be fully automated and orchestrated. NGINX Plus NGINX Plus configuration and capabilities can be fully automated and orchestrated. F5 XC F5 XC configuration and capabilities can be fully automated and orchestrated. Incident Response Planning and Incident Handling BIG-IP F5 BIG-IP provides the ability to detect, prevent and log application security events. NGINX Plus F5 NGINX Plus provides the ability to detect, prevent and log application security events in a containerized form factor. F5 XC F5 Distributed Cloud provides the ability to detect, prevent and log application security events. Strong Authentication BIG-IP F5 BIG-IP supports requiring SAML, OIDC, Active Directory, and mTLS authentication before a client can access an application NGINX Plus F5 BIG-IP NGINX Plus supports requiring OIDC, and mTLS authentication before a client can access an application containerized format. F5 XC N/A Enterprise Threat Intelligence BIG-IP F5 provides threat intelligence feeds that help organizations detect whether they are a target of a threat campaign. This service can be leveraged by BIG-IP. NGINX Plus F5 provides threat intelligence feeds that help organizations detect whether they are a target of a threat campaign. This service can be leveraged by NGINX Plus. F5 XC F5 provides threat intelligence feeds that help organizations detect whether they are a target of a threat campaign. This service can be leveraged by F5 XC. Dynamic Threat Discovery BIG-IP BIG-IP can learn HTTP traffic patterns and establish a baseline to protect applications. NGINX Plus N/A F5 XC N/A Continuous Monitoring Reporting BIG-IP BIG-IP provides application security and telemetry logging providing vital application access, performance, and threat data for analysis. NGINX Plus NGINX Plus provides application security and telemetry logging providing vital application access, performance, and threat data for analysis. F5 XC F5 XC provides application security and telemetry logging providing vital application access, performance, and threat data for analysis. Web PEP Capabilities Break and Inspect BIG-IP F5 BIG-IP provides the ability to decrypt TLS traffic and send the decrypted traffic to any number of security devices, allowing the security devices. NGINX Plus N/A F5 XC N/A Active Content Mitigation BIG-IP BIG-IP provides the ability to decrypt TLS traffic and send this traffic to a content filtering solution for further inspection. This allows the filtering solution to inspect previously encrypted traffic and remove any malicious content. NGINX Plus N/A F5 XC N/A Certificate Denylisting BIG-IP F5 BIG-IP can enforce certification revocation on clients (human or non-human) presenting certificates (mTLS/Smart Card/CAC/PIV) via OCSP or CRLs before granting access to the application. BIG-IP can also be configured to deny certificates based on a blacklist. NGINX Plus F5 BIG-IP can enforce certification revocation on clients (human or non-human) presenting certificates (mTLS/Smart Card/CAC/PIV) via OCSP or CRLs before granting access to the application. F5 XC N/A Content Filtering BIG-IP BIG-IP provides the ability to decrypt TLS traffic and send this traffic to a content filtering solution for further inspection. This allows the filtering solution to inspect previously encrypted traffic and remove any malicious content. NGINX Plus N/A F5 XC N/A Authenticated Proxy BIG-IP F5 BIG-IP is a reverse proxy that provides the ability to require SAML, OIDC, Active Directory and mTLS authentication before a client can access an application. NGINX Plus F5 BIG-IP NGINX Plus is a reverse proxy that provides the ability to require OIDC, and mTLS authentication before a client can access an application in a containerized format. F5 XC N/A Data Loss Prevention BIG-IP BIG-IP can detect and block sensitive data leaving an application. Data patterns that are deemed sensitive can be added. Additionally, BIG-IP provides the ability to decrypt TLS traffic and send this traffic to a DLP solution for further inspection preventing sensitive data leakage. NGINX Plus NGINX Plus can detect and block sensitive data leaving an application. Data patterns that are deemed sensitive can be added. F5 XC F5 XC can detect and block sensitive data leaving an application. Data patterns that are deemed sensitive can be added. Domain Resolution Filtering BIG-IP BIG-IP can report of block DNS over HTTPS originating from or destined for your agency. NGINX Plus N/A F5 XC N/A Protocol Compliance Enforcement BIG-IP BIG-IP provides protocol compliance for both HTTP and DNS with the ability to report or reject traffic that is out of compliance. NGINX Plus NGINX Plus provides protocol compliance for HTTP with the ability to report or reject traffic that is out of compliance. F5 XC F5 XC provides protocol compliance for HTTP with the ability to report or reject traffic that is out of compliance. Domain Category Filtering BIG-IP BIG-IP provides break and inspect capabilities for traffic egressing from the network. Categories may be configured to bypass break and inspect for domain categories (e.g., banking, medical, government). This is typically done so that PII data is not inspected. NGINX Plus N/A F5 XC F5 XC CEs provide forward proxy capabilities with the ability to restrict domain and URL access. https://docs.cloud.f5.com/docs/how-to/network-firewall/forward-proxy-policies Domain Reputation Filtering BIG-IP BIG-IP provides the ability to deny access to domains via a list or categories of domains enforced at the HTTP protocol layer. Domain filtering can also be provided via DNS using a list of domains or an integration with a RPZ provider such as Spamhaus or SUBRL. NGINX Plus N/A F5 XC N/A Bandwidth Control BIG-IP F5 BIG-IP provides the ability to limit bandwidth on a per application basis. https://techdocs.f5.com/en-us/BIG-IP-16-1-0/big-ip-policy-enforcement-manager-implementations/managing-traffic-with-bandwidth-controllers.html NGINX Plus F5 NGINX Plus provides the ability to rate limit on a per application basis in a containerized/Kubernetes environment. F5 XC F5 XC provides the ability to rate limit on a per application basis at a regional edge, on-prem or in the cloud. Malicious Content Filtering BIG-IP BIG-IP provides the ability to decrypt TLS traffic and send this traffic to a content filtering solution for further inspection. This allows the filtering solution to inspect previously encrypted traffic and remove any malicious content. NGINX Plus N/A F5 XC N/A Access Control BIG-IP F5 BIG-IP provides the ability to define policies to limit actions on protected web applications. This is achieved by limiting on a per user and per application basis the URLs and HTTP methods that a user is permitted to access. NGINX Plus F5 NGINX Plus provides the ability to define policies to limit actions on protected web applications. This is achieved by limiting on a per user and per application basis the URLs and HTTP methods that a user is permitted to access. F5 XC F5 XC provides the ability to define policies to limit actions on protected web applications. This is achieved by limiting on a per user and per application basis the URLs and HTTP methods that a user is permitted to access. Resiliency PEP Security Capabilities Distributed Denial of Service Protections BIG-IP BIG-IP provides protection against DOS attacks at layers 3-7 by providing the ability to learn traffic patterns and establish a baseline. BIG-IP Layer 3-4 capabilities provide protection against IP, UDP and TCP based attacks. Layer 7 capabilities provide protection against DNS, TLS and HTTP based DOS attacks. NGINX Plus NGINX Plus provides protection against HTTP based DOS attacks. F5 XC F5 XC provides protection against HTTP based DOS attacks. Elastic Expansion BIG-IP F5 BIG-IP provides the ability to scale out applications by distributed the application traffic across as many instances as needed. NGINX Plus F5 NGINX Plus provides the ability to scale out applications by distributed the application traffic across as many instances as needed in a containerized environment. F5 XC F5 XC provides the ability to scale out applications by distributed the application traffic across as many instances as needed. Regional Delivery BIG-IP N/A NGINX Plus N/A F5 XC F5 XC provides the ability through a Regional Edge to host containerized application and their associated services through a secure scalable fabric. Additionally, F5 XC’s Regional Edge provides the ability to scale, secure and deliver applications across a geographically dispersed set of environments. Domain Name System PEP Security Capabilities Domain Name Sinkholing BIG-IP Domain Name Sinkholing DNS using a list of domains or an integration with a RPZ provider such as Spamhaus or SUBRL. NGINX Plus N/A F5 XC N/A Domain Name Verification for Agency Clients BIG-IP F5 BIG-IP can enforce that queries from agency clients utilize DNSSEC NGINX Plus N/A F5 XC N/A Domain Name Validation for Agency Domains BIG-IP F5 BIG-IP can enforce DNSSEC chain of trust for all agency domains. NGINX Plus N/A F5 XC N/A Intrusion Detection PEP Security Capabilities Intrusion Detection and Prevention Systems BIG-IP F5 BIG-IP provides Intrusion Detection capabilities that allow for the reporting and blocking of threats over a wide range of protocols. NGINX Plus N/A F5 XC N/A Enterprise PEP Security Capabilities Virtual Private Network BIG-IP F5 BIG-IP provides site-to-site IPSEC capabilities along with end user remote access SSL VPN. NGINX Plus N/A F5 XC N/A Application Container BIG-IP N/A NGINX Plus F5 NGINX Plus provides load balancing, ingress services (for K8s), WAF, HTTP DOS protection and API Security for containerized services. F5 XC F5 XC provides the ability to host containerized services in F5 XC Regional Edge. Services PEP Security Capabilities Active Content Mitigation BIG-IP BIG-IP provides the ability to decrypt TLS traffic and send this traffic to a content filtering solution for further inspection. This allows the filtering solution to inspect previously encrypted traffic and remove any malicious content. NGINX Plus N/A F5 XC N/A Data Loss Prevention BIG-IP BIG-IP can detect and block sensitive data leaving an application. Data patterns that are deemed sensitive can be added. Additionally, BIG-IP provides the ability to decrypt TLS traffic and send this traffic to a DLP solution for further inspection preventing sensitive data leakage. NGINX Plus NGINX Plus can detect and block sensitive data leaving an application. Data patterns that are deemed sensitive can be added. F5 XC F5 XC can detect and block sensitive data leaving an application. Data patterns that are deemed sensitive can be added. Protocol Compliance Enforcement BIG-IP F5 BIG-IP provides the ability to enforce protocol compliance for HTTP and DNS protocols. NGINX Plus F5 NGINX Plus provides the ability to enforce protocol compliance for the HTTP protocol. F5 XC F5 XC provides the ability to enforce protocol compliance for the HTTP protocol. Malicious Content Filtering BIG-IP BIG-IP provides the ability to decrypt TLS traffic and send this traffic to a content filtering solution for further inspection. This allows the filtering solution to inspect previously encrypted traffic and remove any malicious content. NGINX Plus N/A F5 XC N/A Access Control BIG-IP F5 BIG-IP provides the ability to define policies to limit actions on protected web applications. This is achieved by limiting on a per user and per application basis the URLs and HTTP methods that a user is permitted to access. NGINX Plus F5 NGINX Plus provides the ability to define policies to limit actions on protected web applications. This is achieved by limiting on a per user and per application basis the URLs and HTTP methods that a user is permitted to access. F5 XC F5 XC provides the ability to define policies to limit actions on protected web applications. This is achieved by limiting on a per user and per application basis the URLs and HTTP methods that a user is permitted to access. Identity PEP Security Capabilities Behavioral Baselining BIG-IP BIG-IP can learn HTTP traffic patterns and establish a baseline to protect applications. NGINX Plus N/A F5 XC N/A Multi-factor Authentication BIG-IP F5 BIG-IP supports requiring SAML, OIDC, Active Directory, and mTLS authentication before a client can access an application NGINX Plus F5 BIG-IP NGINX Plus supports requiring OIDC, and mTLS authentication before a client can access an application containerized format. F5 XC N/A Continuous Authentication BIG-IP F5 BIG-IP provides the ability to authenticate users prior to accessing an application. After access to the application BIG-IP can enforce periodic requests for authentication to reverify the client’s identity in addition to their OS posture. NGINX Plus N/A F5 XC N/A190Views2likes0CommentsNGINX as an HTTP Load Balancer
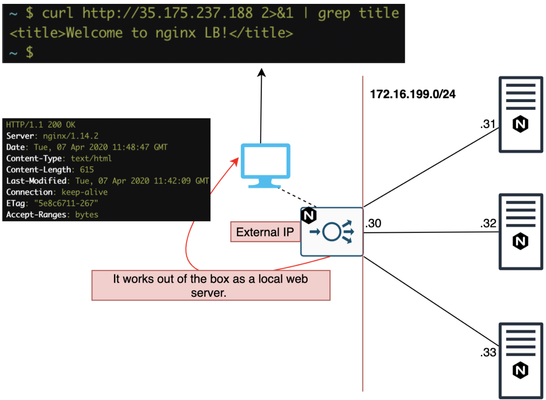
Quick Intro You've probably used NGINX as a WebServer and you might be wondering how does it work as a load balancer. We don't need a different NGINX file or to install adifferent package to make it a load balancer. NGINX works as a load balancer out of the box as long as we specify we want it to work as a load balancer. In this article, we're going to introduce NGINX HTTP load balancer. If you need more details, please refer to NGINX official documentation. However, NGINX also supportsTCP and UDP load balancingandhealth monitorswhich are not covered here. NGINX as a WebServer by default Once NGINX is installed, it works as a WebServer by default: The response above came from our client-facing NGINX Load Balancer-to-be which is currently just a webserver. Let's make it an HTTP load balancer, shall we? NGINX as a Load Balancer Disable WebServer Let's comment out thedefaultfile on/etc/nginx/sites-enabledto disable our local WebServer just in case: Then I reload the config: If we try to connect now, it won't work now because we disabled thedefaultpage: Now, we're ready to create the load balancer's file! Creating Load Balancer's file Essentially, the default NGINX config file (/etc/nginx/nginx.conf) already has an http block which references the/etc/nginx/conf.ddirectory. With that in mind, we can pretty much create our file in/etc/nginx/conf.d/and whatever is in there will be in HTTP context: Withinupstreamdirective, we add our backend servers along with the port they're listening to. These are the servers NGINX load balancer will forward the request to. Lastly, we create a server config for our listener withproxy_passpointing to upstream name (backends). We now reload NGINX again: Lab tests NGINX has a couple of different load balancing methods and round robin (potentially weighted) is the default one. Round robin test I tried the first time: Second time: Third time: Fourth time it goes back to server 1: That's because the default load balancing method for NGINX is round robin. Weight test Now I've added weight=2 and I expect that server 2 will proportionally take 2x more requests than the rest of the servers: Once again I reload the configuration after the changes: First request goes to Server 3: Next one to Server 2: Then again to Server 2: And lastly Server 1: Administratively shutting down a server We can also administratively shut down server 2 for maintenance, for example, by adding thedownkeyword: When we issue the requests it only goes to server 1 or 3 now: Other Load Balancing methods Least connections Least connections sends requests to the server with the least number of active connections taking into consideration any optionally configuredweight: If there's a tie,round robinis used, taking into account the optionally configured weights. For more information on least connections method, please click here. IP Hash The request is sent to the server as a result of a hash calculation based on the first 3 octets of Client IP address or the whole IPv6 address. This method makes sure requests from the same client are always sent to the same server, unless it's unavailable. Note: A hash from server that is marked down is preserved for when it comes back up. For more information on IP hash method, please click here. Custom or Generic Hash We can also define a key for the hash itself. In below example, the key is the variable$request_uriwhich represents the URI present in the HTTP request sent by client: Least Time (NGINX Plus only) This method is not supported in NGINX free version. In this case, NGINX Plus picks the server with lowest average latency + number of active connections. The lowest average latency is calculated based on an argument passed toleast_timewith the following values: header: time it took to receive the first byte from server last_byte: time it took to receive the full response from server last_byteinflight: time it took toreceive full response from server taking into account incomplete requests In above example, NGINX Plus will make its load balancing decision based on the time it took to receive the full HTTP response from our server and will also include incomplete requests in the calculation. Note that /etc/nginx/conf.d/ is the default directory for NGINX config files. In above case, as I installed NGINX directly from Debian APT repository, it also added sites-enabled. Some Linux distributions do add it to make it easier for those who use Apache. For more information on least time method, please click here. Random In this method, requests are passed on to randomly selected servers but it's only ideal for environments where multiple load balancers are passing on requests to the same back end servers. Note that least_time parameter in this method is only available on NGINX Plus. For more details about this method, please clickhere.2.9KViews2likes0CommentsAchieving an SSL Labs A+ score with F5 products
Overview Transport Layer Security (TLS, formerly SSL or Secure Sockets Layer) is a verywell-establishedlayer 5 protocol with many moving parts. It has been augmented significantly over the years to address a seemingly endless series of new requirements and vulnerabilities. Despite its significant maturity, TLS remains a misunderstood system thatorganizationsstruggle with. This article aims to describe what is required to achieve a good TLS configuration on F5 products, from the point of view of an industry standard SSL Labs testing tool from Qualys. Generally, getting a good score (at the moment!) from SSL Labs involves a few main points: Restricting the supported protocols to TLS 1.2 and 1.3 Disabling weak ciphers, algorithms, andconfiguration options Enabling HTTP Strict Transport Security (HSTS). If you do the above things, you should easily be able toachievean A or A+ score. Having HSTS enabled means that a client browser will always try to connect to your site using HTTPS. You should be somewhat cautious when enabling HSTS, as this setting is cached by the client browser (for a definableperiod). If you hadacatastrophe with your site, it could potentially leave it unreachable as browsers would never try to connect via HTTP. In myview,the risk is low and the reward is high. F5 Distributed Cloud If you haveanHTTPS-enabledLoad Balancer configuration configured on F5 Distributed Cloud, then this task couldn't be easier. The 'TLS Security Level' setting of 'High' should get you an 'A' score, and all you need to do to achieve an 'A+' is enable HSTS. Make sure 'TLS Security Level' is set to 'High', tick the 'Add HSTS Header' option and pat yourself on the back because you're all done. F5 BIG-IP To securely configureanHTTPS service on a BIG-IP, we are going to configure twoobjects,anHTTP profile and an SSL profile. This article will presume that you have an existing Virtual Server and other underlying configuration (SSL certificates, etc). SSL profile The SSL profile needs to be using a cipher group such as 'f5-secure' and the following options set: No SSL, No DTLS, No TLS v1.1, Single DH use, No DTLS v1.2, No SSLv3, No TLSv1. I also recommend changing the SSL signing hash algorithm to SHA256 or SHA384. A sample Client SSL configuration looks like this: ltm profile client-ssl clientssl_Mysite-2023 { cert-key-chain { Mysite-Chain-0 { cert Mysite-2023 chain Mysite-2023 key Mysite-2023 } } cipher-group f5-secure ciphers none defaults-from clientssl options { dont-insert-empty-fragments no-ssl no-dtls no-tlsv1.1 single-dh-use no-dtlsv1.2 no-dtlsv1 no-sslv3 no-tlsv1 } ssl-sign-hash sha384 } HTTP profile The HTTP profile also needs some changes to insert the headers associated with HSTS: ltm profile http http_Mysite-2023 { defaults-from http hsts { include-subdomains enabled maximum-age 31536000 mode enabled preload disabled } proxy-type reverse } If you are using iRules to do other HTTP transforms, then you may need to do the HSTS HTTP header insertions in an iRule due to the order of operations of the TMM proxy. These instructions have been developed on TMOS 17.1. Similar results should be possible on older versions back to TMOS 14.1. Anything olderwon'tsupport the requisite ciphers and protocols required for a good score. NGINX Plus Because NGINX has such strong community support, the TLS security settings required for a good SSL Labs score with NGINX Plus are easily found. The settings below will do the trick: ssl_session_cache shared:le_nginx_SSL:1m; ssl_session_timeout 1440m; ssl_protocols TLSv1.3 TLSv1.2; ssl_prefer_server_ciphers on; ssl_ciphers EECDH+ECDSA+AESGCM:EECDH+aRSA+AESGCM:EECDH+ECDSA+SHA512:EECDH+ECDSA+SHA384:EECDH+ECDSA+SHA256:ECDH+AESGCM:ECDH+AES256:DH+AESGCM:DH+AES256:RSA+AESGCM:!aNULL:!eNULL:!LOW:!RC4:!3DES:!MD5:!EXP:!PSK:!SRP:!DSS; ssl_buffer_size 4k; add_header Strict-Transport-Security 'max-age=31536000; includeSubDomains; preload' always; If you are using LetsEncrypt, you may find these settings are automatically installed for you when certbot manages your certificates. For a more thorough discussion of configuring TLS on NGINX+, please review this article. Other considerations Disabling TLS 1.1 (and older) as described in this guide will mean that old browsers can no longer connect to your site using HTTPS. Browsers that can't support at least TLS 1.2 probably shouldn't be usedanymore,as there is likely a very large number of other problems they are vulnerable to. Someorganizationscreate a non-SSL landing page that presents a "sorry" page for such browsers. I can envisage a little logic in an iRule that checks for old HTTPUser Agent's andredirectsto a "sorry" page, while newer browsers are redirected to a HTTPS site. Another piece of the puzzle to consider isDNSconfiguration—whichis a topic large enough for its own post. That aside, it is worth mentioning that you should implement a CAA record (Certificate Authority Authorization) that defines which TLS Certificate Authorities are allowed to issue certificates for your DNS domain. It is a simple change that SSL Labs looks for in its tests (though it doesn't appear to change the score). The DNS record is similar to below: example.org. CAA 128 issue "letsencrypt.org" For moreinformation,look at RFC 6844. Conclusion Theseinstructions to achieve a good SSL Labs score and the required configurations are valid at the time of published, but a good security posture is a moving target and as such requires constant evaluation. That is one distinct advantage of F5 DistributedCloud—theconfigurations are constantly beinganalyzedand enhanced behind-the-scenes by a team of expert engineers.690Views1like0CommentsHow to persist 'real' IP into Kubernetes
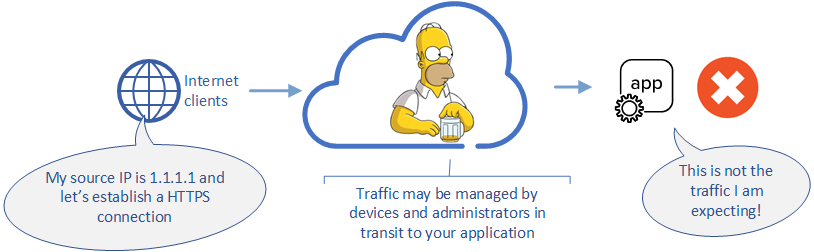
Summary How do you preserve the “real” IP address to a Pod (container) that is running in a Kubernetes cluster?Recently Eric Chen and I got asked this question by a customer and we’ll share how we solved this problem. What's the Problem? In Kubernetes a “pod” is not sitting on your external network, instead it is sitting comfortably on its own network.The issue is that using NodePort to expose the pod will source NAT (SNAT) and the pod will see the IP address of another internal IP address.You could use a “externalTrafficPolicy” to preserve the IP address, but that has some other limitations (you have to steer traffic to the node where the pod is running). Possible Solutions X-Forwarded-For The obvious solution to preserve the source IP address is to have an external load balancer insert an X-Forwarded-For header into HTTP requests and have the pod use the HTTP header value instead of the client IP address.The load balancer would change a request from: GET /stuff HTTP/1.1 host: mypod.example.com to: GET /stuff HTTP/1.1 host: mypod.example.com X-Forwarded-For: 192.0.2.10 This works well for HTTP traffic, but does not work for TCP traffic. Proxy Protocol Proxy Protocol is a method of preserving the source IP address over a TCP connection.Instead of manipulating the traffic at Layer 7 (modifying the application traffic); we will manipulate the TCP traffic to add a prefix to the connection with the source IP address information.At the TCP level this would change the request to: PROXY TCP[IP::version] [IP::remote_addr] [IP::local_addr] [TCP::remote_port] [TCP::local_port] GET /stuff HTTP/1.1 host: mypod.example.com Note that the application payload is not modified, but has data appended to it. Some implications of proxy protcol: In the case of encrypted traffic, there is no need for the load balancer to terminate the SSL/TLS connection. The destination of the proxy protocol traffic must be able to remove prefix prior to processing the application traffic (otherwise it would believe the connection was somehow corrupted). I.e., both endpoints of a connection need to support proxy protocol. Customer's Problem Statement The customer wanted to use both a BIG-IP at the edge of their Kubernetes cluster AND use NGINX as the Ingress Controller within the Kubernetes.The BIG-IP would be responsible for providing L4 TCP load balancing to NGINX that would be acting as a L7 HTTP/HTTPS Ingress Controller. Using the solutions outlined earlier we were able to provide a solution that met these requirements. BIG-IP utilizes proxy protocol to preserve the source IP address over a TCP connection. BIG-IP can be the sender of proxy protocol with this iRule. NGINX is configured to receive proxy protocol connections from the BIG-IP and uses X-Forwarded-For headers to preserve the source IP address to the pod. To deploy the solution we leveraged Container Ingress Services to deploy the proxy protocol configuration and bring traffic to the NGINX Ingress Controller.NGINX Ingress Controller was configured to use proxy protocol for connections originating from the BIG-IP. Conclusion Using F5 BIG-IP and NGINX we were able to provide a solution to the customers requirements and provide better visibility into the “real” IP address of their clients.5.6KViews1like1Comment