Configuring an Application for Smart Card Authentication and Forms Based SSO Using a Static Username and Password
A customer recently reached out requesting assistance providing smart card authentication to an application that does not integrate with AD or LDAP and has only a single username and password. While many of you out there may have done this in the past, I for one had not and of course I too was curious how I could make such a solution work. So with that, let's get to it.
In order to successfully deploy this solution, please configure the following prerequisites.
- Local Traffic Manager licensed and provisioned
- Access Policy Manager licensed and provisioned
- CA certificate or a bundle of CA certs
Note: This CA cert or bundle will contain all CA certs which issued the client certificates you will be authenticating with.
- OCSP IP address for certificate revocation checking
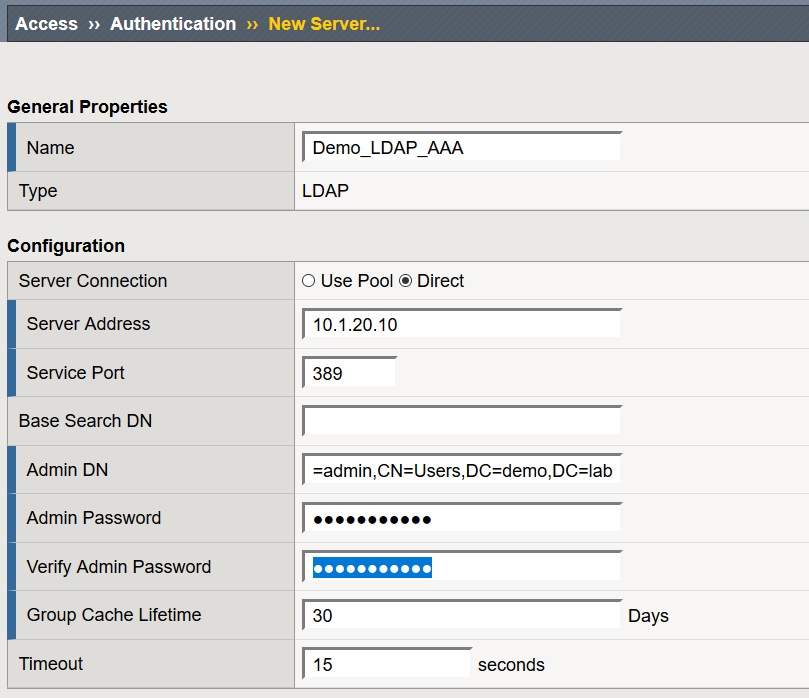
Configuring a LDAP AAA Resource
- Navigate to Access > Authentication > LDAP and select Create
- Name: Demo_LDAP_AAA
- Server Connection: Direct
- Base Port: 389
- Admin DN: CN=admin,CN=Users,DC=demo,DC=lab
- Leave all other settings at their defaults and select Finished
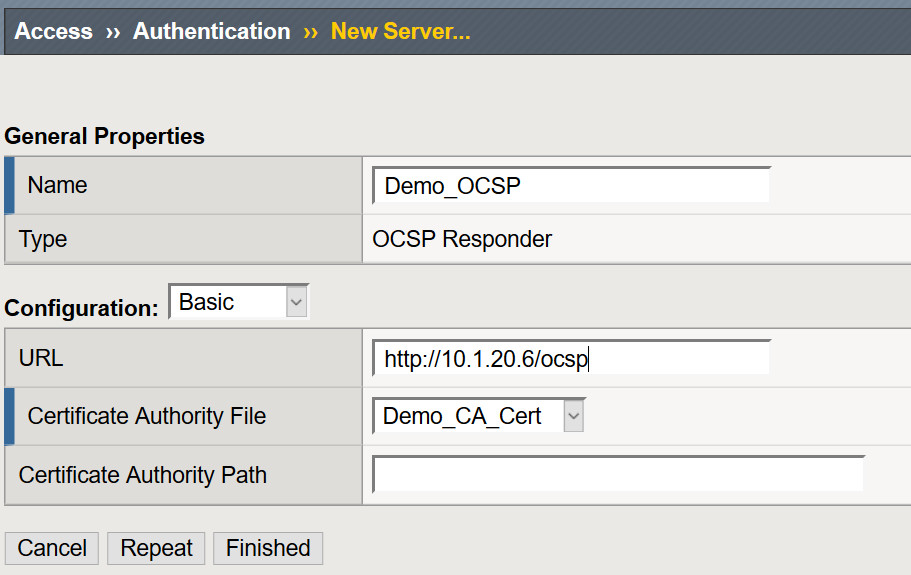
Configuring a OCSP AAA Resource
- Navigate to Access > Authentication > OCSP Responder > Select Create
- Name: Demo_OCSP
- URL: http://OCSP_IP/ocsp
- Certificate Authority File: Select the issuing CA Certificate
- Leave all other settings at their defaults and select Finished
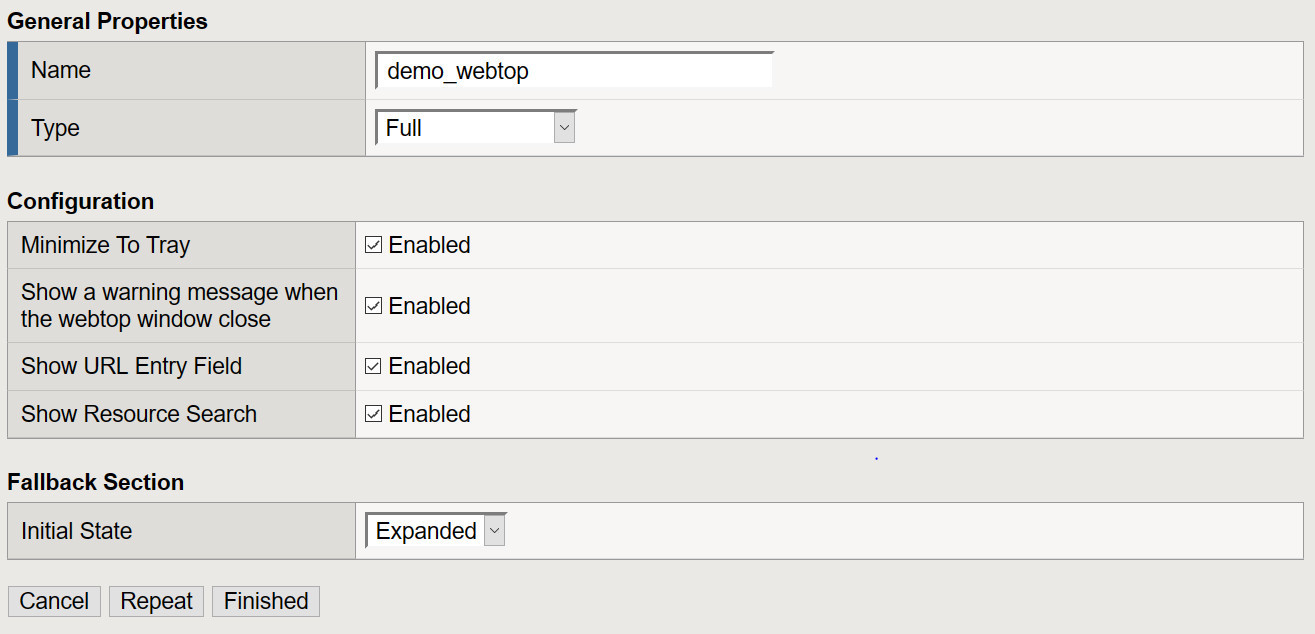
Creating a Webtop
- Navigate to Access >> Webtops >> Webtop Lists: Create
- From the drop down select Full for the type of Webtop you will be deploying, provide a name and select Finished.
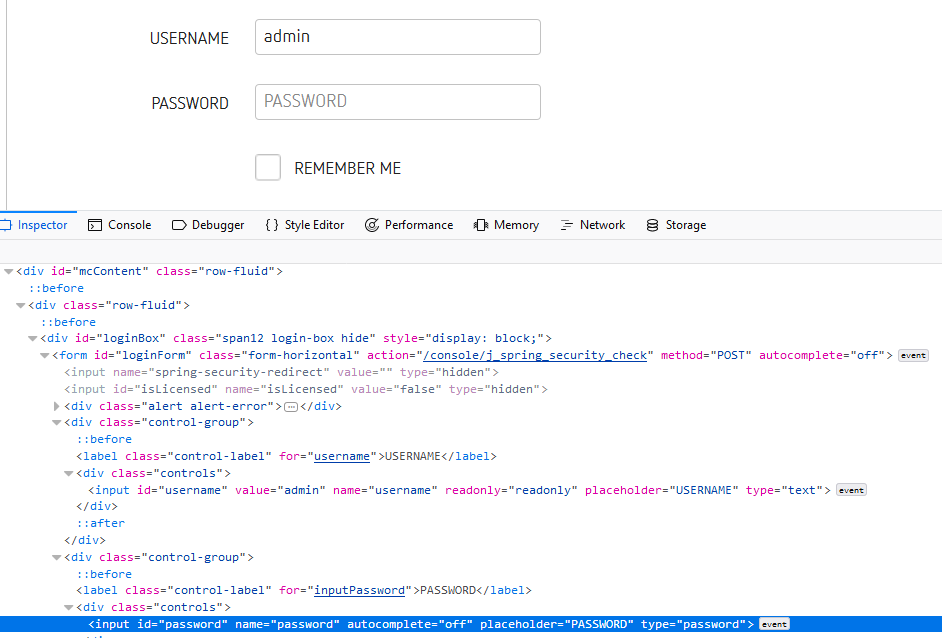
Identify Form, Form Action and Form Parameters
In this scenario I used Firefox though your favorite browser can also be used. This data will be used to configure our SSO profile.
- Lunch Firefox and browse to the application you are attempting to configure SSO for.
- From the Firefox Menu bar, select Tools >> Web Developer >> Click Inspector
To make it easy to identify the form I simply clicked in the USERNAME or PASSWORD in fields in the web page and Inspector took me to that content.
- Capture action: /console/j_spring_security_check
- Capture method: POST
- Capture input id for the username parameter
- Capture input id for the password parameter
Create a Forms SSO Profile
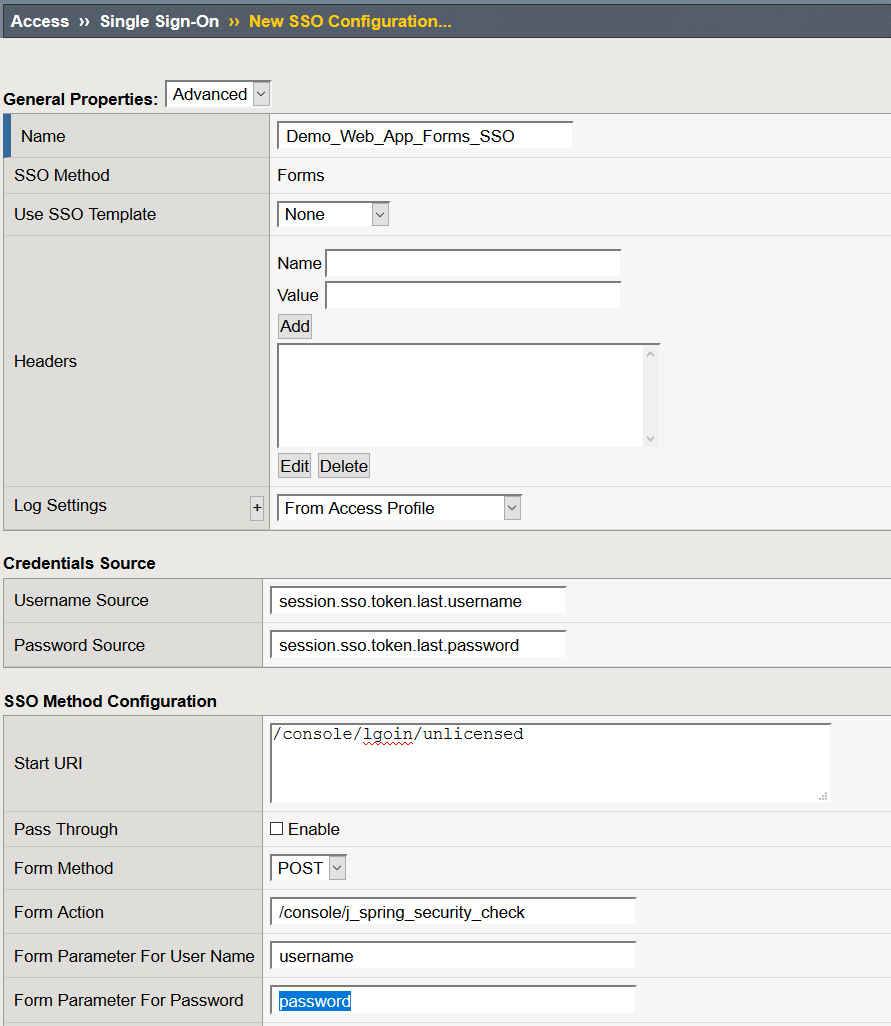
- Navigate to Access >> Single Sign-On >> Forms Based >> Click Create
- Name: Demo_Web_App_Forms_SSO
- User SSO Template: None
- Username Source: session.sso.token.last.username
- Password Source: session.sso.token.last.password
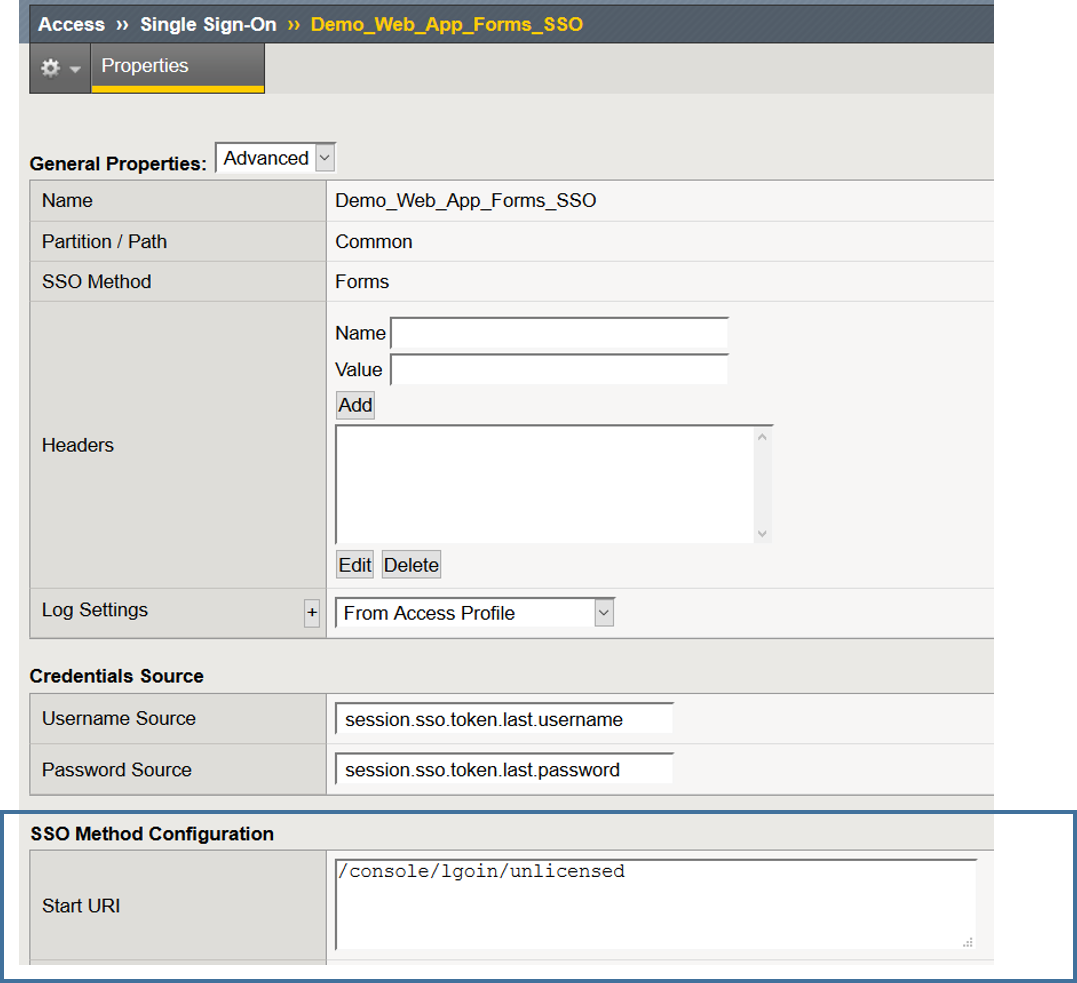
- Start URI: This is URI of the application at the logon screen
- Form Method: Post
- Form Action: /console/j_spring_security_check
- Form Parameter For User Name: username
- Form Parameter For Password: password
- Click Finished
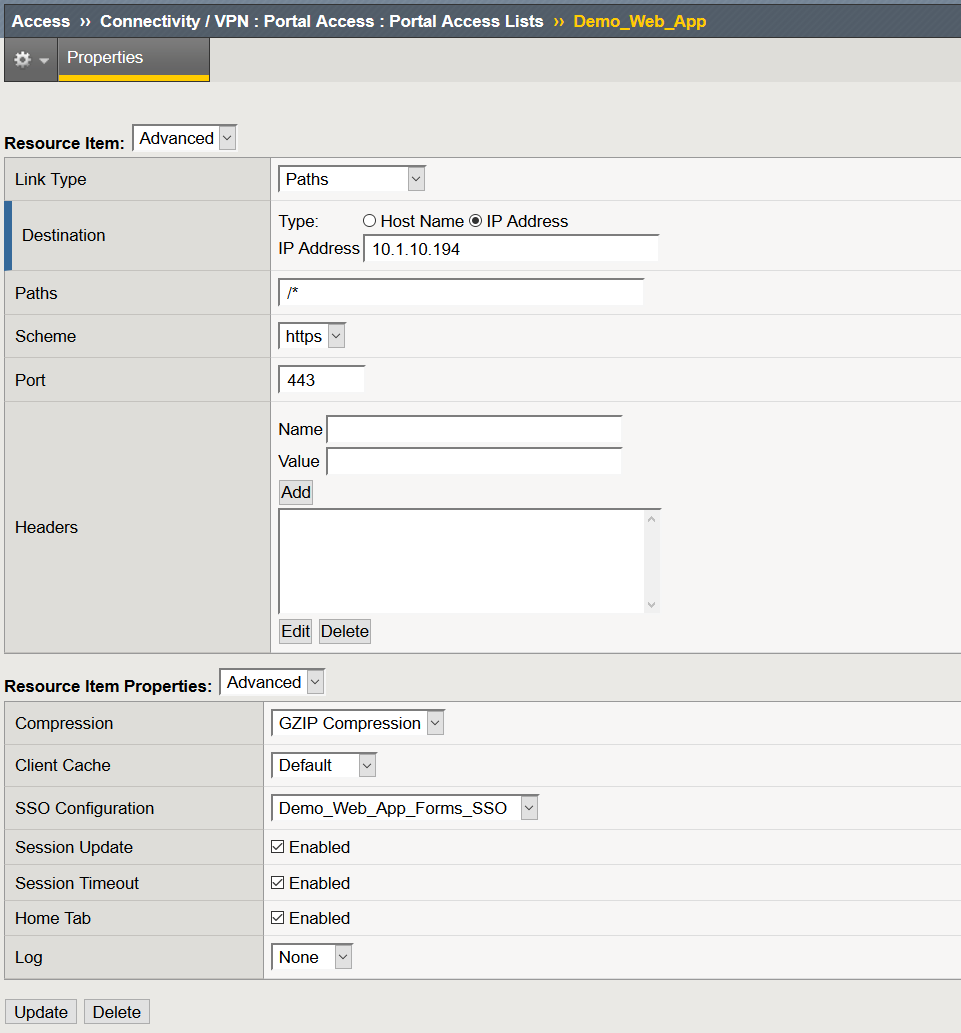
Create a Portal Access Resource
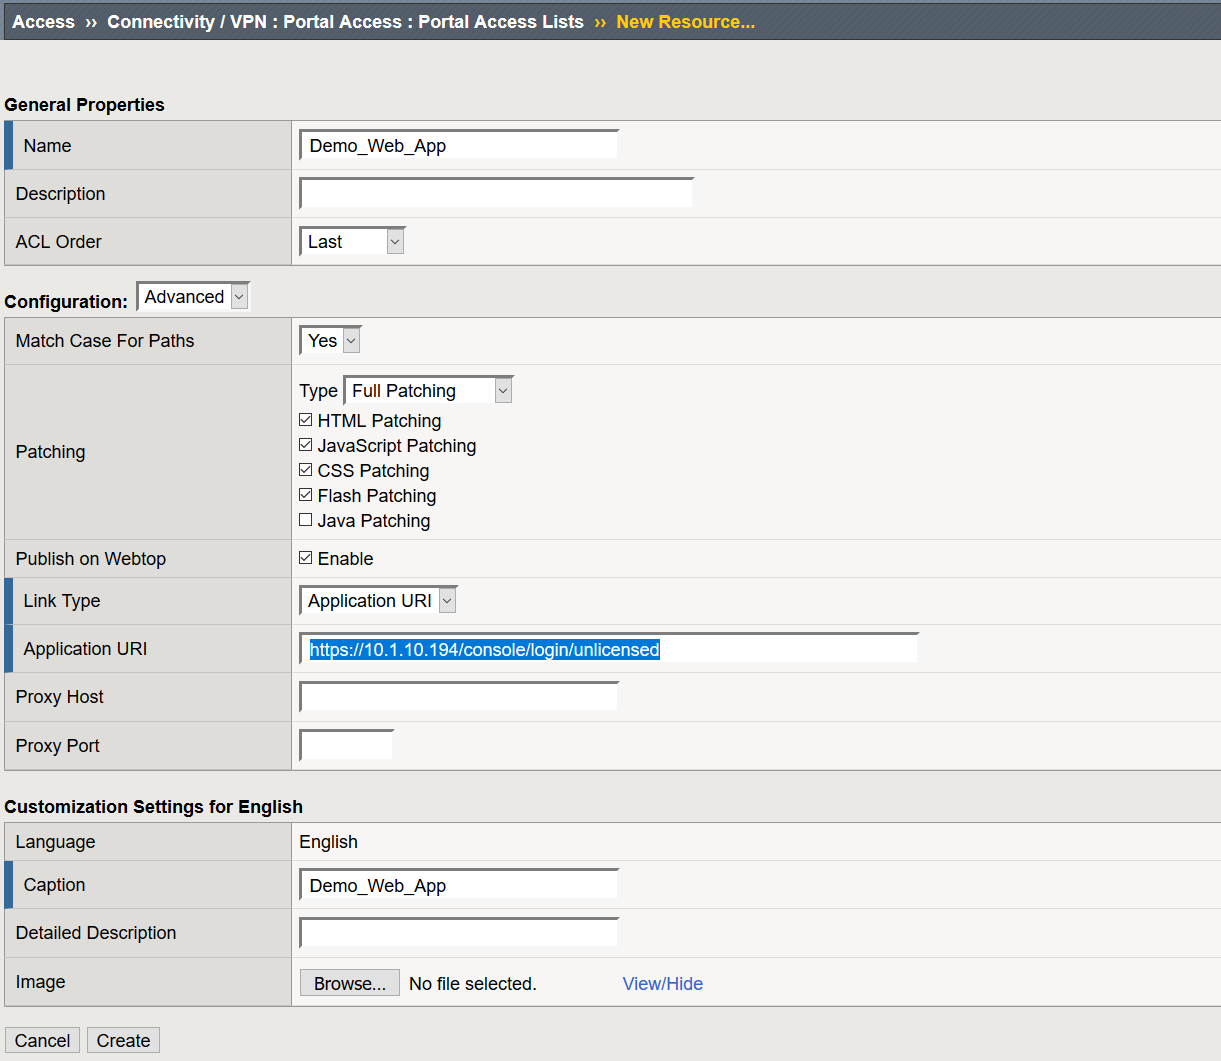
- Navigate to Access >> Connectivity / VPN >> Portal Access >> Portal Access List >> Click Create
- Name: Demo_Web_App
- Link Type: Application URI
- Application URI: URI to your web application
- Caption: Demo_Web_App
- Click Create
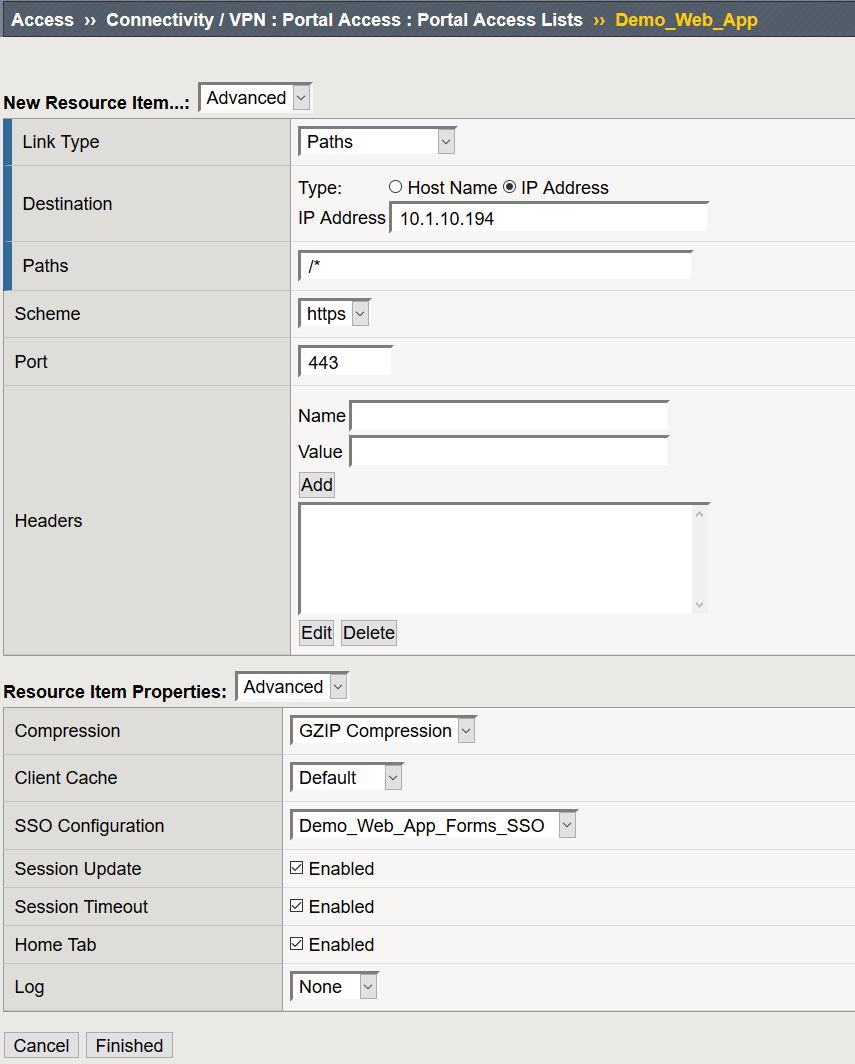
After you click Create, the page will refresh and at the bottom of the screen you will then see an option to create Resource Items
- Click Add
- Destination: IP or Host Name of the web application
- Link Type: Paths
- Paths: /*
- Scheme: https
- SSO Configuration: Demo_Web_App_Forms_SSO
- Click Finished
Create a Connectivity Profile
- Navigate to Access >> Connectivity / VPN > Connectivity >> Profiles >> Click Add
- Profile Name: Demo_CP
- Parent Profile: connectivity
- Click OK
Create Client Cert Access Policy
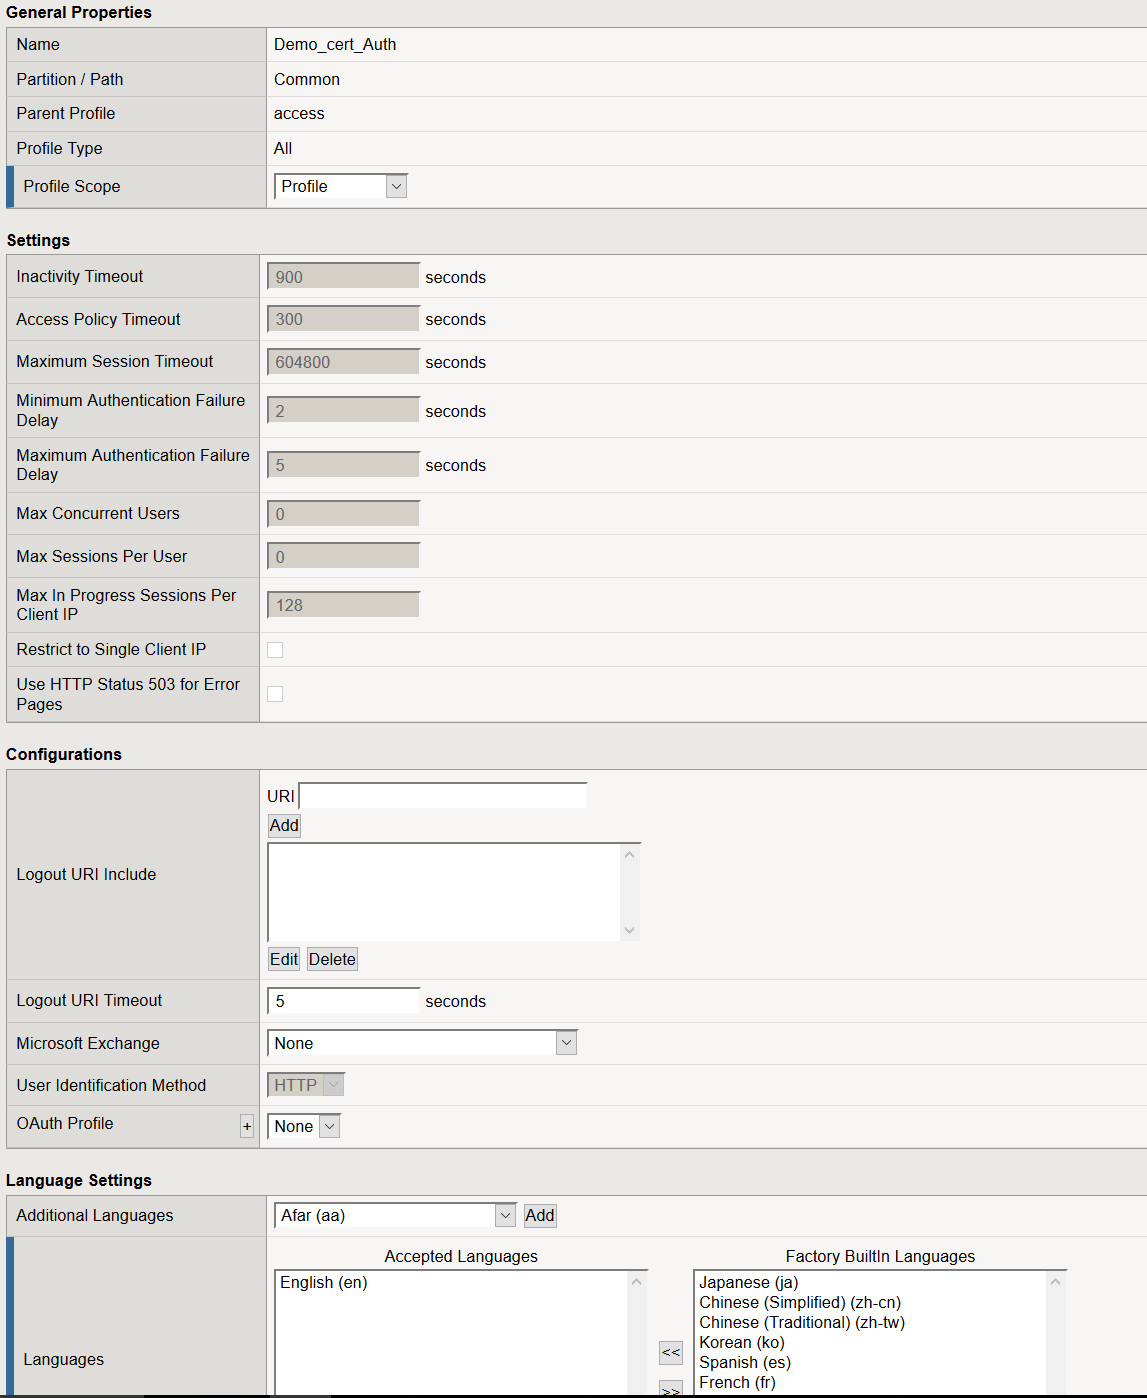
- Navigate to Access > Profiles / Policies > Select Create
- Name: Demo_cert_Auth
- Profile Type: All
- Profile Scope: Profile
- Languages: Select your desired language and move it to Accepted Languages
- Leave all other settings at their defaults and select Finished
Modify the Access Policy Using the Visual Policy Editor
- From the Access > Profiles > Policies : Access Profiles (Per-Session Policies) page, select Edit from the access policy created in the previous step.
- Between Start and Deny select the +
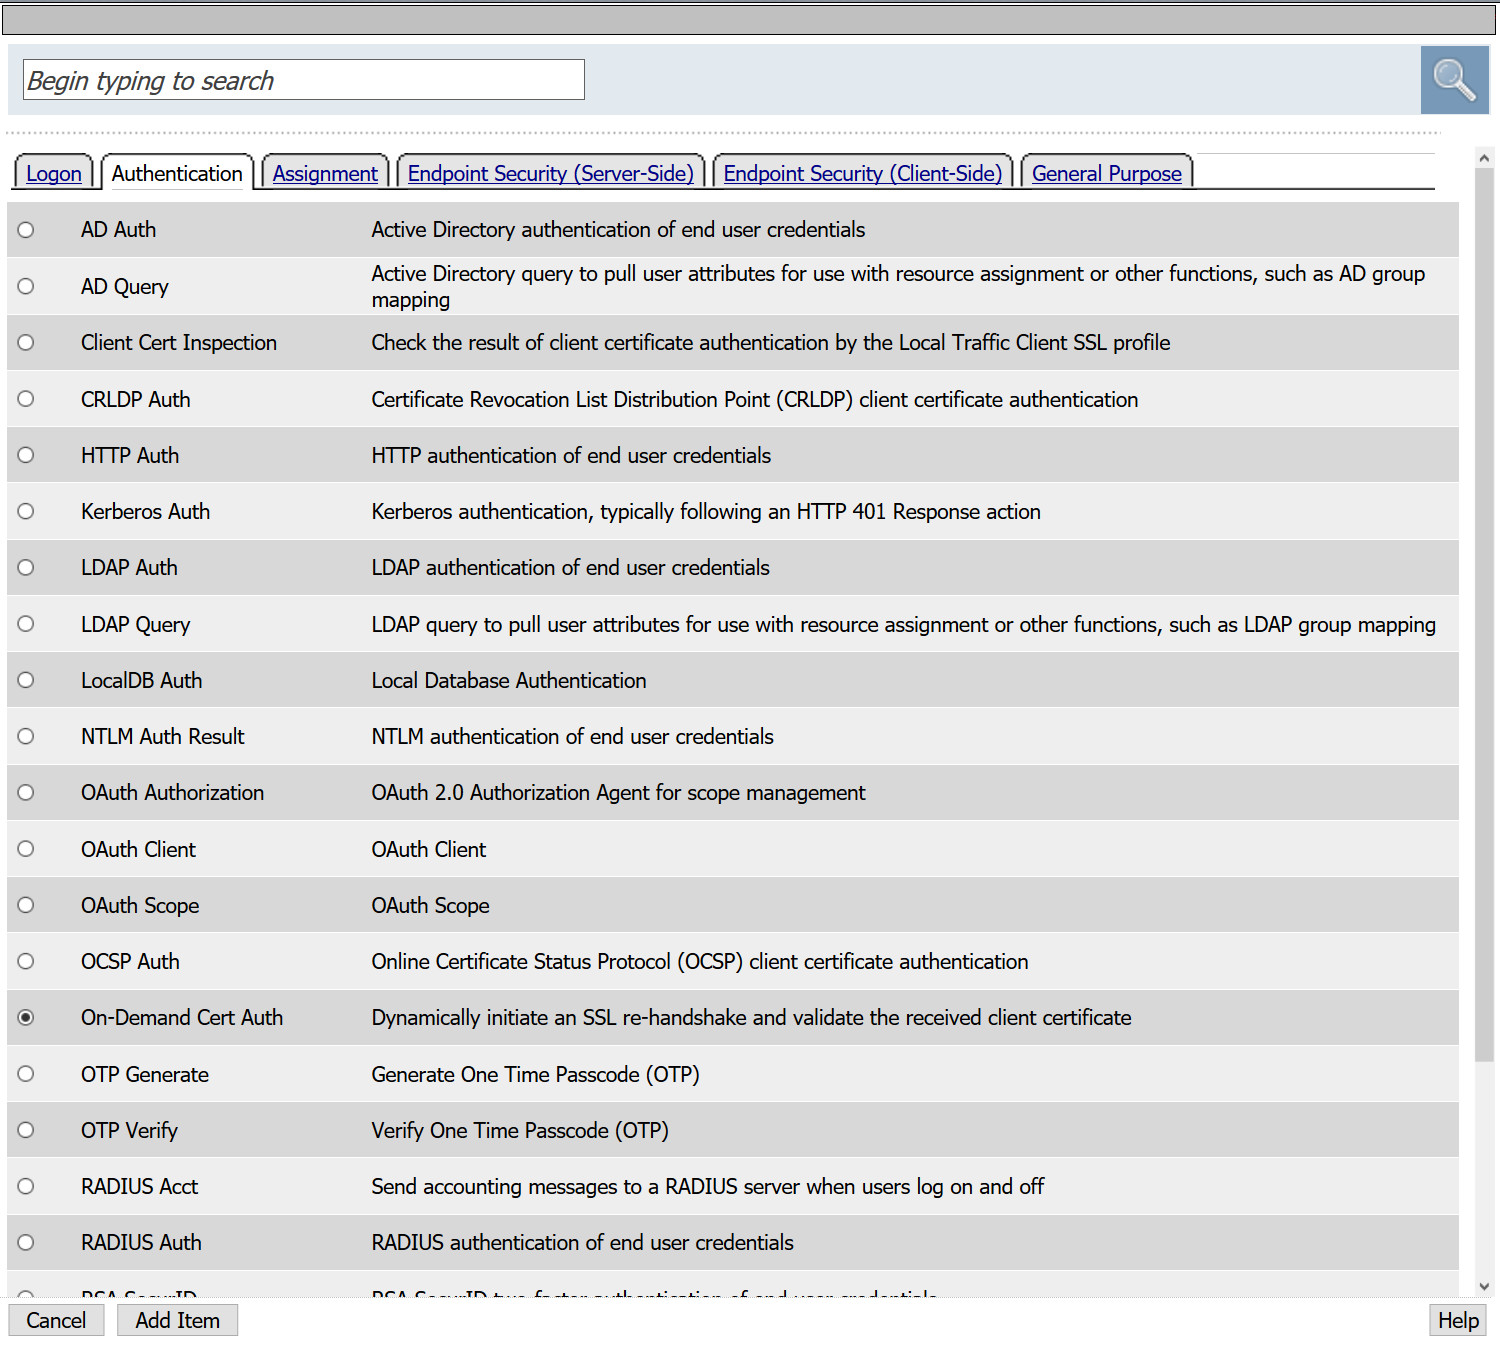
- From the popup select the Authentication tab and select On_Demand Cert Auth > Add Item
- You will be presented with an option to request or require a client present a client certificate. For this example, we will Require the client present a certificate.
- Select Save
- Following the successful branch of On Demand Cert Auth in the VPE, select +
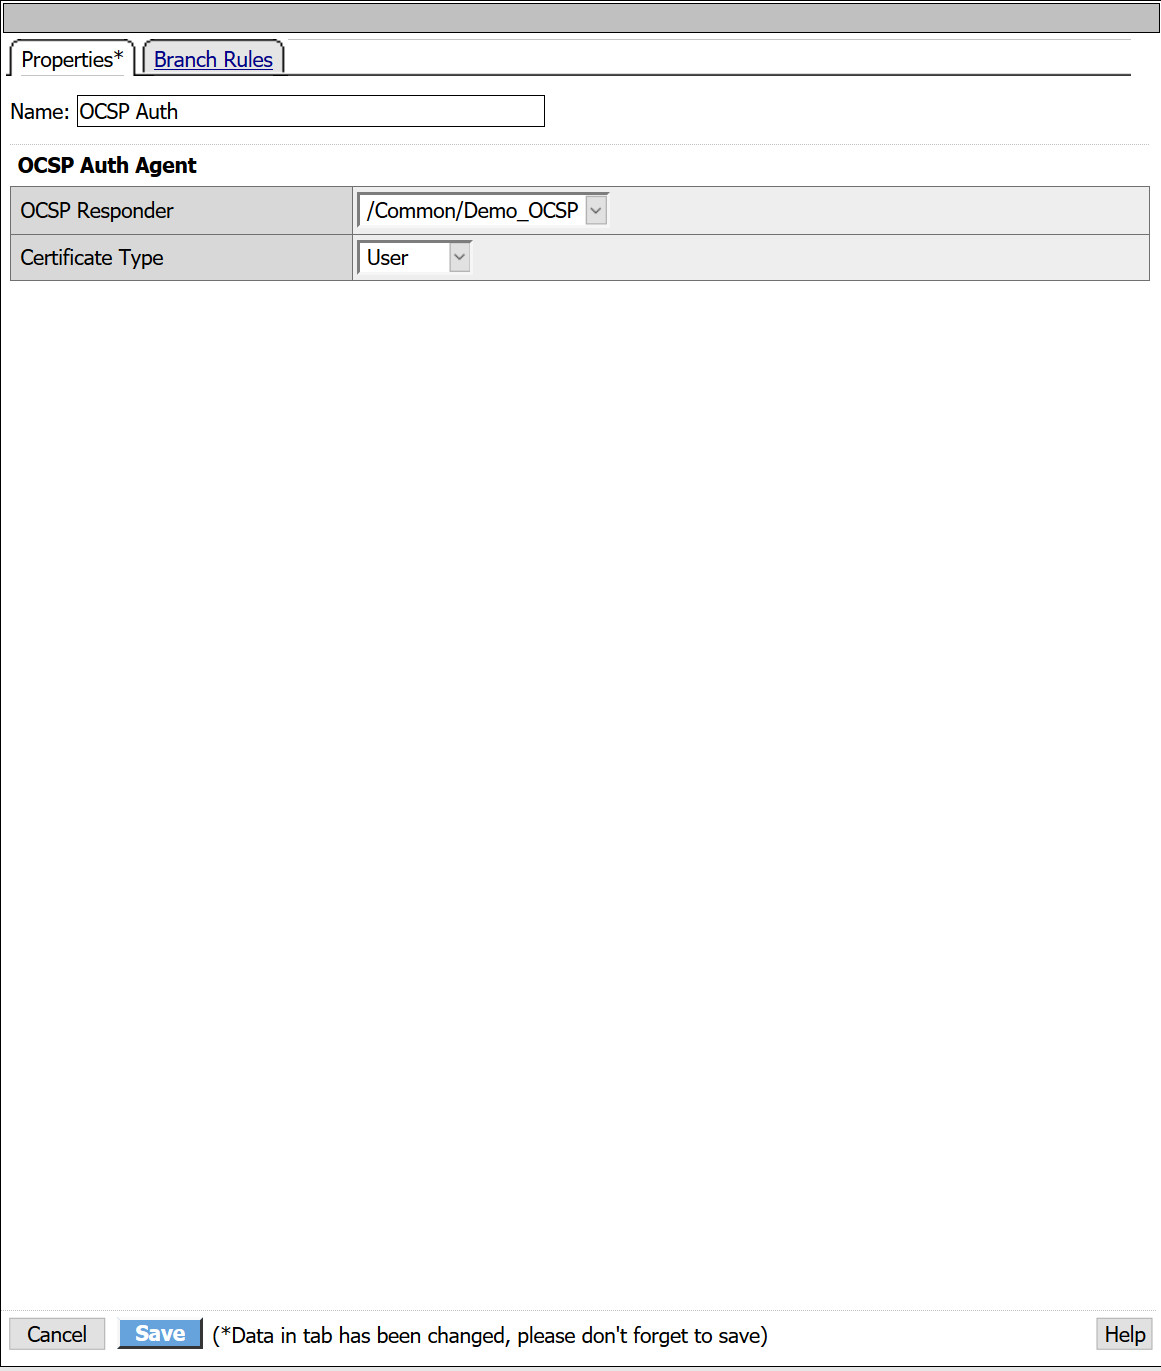
- From the Authentication tab, select OCSP Auth > Add Item
- From the OCSP Responder drop down, select the OCSP AAA object created in previous steps.
- Certificate Type: User
- Click Save
- Following the successful branch of OCSP Auth, select +
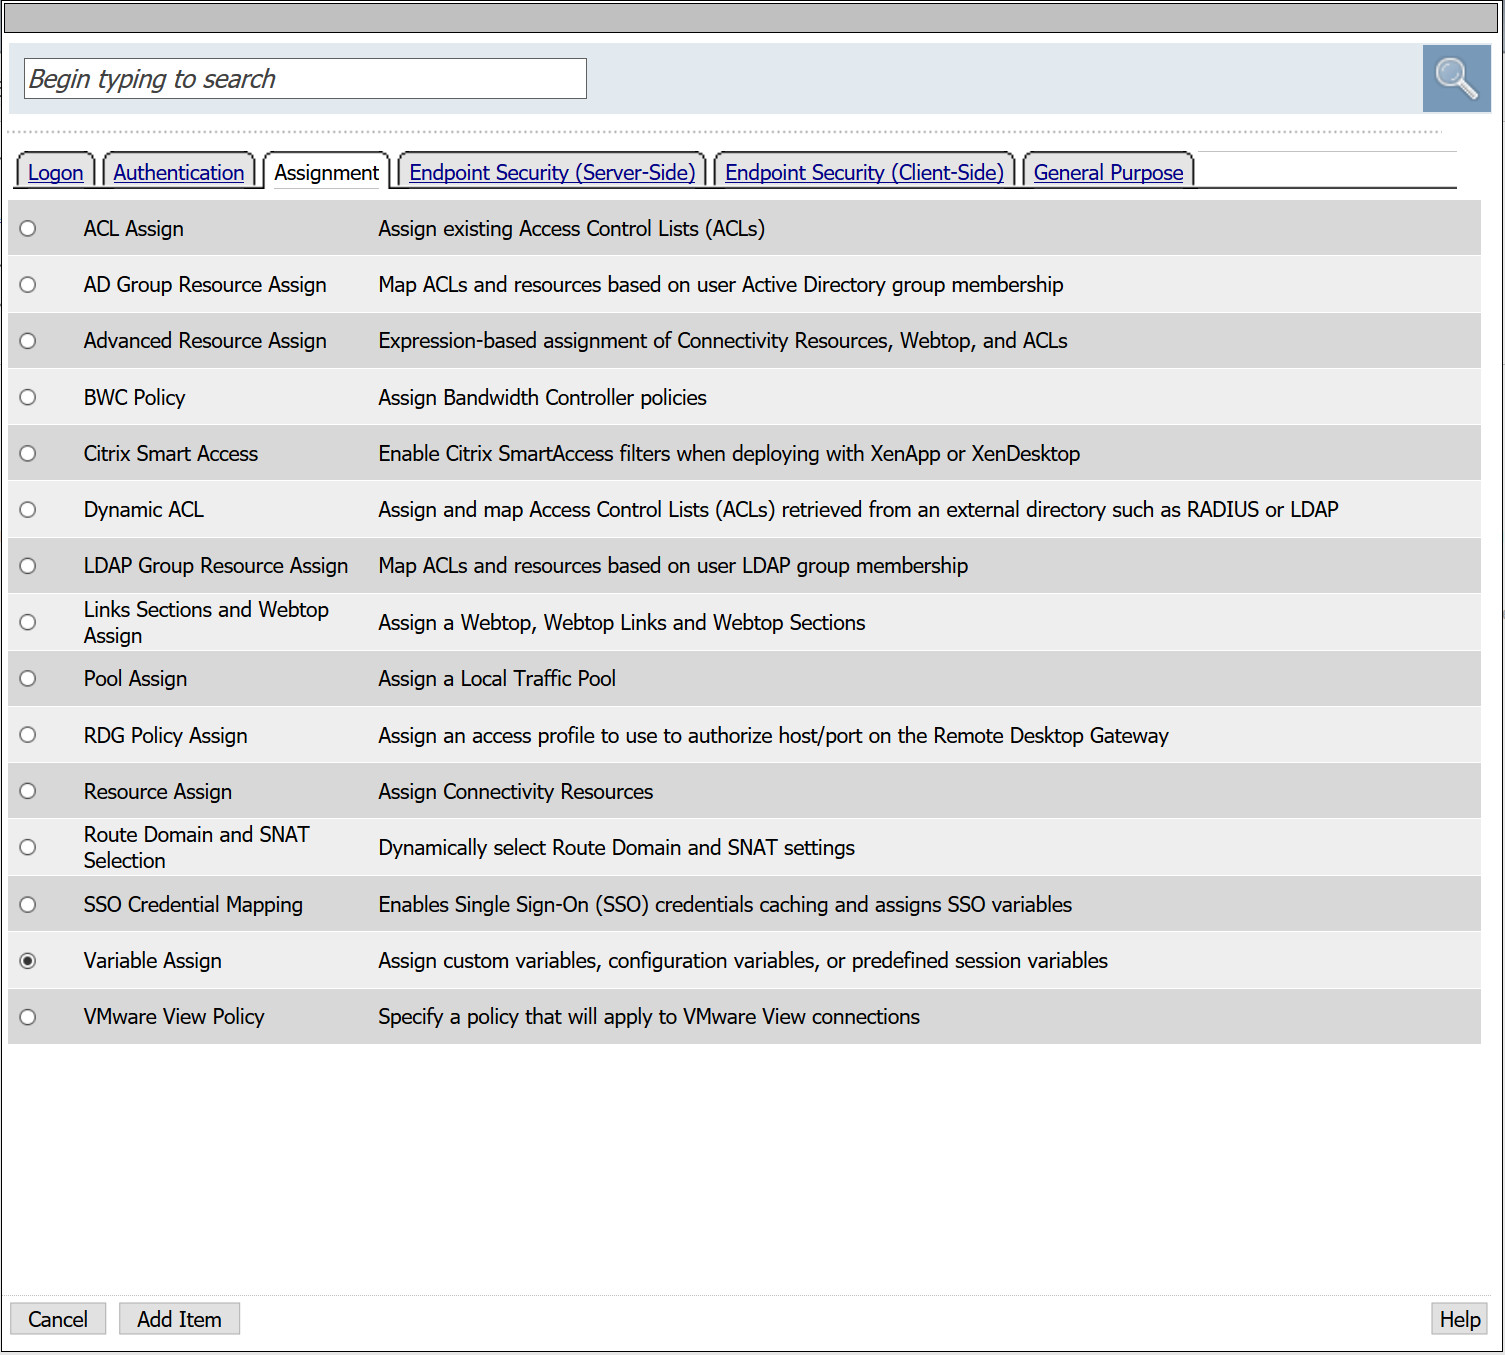
- From the Assignment tab, select Variable Assign > Add Item
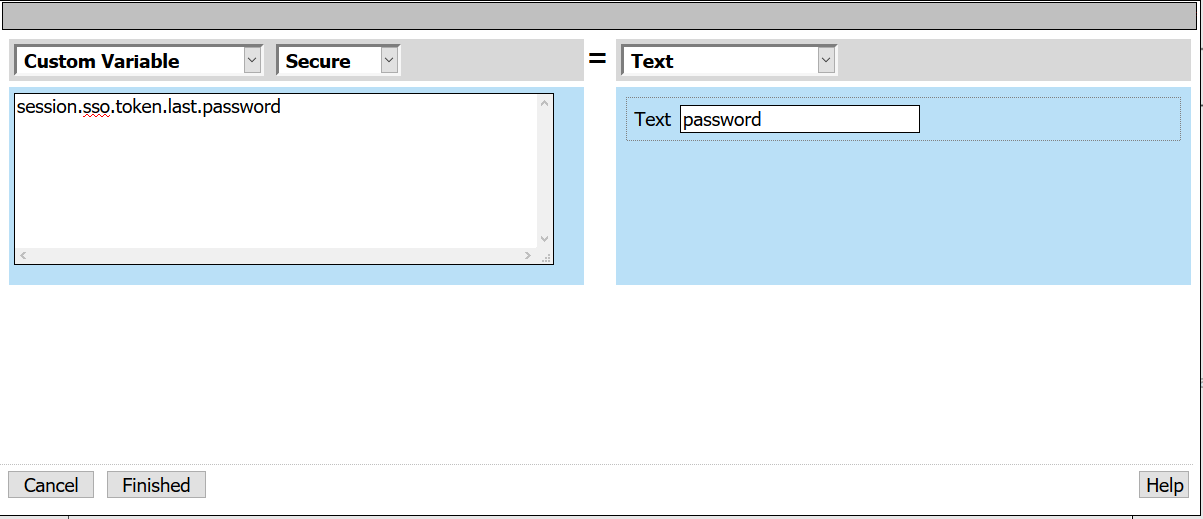
- From the first empty Assignment, select Change
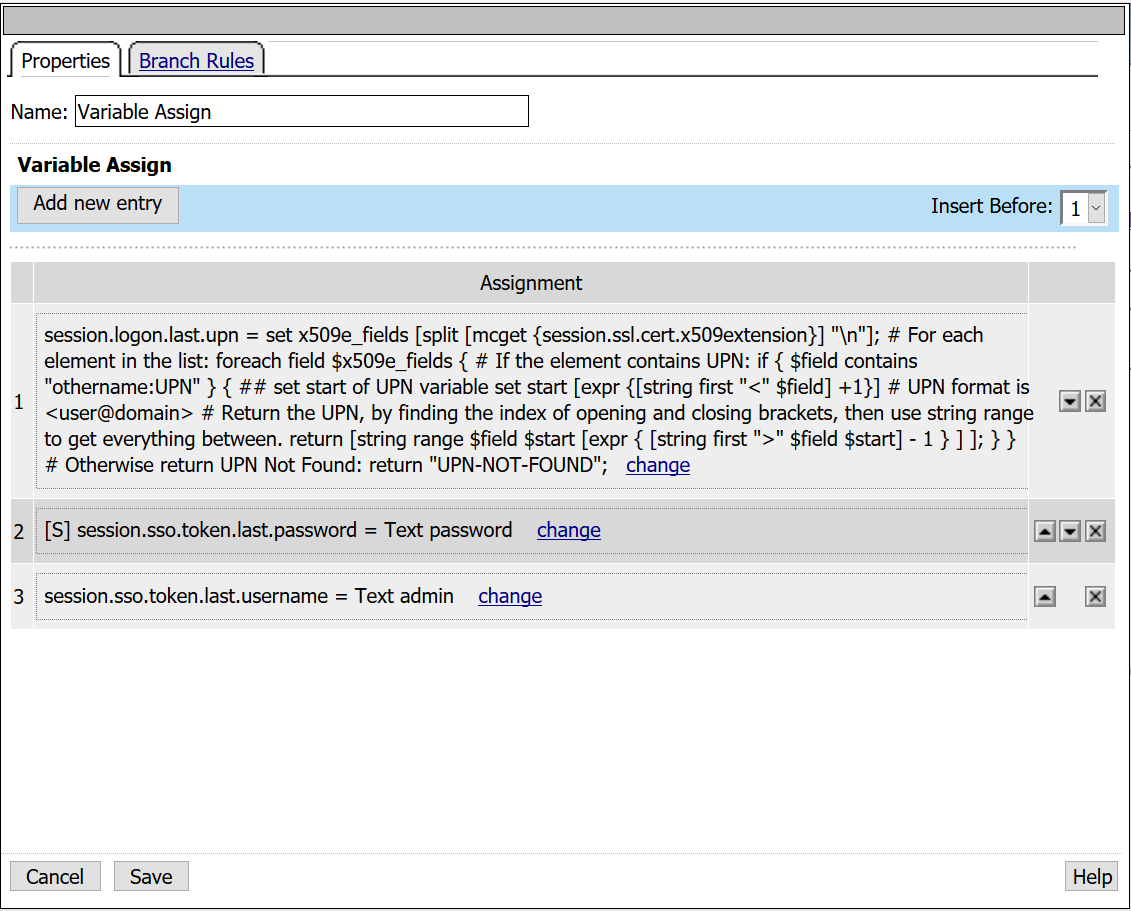
- Custom Variable: session.sso.token.last.password
- Select Secure from the drop down menu
Note: Unsecure or Secure specifies whether the variable is secure. A secure variable is stored in encrypted form in the session database. The value of a secure variable is not displayed in the session report, or logged by the logging agent.
- Text: password
- Select Finished
- Under Variable Assign, select Add new entry > Change empty variable
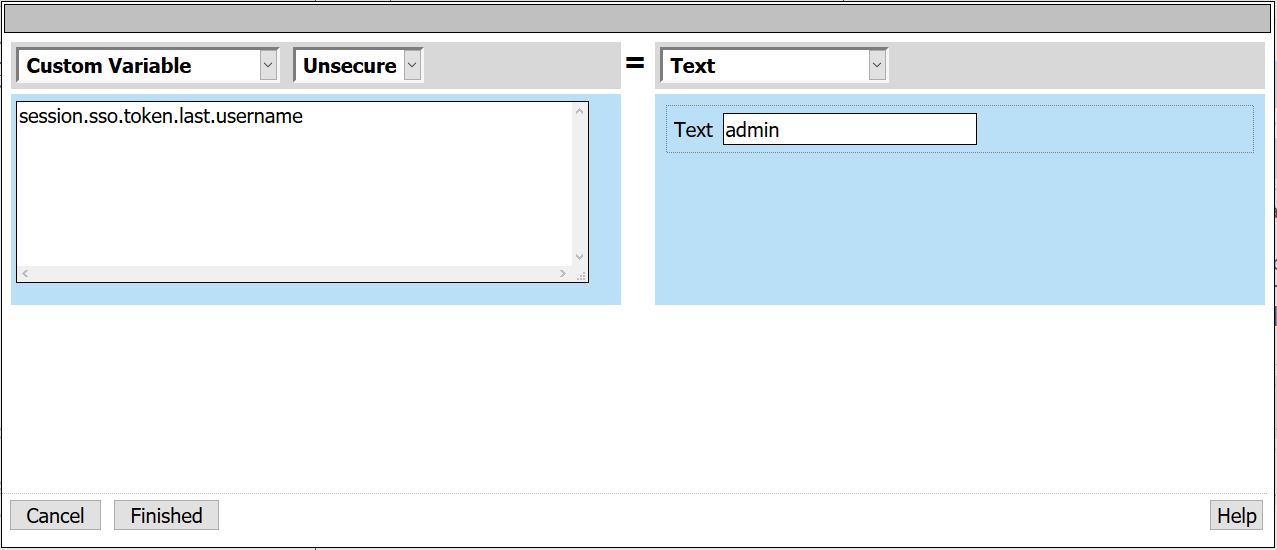
- Custom Variable: session.sso.token.last.username
- Text: admin
- Under Variable Assign, select Add new entry > Change empty variable
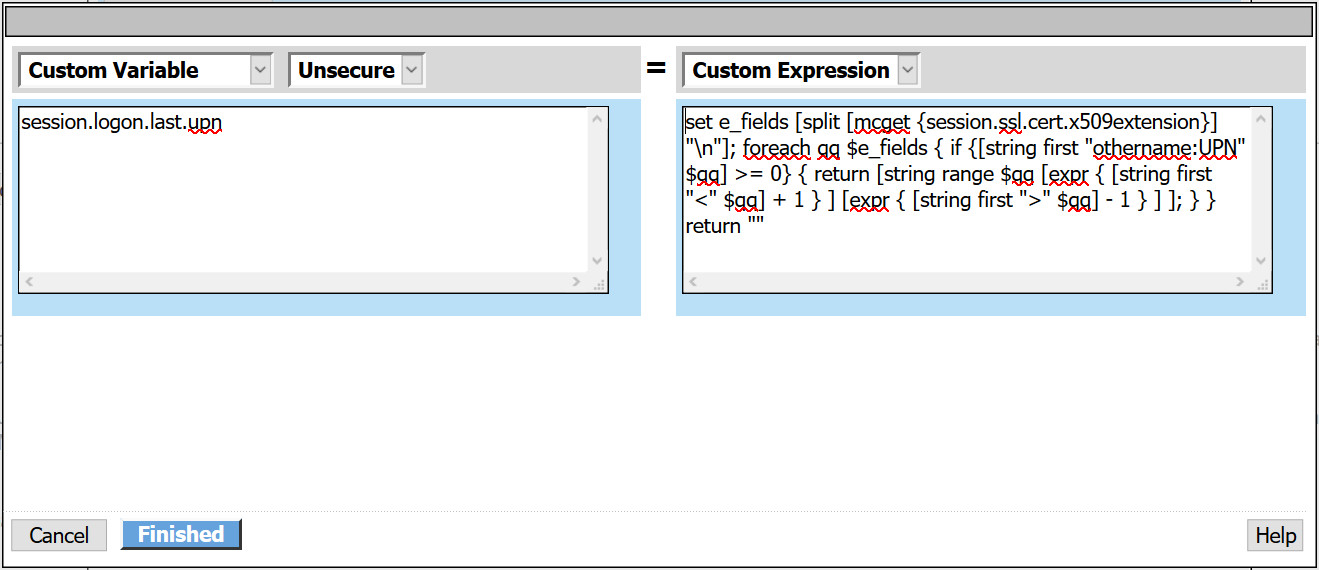
- Custom Variable: session.logon.last.upn
- Custom Expression:
set x509e_fields [split [mcget {session.ssl.cert.x509extension}] "\n"];  # For each element in the list:  foreach field $x509e_fields {  # If the element contains UPN:
if { $field contains "othername:UPN" } {  ## set start of UPN variable  set start [expr {[string first "<" $field] +1}]  # UPN format is   # Return the UPN, by finding the index of opening and closing brackets, then use string range to get everything between.  return [string range $field $start [expr { [string first ">" $field $start] - 1 } ] ];  } }  # Otherwise return UPN Not Found:  return "UPN-NOT-FOUND";
- Select Finished > Save
- Select Save
- Following the fallback branch of Variable Assign, select +
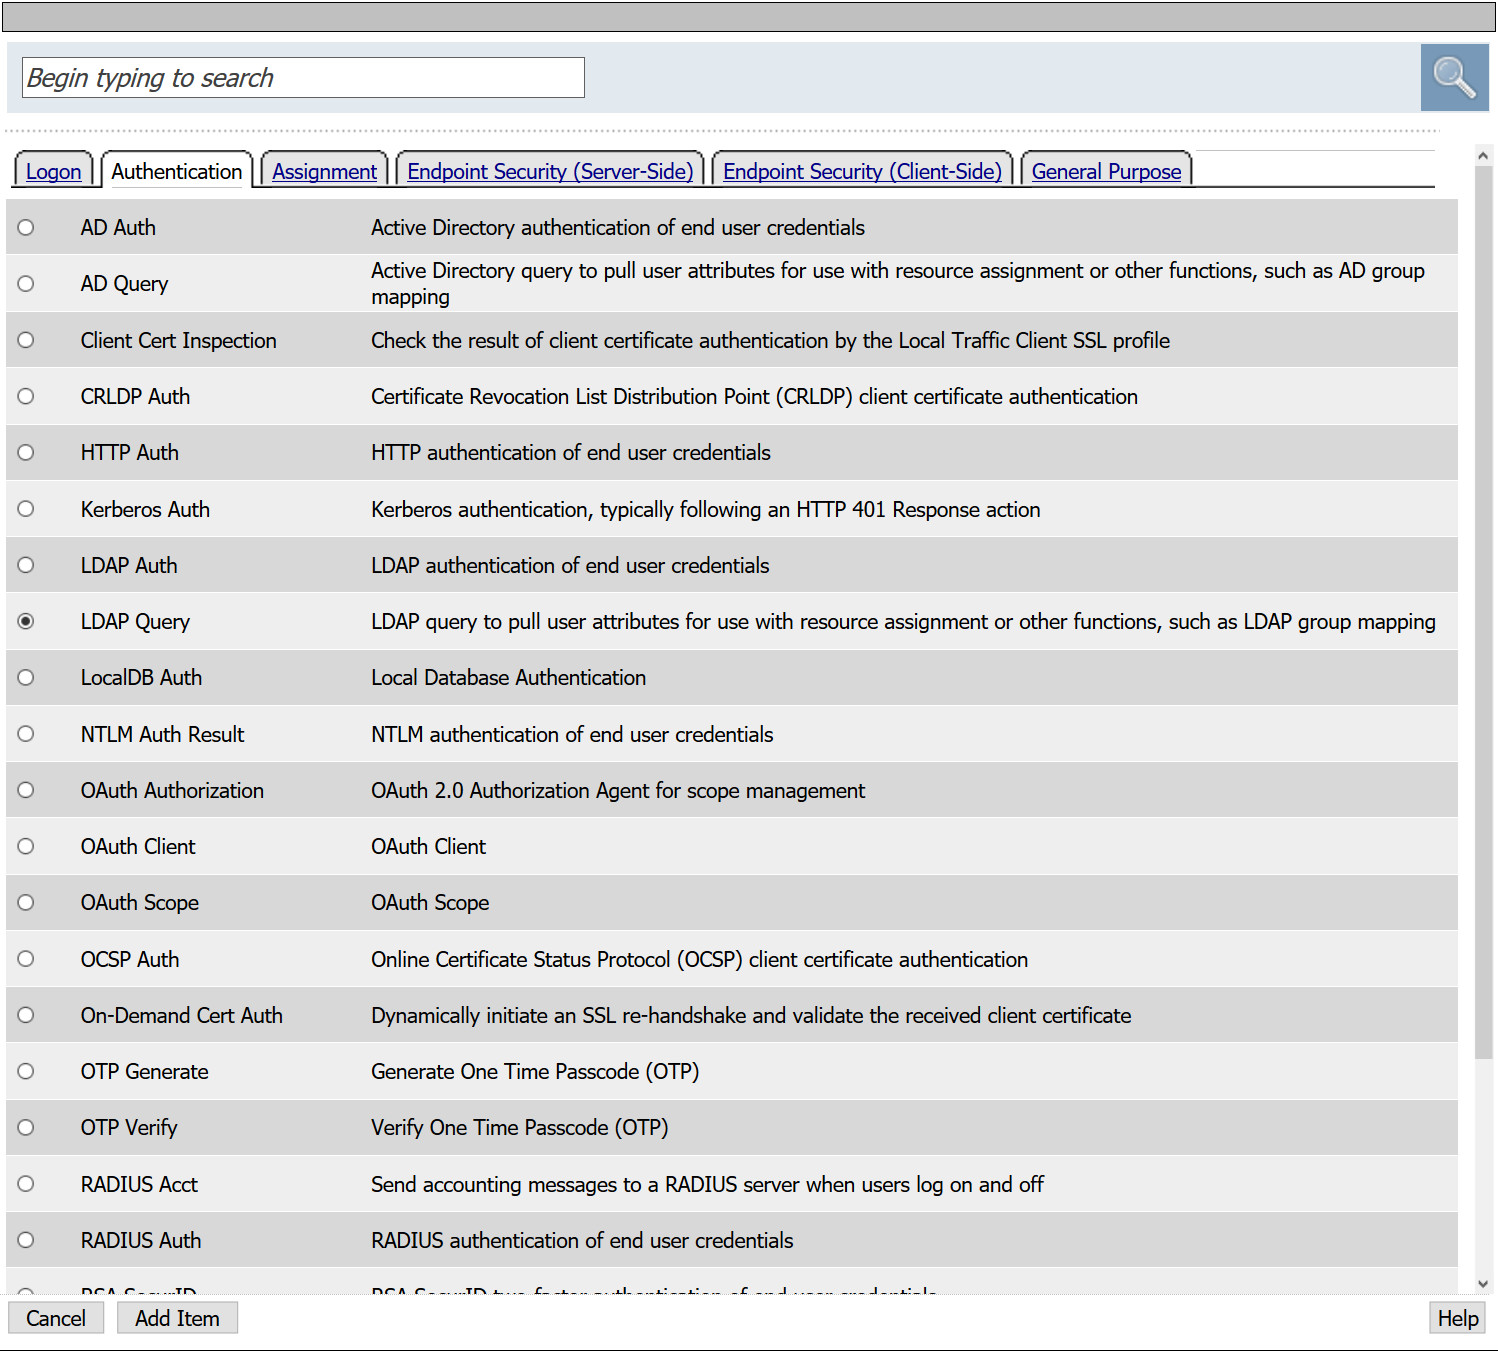
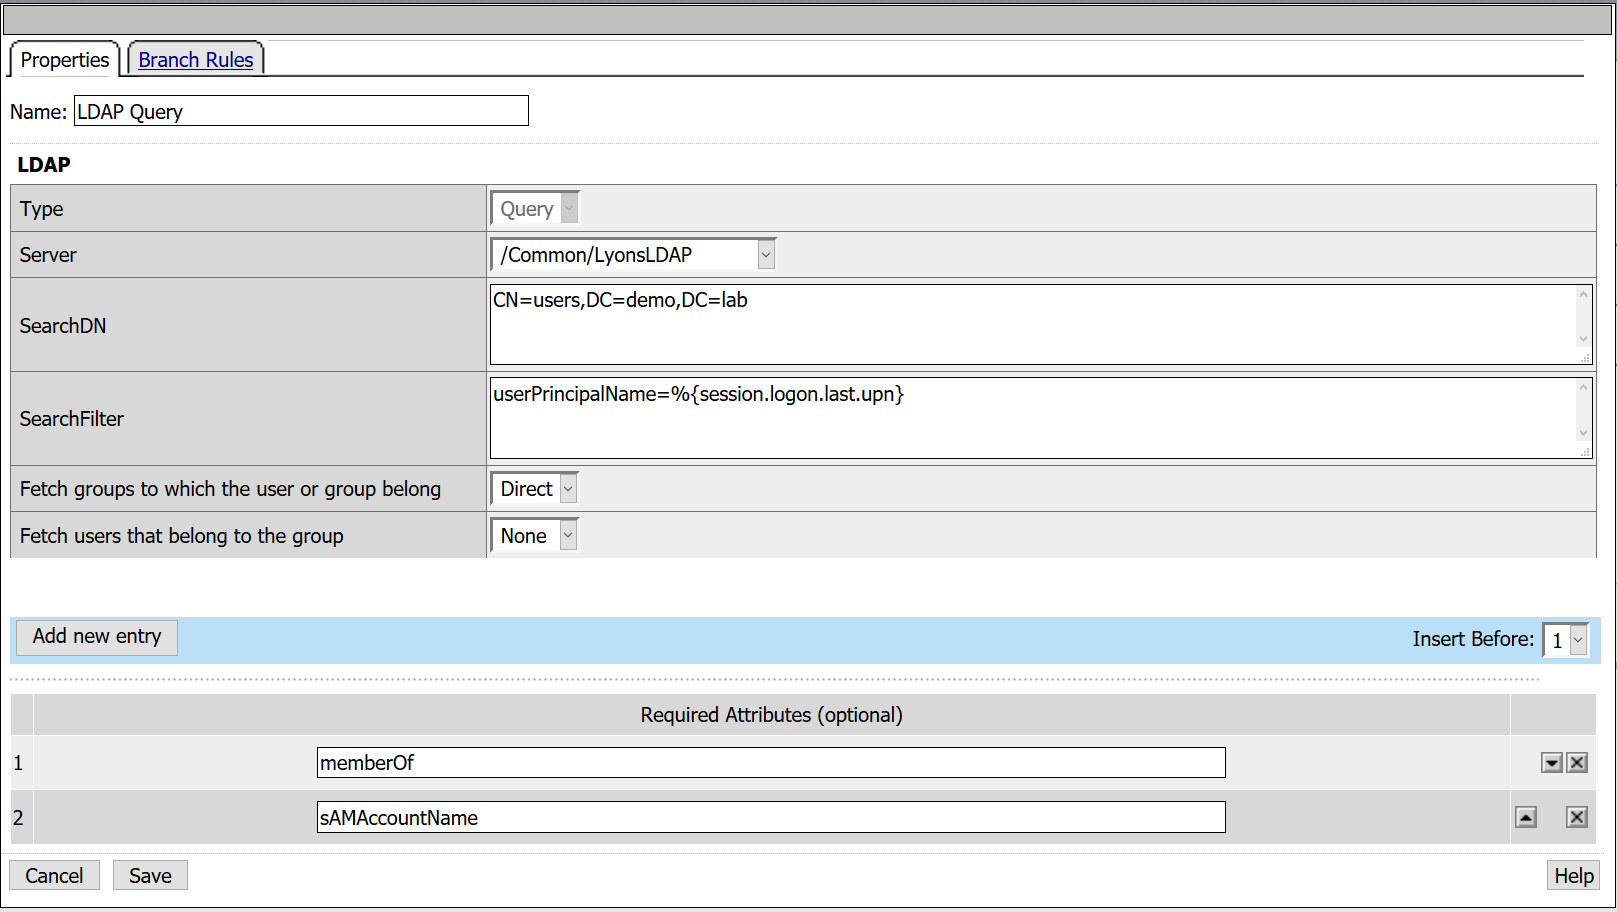
- From the Authentication tab, select LDAP Query > Add Item
- From the Server drop down, select the LDAP AAA created in previous steps
- SearchDN: CN=Users,DC=demo,DC=lab
- SearchFilter: UserPrincipalName=%{session.logon.last.upn}
- Fetch Groups to which the user or group below: Direct
- Required Attributes: sAMAccountName
- Required Attributes: memberOf
Note: sAMAccountName is not required for successful authentication as it is when performing Kerberos KCD though it can be useful to know who is logging in by name versus a long string of characters.
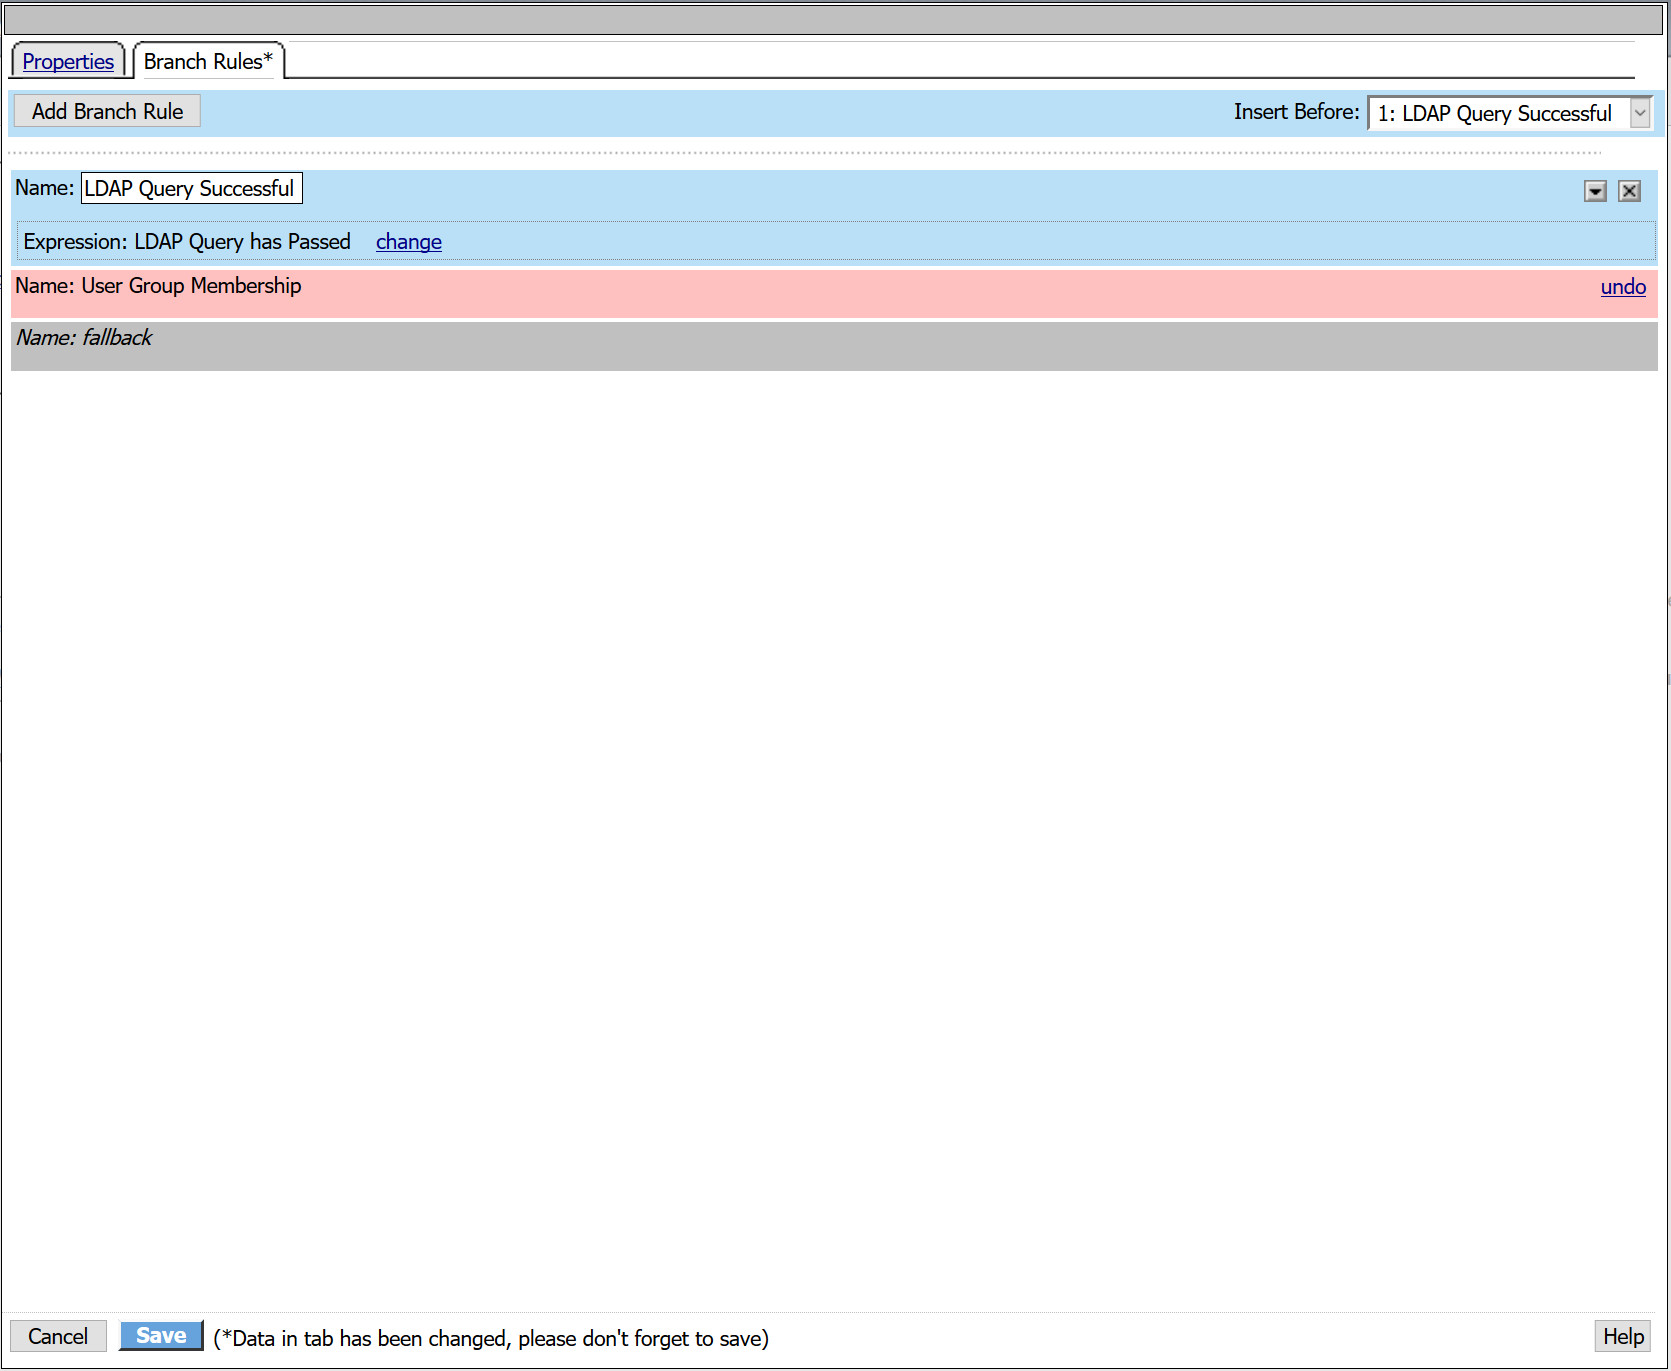
- Navigate to the Branch Rules tab
- Remove the existing Group Membership expression by selecting the X
- Select Add Branch Rule
- Name: LDAP Query Successful
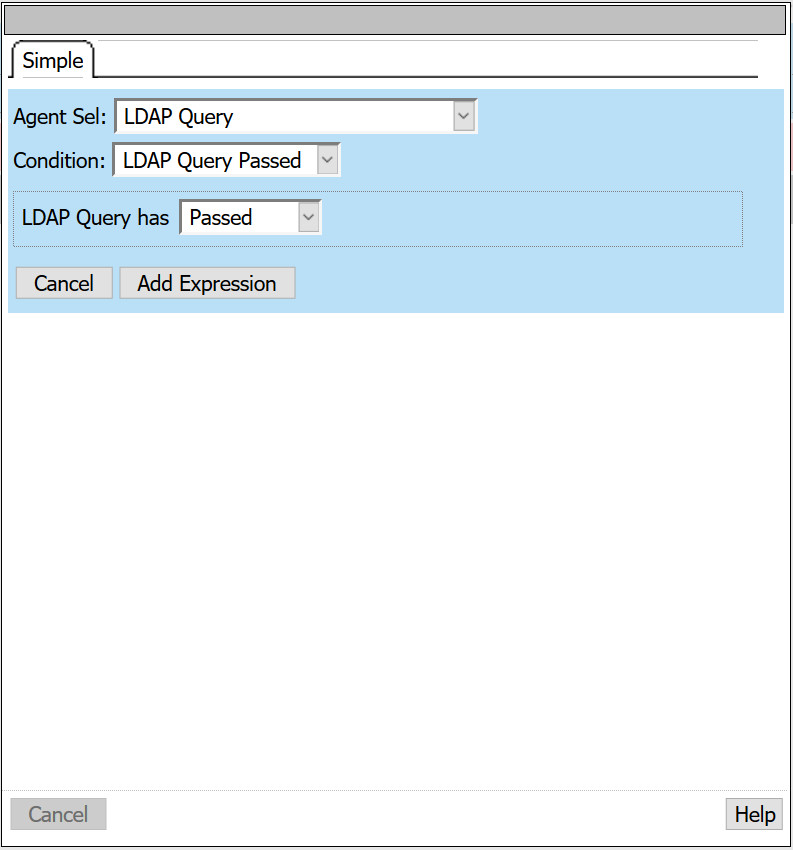
- Next to expression, select change
- Agent Sel: LDAP Query
- Condition: LDAP Query Passed
- LDAP Query has: Passed
- Select Add Expression > Finished
- Click Save
- Following the LDAP Query Successful branch, select +
- From the Assignment tab, select SSO Credential Mapping > Add Item
- SSO Token Username: mcget {session.sso.token.last.username}
- SSO Token Password: mcget {session.sso.token.last.password}
- Click Save
- Following the SSO Credential Mapping branch select +
- Select Advanced Resource Assign from the Assignment tab
- Click Add new entry
- Click Add/Delete
- From the Portal Access tab, select the Demo_Web_App resource created in previous tasks.
- From the Webtop tab, select the demo_webtop created in previous tasks.
- Click Update
- Click Save
- From the fallback branch, select Deny
- Change ending to Allow and click Save
At this point, you have a fully deployed VPE capable of supporting smart card authentication and have statically created a username and password that will be included in your HTTP Post to the web application.
- Select Apply Policy
Configure SSL Client Profile
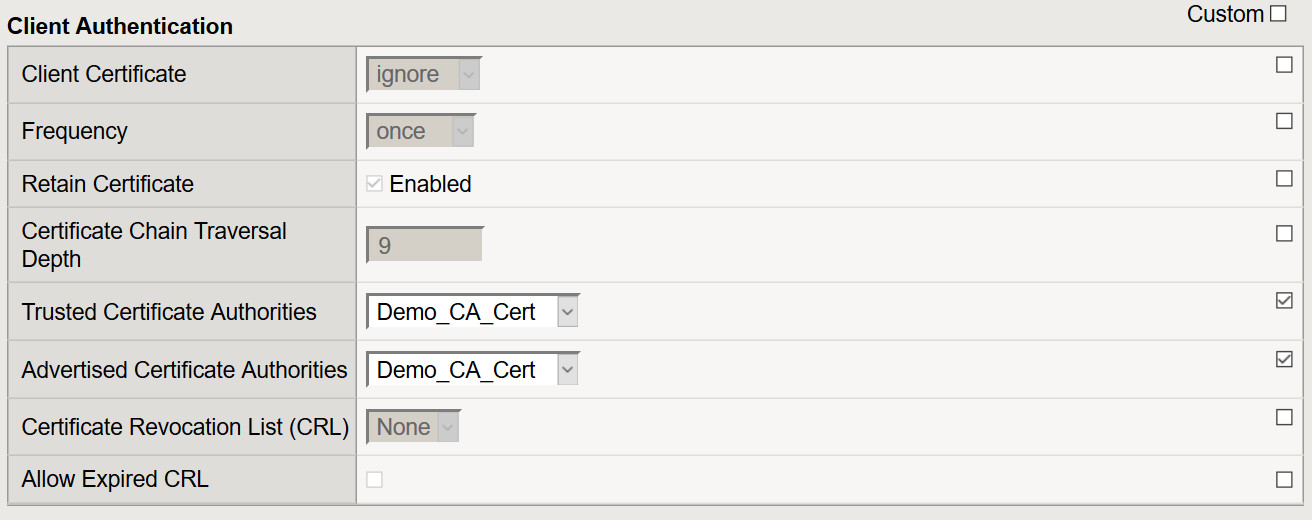
- To support client certificate-based authentication, we must also create a Client SSL Profile on the BIG-IP using the steps below.
- Navigate to Local Traffic > Profiles > SSL > Client > Create
- Name: DemoSSLProfile
- Certificate Key Chain: Place a check mark under the custom field. Click Add to select the appropriate cert/key pair.
- Client Certificate: Leave it set to ignore as the APM ODCA will perform this function.
- Trusted Certificate Authorities: Select the CA or CA bundle certificate
- Advertised Certificate Authorities: Select the CA or CA bundle certificate
- All other settings can be left at their defaults.
- Click Finished
Create a Virtual Server for your Web Application
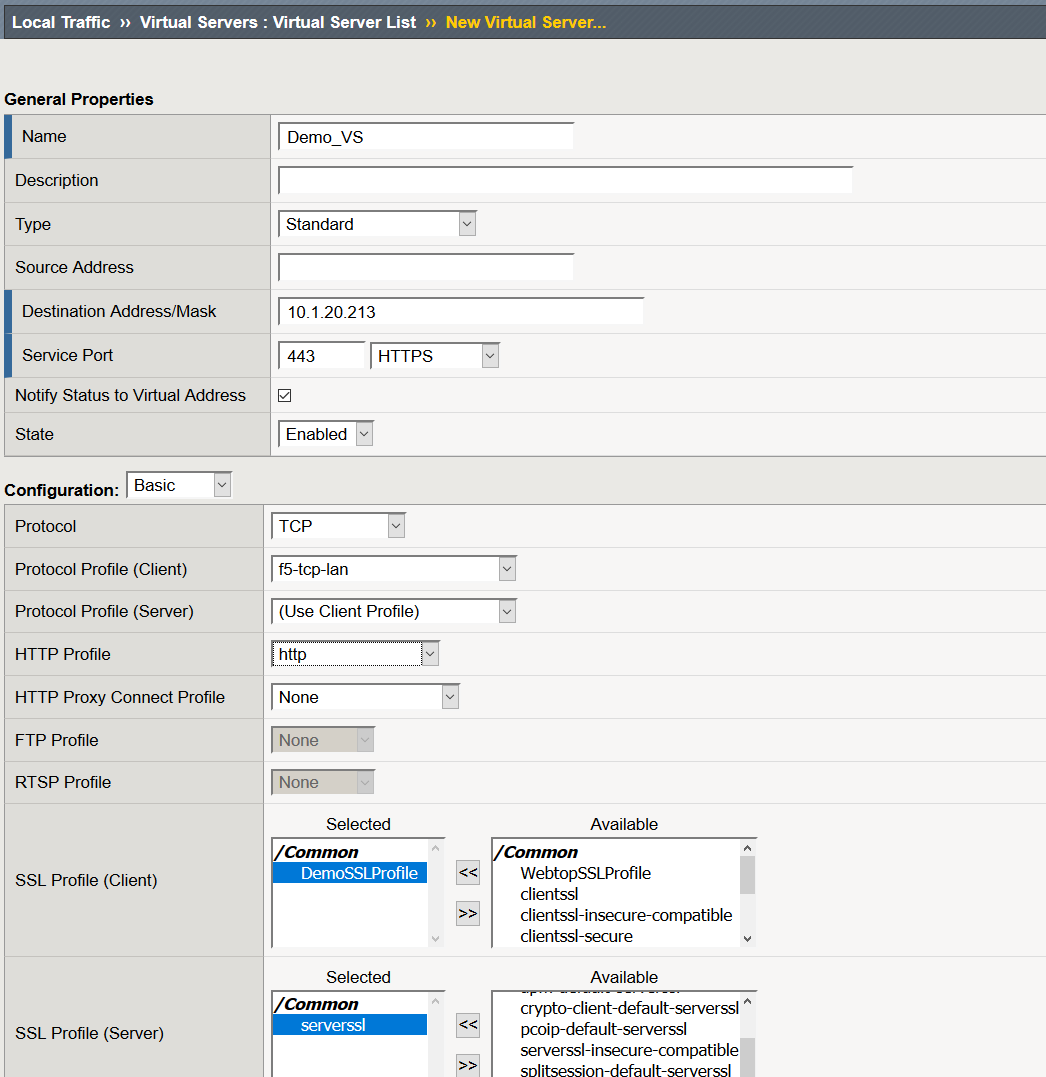
- Navigate to Local Traffic >> Virtual Servers >> Click Create
- Name: Demo_Web_App_VS
- Destination Address: IP that users will connect to in order to access the web application
- Service Port: 443
- Protocol Profile (Client): f5-tcp-lan
- HTTP Profile: http
- SSL Profile (Client): DemoSSLProfile
- SSL Profile (Server): serverssl
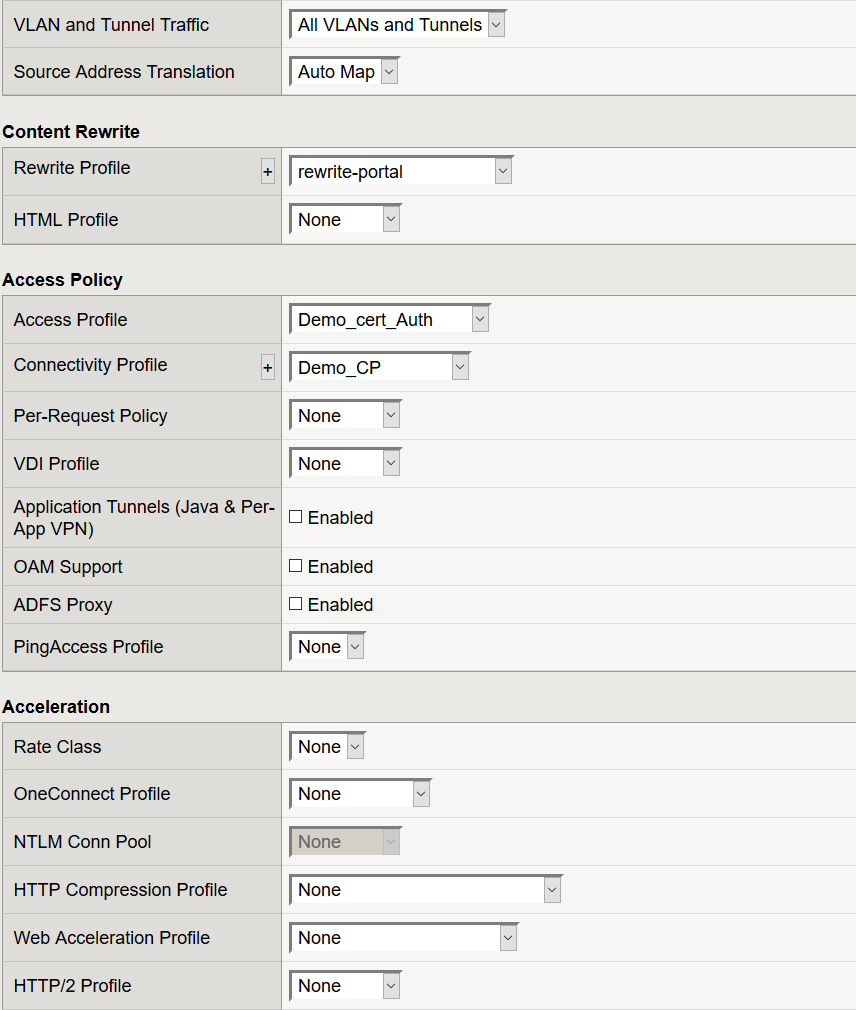
- Source Address Translation: Automap
- Rewrite Profile: rewrite_portal
- Access Profile: Demo_cert_Auth
- Connectivity Profile: Demo_CP
- Click Finished
At this point, we have successfully configured all components required to support this use case so let's attempt access.
Validation Testing
- From a browser navigate to the IP of your virtual server or the DNS name that resolves that IP
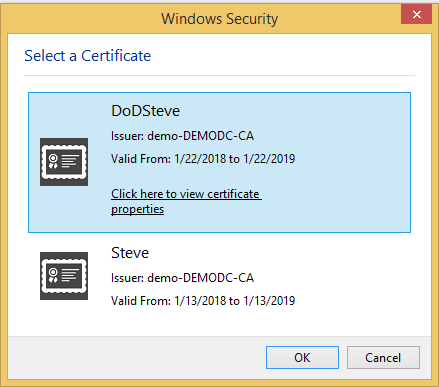
- You should be prompted for user certificate
- Select your user cert and Click OK
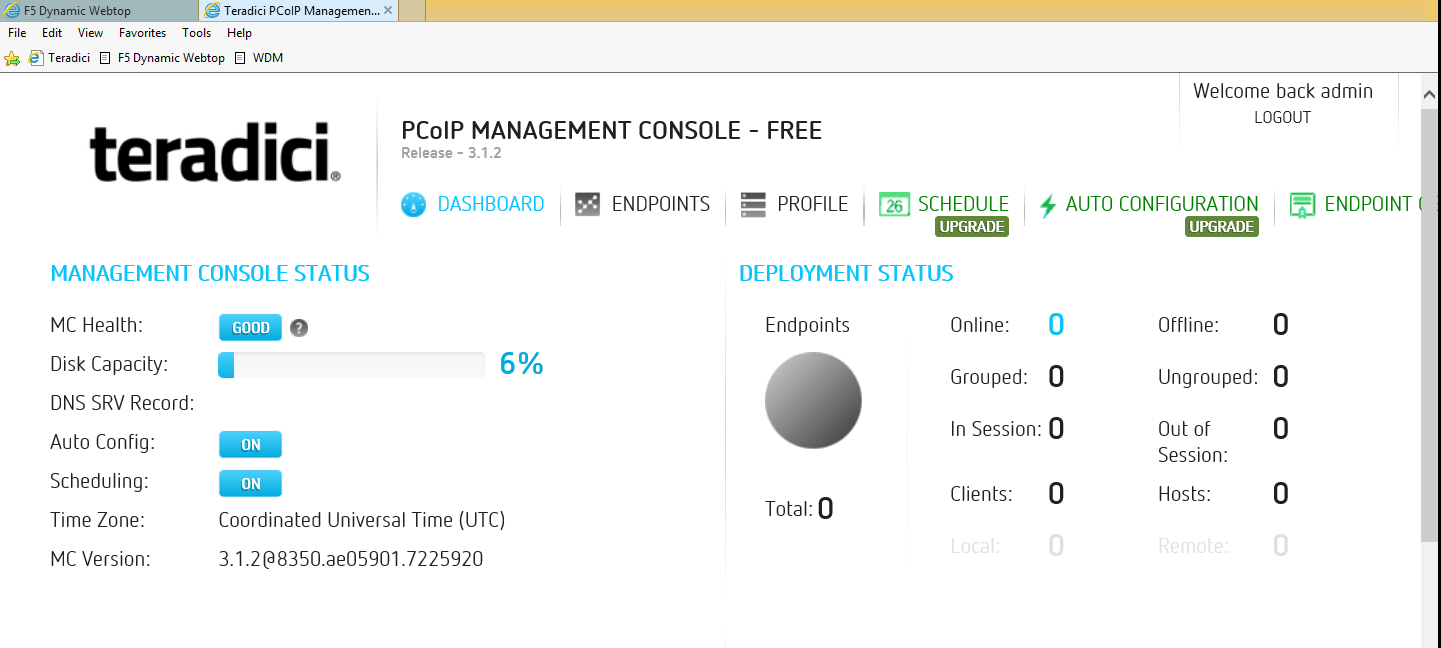
- You should be presented with your Webtop
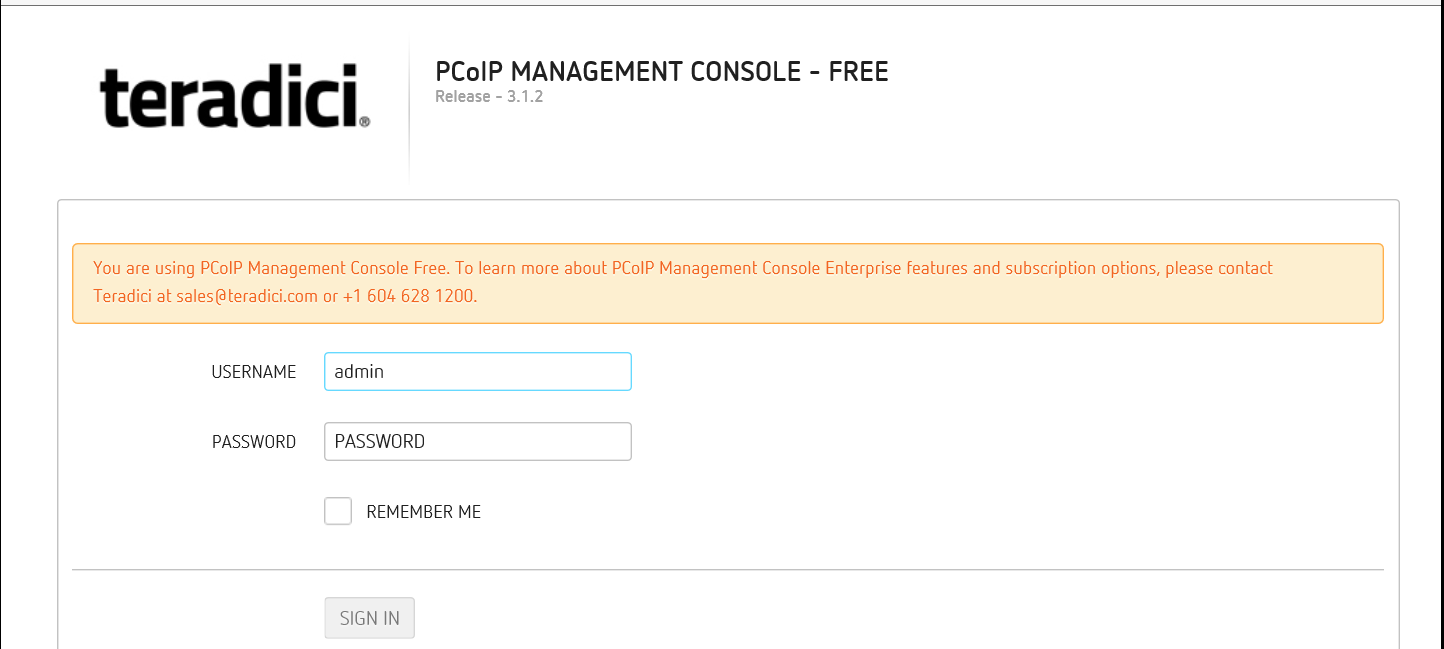
- Click on the resource item and you should be redirected to that web application
- If your configuration is correct, you will be logged in using the SSO credentials provided within the VPE and SSO profile.
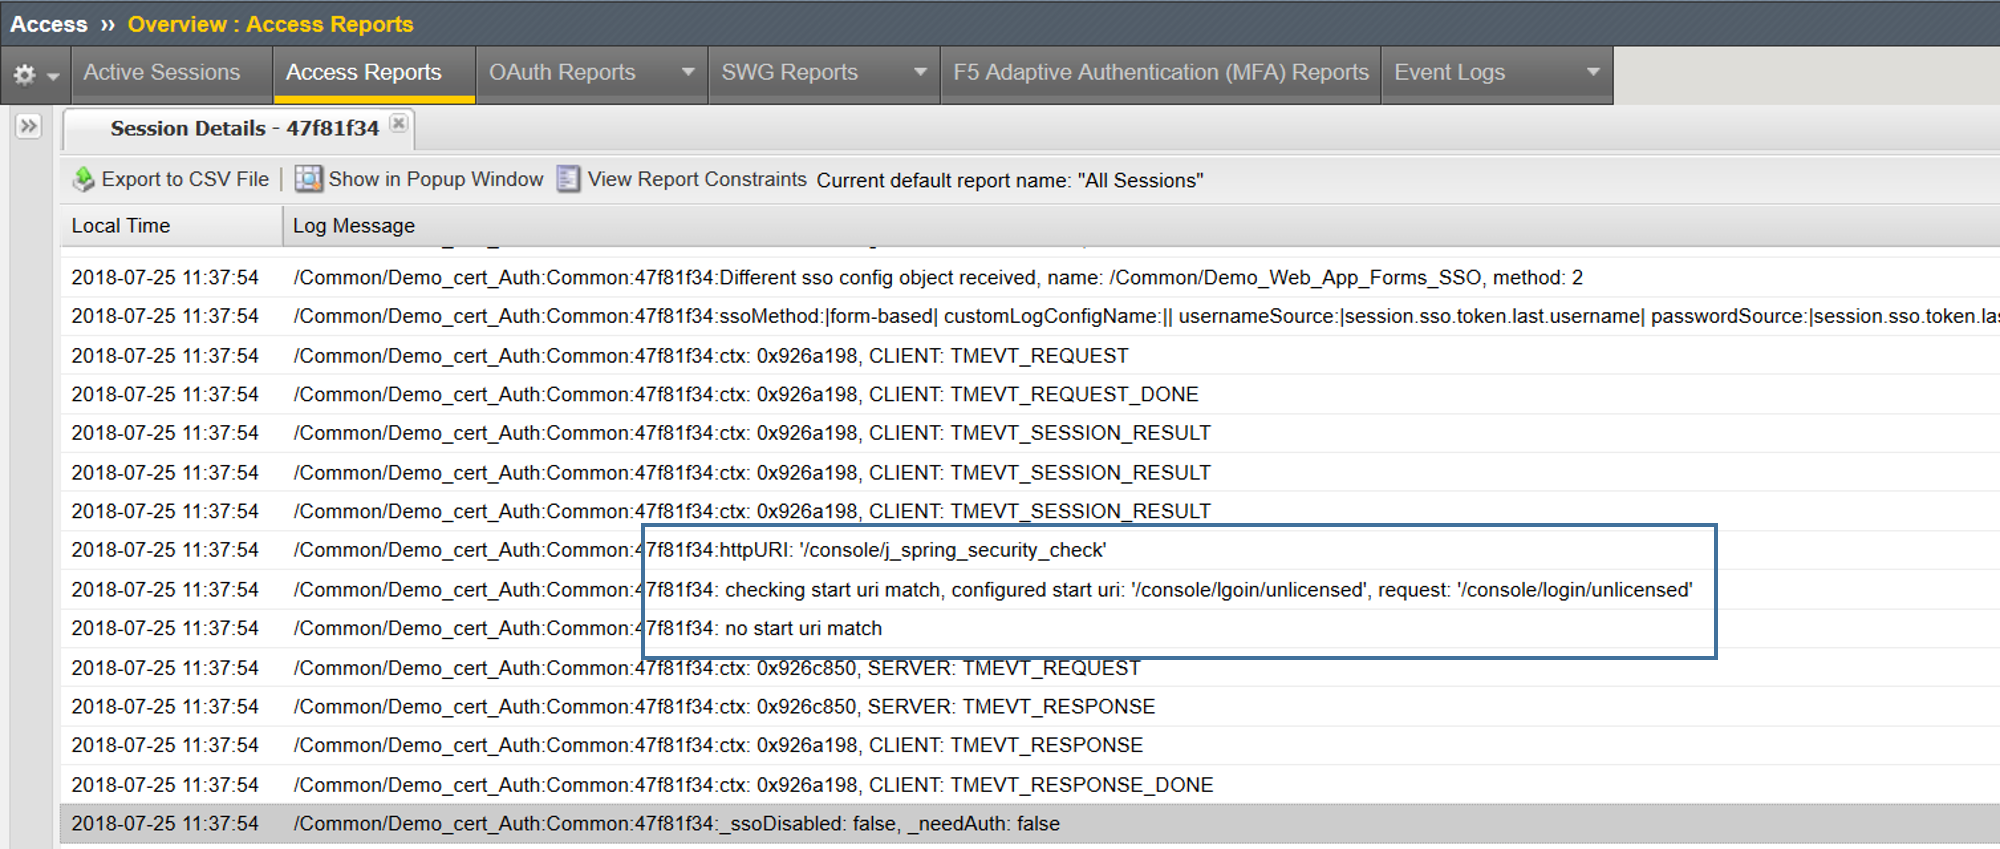
In my first attempt I actually was not successful and received no logon error. This is likely one of 2 things, either I did not assign my SSO profile or the Start URI is incorrect. Let's validate
- Validated SSO profile is assigned
Ahhh, now I see! Human error of course. I typed the Start URI incorrectly so, no there was no uri match.
After modifying the Start URI to the correct URI, I am now able to successfully login using the SSO configuration in this guide.
I am by no means saying this will be a common configuration though it is a use case that I have seen in the field more than once. As always, if it helps at least one of you out there it was well worth it. Until next time.
Help guide the future of your DevCentral Community!
What tools do you use to collaborate? (1min - anonymous)