inspection
3 TopicsOrchestrated Infrastructure Security - Protocol Inspection with AFM
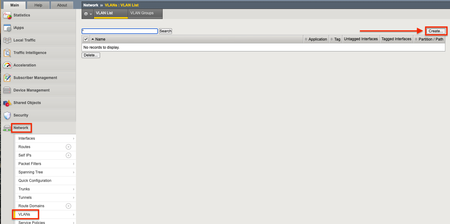
The F5 Beacon capabilities referenced in this article hosted on F5 Cloud Services are planning a migration to a new SaaS Platform - Check out the latest here. Introduction This article is part of a series on implementing Orchestrated Infrastructure Security. It includes High Availability, Central Management with BIG-IQ, Application Visibility with Beacon and the protection of critical assets using F5 Advanced WAF and Protocol Inspection (IPS) with AFM. It is assumed that SSL Orchestrator is already deployed, and basic network connectivity is working. If you need help setting up SSL Orchestrator for the first time, refer to the Dev/Central article series Implementing SSL Orchestrator here. This article focuses on configuring Protocol Inspection (IPS) with AFM deployed as a Layer 2 solution. It covers the configuration of Protocol Inspection on an F5 BIG-IP running version 16.0.0. Configuration of BIG-IP deployed as AFM can be downloaded from here from GitLab. Please forgive me for using SSL and TLS interchangeably in this article. This article is divided into the following high level sections: Protocol Inspection (IPS) with AFM Network Configuration Create an AFM Protocol Inspection Policy Attach Virtual Servers to an AFM Protocol Inspection Policy Protocol Inspection (IPS) with AFM: Network Configuration The BIG-IP will be deployed with VLAN Groups. This combines 2 interfaces to act as an L2 bridge where data flows into one interface and is passed out the other interface. From the F5 Configuration Utility go to Network > VLANs. Click Create on the right. Give it a name, ingress1 in this example. Set the Interface to 5.0. Set Tagging to Untagged then click Add. Interface 5.0 (untagged) should be visible like in the image below. Click Repeat at the bottom to create another VLAN. Note: In this example interface 5.0 will receive decrypted traffic from sslo1. Give it a name, egress1 in this example. Set the Interface to 6.0. Set Tagging to Untagged then click Add. Interface 6.0 (untagged) should be visible like in the image below. Click Finished when done. Note: In this example interface 6.0 will receive decrypted traffic from sslo1. Note: This guide assumes you are setting up a redundant pair of SSL Orchestrators. Therefore, you should repeat these steps to configure VLANs for the two interfaces connected to sslo2. These VLANs should be named in a way that you can differentiate them from the others. Example: ingress2 and egress2 It should look something like this when done: Note: In this example Interface 3.0 and 4.0 are physically connected to sslo2. Click VLAN Groups then Create on the right. Give it a name, vlg1 in this example. Move ingress1 and egress1 from Available to Members. Set the Transparency Mode to Transparent. Check the box to Bridge All Traffic then click Finished. Note: This guide assumes you are setting up a redundant pair of SSL Orchestrators. Therefore, you should repeat these steps to configure a VLAN Group for the two interfaces connected to sslo2. This VLAN Group should be named in a way that you can differentiate it from the other, example: vlg1 and vlg2. It should look like the image below: For full Layer 2 transparency the following CLI option needs to be enabled: (tmos)# modify sys db connection.vgl2transparent value enable Create an AFM Protocol Inspection Policy You can skip this step if you already have an AFM Protocol Inspection policy created and attached to one or more virtual servers. If not, we’ll cover it briefly. In this example we configured Protocol Inspection with Signatures and Compliance enabled. From Security select Protocol Security > Inspection Profiles > Add > New. Give it a name, IPS in this example. For Services, select the Protocol(s) you want to inspect, HTTP in this example. Optionally check the box to enable automatic updates and click Commit Changes to System. Attach Virtual Servers to an AFM Protocol Inspection Policy Attach the Protocol Inspection Profile to the Virtual Server(s) you wish to protect. From Local Traffic select Virtual Servers. Click the name of the Virtual Server you want to apply the profile to, 10.4.11.52 in this example. Click Security > Policies. Set the Protocol Inspection Profile to Enabled, then select the Profile created previously, IPS in this example. Click Update when done. Repeat this process to attach the IPS Profile to the remaining Virtual Servers. Summary In this article you learned how to configure BIG-IP in layer 2 transparency mode using VLAN groups. We also covered how to create an AFM Protocol Inspection policy and attach it to your Virtual Servers. Next Steps Click Next to proceed to the next article in the series.799Views1like0Comments
AFM packet inspection
I'm trying to make FTP dynamic ports to work on the AFM but they keep getting blocked. Is there a way to accomplish this using inspection? I also found this which is a little bit concerning: https://clouddocs.f5.com/training/community/firewall/html/class1/module1/lab2.html "Advanced Firewall Manager (AFM) provides “Shallow” packet inspection while Application Security Manager (ASM) provides “Deep” packet inspection. By this we mean that AFM is concerned with source IP address and port, destination IP address and port, and protocol (this is also known as 5-tuple/quintuple filtering)." Other Links https://support.f5.com/csp/article/K44080215 https://support.f5.com/csp/article/K02466443322Views0likes1CommentCatch, Clean, and Release: File Sanitization with F5 and OPSWAT
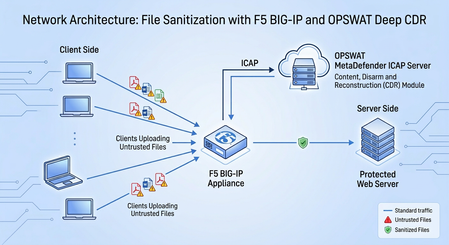
In today’s hyper-connected business environment, organizations rely heavily on the constant exchange of digital documents, yet did you know over 90% of malware continues to be delivered through seemingly harmless file attachments and downloads. Traditional security tools, such as antivirus scanners and sandboxes, struggle to keep pace because they rely on recognizing known malware signatures or observing suspicious behaviors. As sophisticated attackers increasingly leverage zero-day exploits and polymorphic malware, IT security teams are left vulnerable to threats that have never been seen before, creating an urgent need for a more proactive defense. Content Disarm and Reconstruction (CDR) addresses this gap by shifting the security paradigm from "detection" to "prevention". Instead of wasting critical time trying to determine if a file is malicious, CDR assumes all incoming files are untrustworthy, strips out potentially hazardous components (such as macros, embedded scripts, or active code), and rebuilds a perfectly safe, fully functional copy for the end-user. This proactive sanitization allows organizations to neutralize file-borne threats instantly, eliminating the business disruption of traditional sandboxing delays and ensuring uninterrupted workflow productivity. The "why" part of this solution is needed is fairly obvious now, but the question of "how" remains. This is where the coupling of F5 BIG-IP and OPSWAT Deep CDR™ from OPSWAT's MetaDefender platform offers a quick and easy on ramp to these modern protections. Disarm threats on the fly: Integrating F5 BIG-IP with OPSWAT Deep CDR via ICAP The solution discussed was staged in a lab using real files. It is very flexible, it could leverage ICAP from the standard LTM module of BIG-IP but can also similarly integrate with the Advanced WAF (AWAF) or SSL Orchestrator modules too. Any file traversing the BIG-IP can be directed to the OPSWAT solution for reconstruction, including a topology such as a forward proxy thus offering a cleansing service for employee files egressing a corporate environment. In all likelihood, the most prevalent use case would be in a reverse proxy scenario, where external fileware is being uploaded to a web service. The intent is to provide ironclad shielding from risks embedded into files that are being ingested into a managed network. Of course, all of the existing tried and true features of the BIG-IP remain, for instance this protected web server could consist of a dozen or more intelligently load balanced nodes. The two particular concerns in today’s threat landscape are: Evolving Malware - Modern malware bypasses standard detection using zero-day exploits and polymorphic code Weaponized Documents - A majority of threats enter networks hidden inside benign-looking PDFs, Office docs, and image files The solution from CDR is encapsulated in the following infographic. The BIG-IP is tailor-made to steer fileware to OPSWAT Deep CDR as SSL/TLS interception is a foundational and high-performance attribute of the F5 reverse proxy. In fact, the intercepted files can in turn be provided to MetaDefender via standard ICAP or a secure TLS-based ICAP. Quick first test – scrub images to thwart steganographic attacks A first example, setup in a lab environment, was to cleanse images uploaded to a sample web server dropbox. Think of perhaps a use case of an insurance portal where scanned images are required to corroborate claims. The art of steganography, richly detailed here, is the practice of hiding data inside another file (such as an image, audio file, video, or document) so that the existence of the hidden data is not obvious. Images are made up of millions of pixels, and each pixel contains numerical color values (Red, Green, Blue). A very common technique is called Least Significant Bit (LSB) embedding, simply utilize the last bit to hide a message, message could be an AI prompt or perhaps code, and the human eye will never pick up on the fact that the image has been ever so slightly altered. One pixel stores a tiny piece of the secret message and millions of pixels cleverly used together store the entire message. Normally a PNG or JPEG containing hidden data does not automatically execute code merely because an application opened it, or a staff member simply viewed it. Another component such as a loader, script, vulnerable application, or a browser exploit must extract and use the hidden content. Our task is to subvert the delivery of the instructions and mute the threat. Using one of many available services on-line, a sample image was used to carry a test message via LSB steganography. A companion tool then takes the image file and displays the embedded, hidden message. Our lab deployment is quite simple, as we will upload the above file to a simulated “Resume Upload” dropbox, a typical use case for human resources departments. We see the graphical interface users are presented with when uploading resumes, it is a simple PHP setup based upon NGINX web server. As noted, the graphical image with the steganographic message has been uploaded and recreated by OPSWAT. The test is now to check the recreated file to see if the embedded message has been successfully removed. We see confirmation that the file is now cleansed. The JavaScript diet: removing unwanted code Another threat vector are hidden scripts that no one in HR ever invited into our resume upload service. Using any number of means, perhaps an AI assistant, one can quickly hand craft a pdf that shields within it JavaScript. As seen below, there is no inherent blocking of this file with the native pdf viewer, this is what pops up when we open the file. Let’s take a look at how OPSWAT MetaDefender, and specifically the Deep CDR module, is configured to handle the above file being targeted for upload. The MetaDefender has a rich web UI, by clicking from the main menu “Workflow Management -> Workflow -> File Process” we can ensure that Deep CDR is enabled and further in the setup screen see a list of file types to be scrubbed (double-click on enlarge). To fully explore the OPSWAT capabilities, one can see the documentation here. Simply using pdf as a point of interest, since it pertains to our lab attempt right now to upload a risky file, we see some of the adjustable features around just this one file type. When our test pdf file arrives at the BIG-IP virtual server, we can grab a TCPDump and follow the stream using Wireshark. This is the wire-level details of interest as the ICAP request travels to MetaDefender, in the red font. 1. We observed this is ICAP Request mode targeting the OPSWAT server on port 1344 2. The client’s source IP address is preserved as an X-header value 3. The target of the file, including the DNS name and the full URL path is presented 4. The submitted pdf file is 1045 bytes in length 5. We observed this is indeed our test file, the only text in it is highlighted. The following shows the remaining component of the protocol trace, including the response back from OPSWAT, in blue font, with the modified file. 6. We see towards the end of the submitted pdf, there exists JavaScript 7. OPSWAT MetaDefender now responds to BIG-IP indicating the modified content being provided over ICAP is allowed and may continue its journey 8. The content length has changed from the original 1045 bytes to 930 bytes, the JavaScript has been removed by Deep CDR MetaDefender will leave behind a processing history that can be useful to explore the actions taken by Deep CDR as well as other signatures, such as those from many AV vendors, that may have triggered. The BIG-IP configuration for ICAP is straightforward and described here. In short, it consists of two profiles: Create a virtual server of type “Internal” to create the relationship between the BIG-IP and MetaDefender ICAP Server module. The virtual server will need to reference an “ICAP Profile”. Simply create a linkage in this field to a “child” of the default shipped profile, using this URI syntax (adjust IP address to your OPSWAT server address): icap://200.200.200.2:1344/OMSScanResp-AV In the setup for the virtual server itself that will handle actual received traffic, normally of type “Standard” for a reverse proxy setup, adjust the Request_Adapt_Profile. As normal, create a child of the default Request_Adapt entry and point the “Internal Virtual Name” pull-down to your ICAP virtual server configured in the last set. The hidden passenger – files embedded within files As the ancient saying goes, “It’s turtles all the way down” but more often than not in CDR it can be files all the way down. The last lab test involved trying to forward to our upload service a file which had a wide range of peculiarities associated with it. The main items we want to have dispensed with easily are active URL links that can with one single click connect a user to malicious hiding sites. The second is to remove any embedded files, the files within files threat, that may have malware lurking within. Here we see a demo file with both risks. Simply hovering over the innocuous looking website reveals an active link to a lurking malicious link. Also, note to the right-hand side, this appeared to be a single file, yet the pdf reader clearly indicates there is a Microsoft .docx file attached to the pdf once opened. Double clicking on the attachment, it would be hard to resist but probably not wise; besides yet another masquerading link we also note an executable is hanging around. This is what Word shows. Something tells me that, perhaps, this might not be the best version of putty.exe to install. From the point of view of the users of the protected web experience, the solution was observed to work remarkably fast. Using Developer Tools with Chrome, one notes that the user uploading the above highly questionable file, would see the upload succeed, as per the HTTP 200 OK status code. Interestingly, the entire file reconstruction and delivery is seen in this case to be in the 2 second range. Reviewers of the secure documents may simply be shielded from the details of what was found within the original files, as the security team will already see full details in MetaDefender. However, the user themselves can also be flagged with comments in the cleansed file, indicating in this case to be very cautious, that the file did originally have malicious links at multiple locations. Both approaches are seen respectively in the following examples. The power of prevention at the perimeter The intent of this lab investigation was to put the principles of zero trust into actual practice. Integrating F5 BIG-IP with OPSWAT Deep CDR via ICAP ensures that all file uploads are aggressively sanitized before they ever reach the protected web server. As mentioned, multiple topologies can be supported, in fact the lab BIG-IP was also configured as a transparent forward proxy, and files were similarly cleansed upon egress. The lack of friction in getting a working solution was a key takeaway, BIG-IP is already able to intercept high rates of encrypted TLS traffic and the added time for full inspection and file reconstruction when needed was low to moderate. In an era of stealthy, evasive exploits, relying on detection is a losing game. The strategy is simple: sanitize before you compromise—because a rebuilt file is a secure file.63Views2likes1Comment