gtm
37 TopicsGTM Pool Members Gone After Maintenance? It's Probably This One Setting
You finish a maintenance window, everything looks good on LTM, and then someone notices Wide IPs are resolving to fewer destinations than before. You check the GTM pools and the members are just... gone. The virtual servers are fine on LTM. GTM just doesn't know about them anymore — and more importantly, it doesn't remember if they were ever pool members. This happens more often than it should, and it almost always comes back to the same thing: virtual-server-discovery enabled doing exactly what it was designed to do, at exactly the wrong moment. What's Actually Going On When virtual-server-discovery is set to enabled on a GTM server object, GTM keeps its view of LTM virtual servers in sync via iQuery. It automatically adds new virtual servers, updates existing ones, and — this is the part that causes problems — deletes virtual servers that LTM stops reporting on. That delete behavior is the issue. Any time iQuery reports zero virtual servers, even temporarily, GTM treats it as a mass deletion event. The virtual servers get pulled from the server object, and with them, their pool memberships. When LTM eventually reports on those virtual servers again, GTM re-discovers them as brand new objects with no memory of which pools they belonged to. Two scenarios trigger this consistently. Scenario 1: LTM Software Upgrade This is the one that catches most people. During an upgrade, LTM reboots and goes through a phase where iQuery can connect but the full configuration hasn't finished loading yet. From GTM's perspective, LTM is reachable but reporting no virtual servers. GTM interprets that as a deletion event, clears out the discovered virtual servers, and empties the pools. When LTM finishes loading and the virtual servers come back, GTM re-discovers them — but the pool memberships are gone. You're left manually rebuilding what was there before the maintenance window started. The telltale sign is pool members coming back in blue/CHECKING state. That only happens to newly discovered objects. GTM treated a returning virtual server as a brand new one — because as far as it's concerned, it is. The GTM log won't show a deletion event, only the re-add. That gap in the logs is a known blind spot with virtual-server-discovery enabled, and it's exactly why the problem is hard to diagnose after the fact. What you'll typically see in /var/log/gtm after the LTM comes back: alert gtmd[xxxxx]: 011a1005:1: SNMP_TRAP: Pool your_pool state change green --> red (No enabled pool members available) alert gtmd[xxxxx]: 011a3004:1: SNMP_TRAP: Wide IP your.wideip.example.com state change green --> red (No enabled pools available) And then shortly after, the virtual servers re-appear in CHECKING state as GTM re-discovers them — but with no pool bindings. Scenario 2: LTM HA Failover This one surprises people because the LTM pair is still running — it's just switching active units. After a failover, the new active device may not have its iQuery connections fully re-established yet. GTM sees the iQuery state as inconsistent, virtual server status updates stop coming through, and members disappear from the discovered list. What makes this harder to diagnose is that tmsh show gtm iquery may show "connected" — but connected doesn't mean the config sync is working correctly. In a GTM sync group, only the device assigned local ID 0 (the GTM with the lowest IP address) is responsible for writing auto-discovery results to the configuration. If that specific device loses its iQuery connection during the failover window, discovery events are missed entirely — even if every other GTM in the group can still reach the LTM. So you can have a situation where five out of six GTMs look perfectly healthy, iQuery shows connected everywhere, and yet pool members are still disappearing — because the one device that matters for discovery is the one with the broken connection. You can check which device in your sync group holds local ID 0 with: tmsh list sys db gtm.peerinfolocalid If that device's iQuery connection to the LTM is the one that dropped during the failover window, that's your answer — even if everything else looks fine. The Fix: enabled-no-delete Both scenarios share the same root cause: GTM's auto-delete behavior treating a temporary iQuery disruption as a permanent deletion event. The fix is the same for both: gtm server /Common/site1-ltm { addresses { 10.1.1.1 { device-name site1-ltm } } datacenter /Common/dc1 monitor /Common/bigip virtual-server-discovery enabled-no-delete } With enabled-no-delete, GTM still auto-discovers new virtual servers and keeps existing ones updated. The only thing that changes is that it will never delete a virtual server just because LTM temporarily stopped reporting it. Your pool memberships survive both scenarios above. Mode Adds new VS Updates VS Deletes VS Pool memberships survive iQuery disruption? disabled No No No Yes — nothing changes enabled Yes Yes Yes No — any disruption can empty pools enabled-no-delete Yes Yes No Yes — preserved The Trade-Off enabled-no-delete won't clean up after you when you intentionally decommission a virtual server on LTM. The stale GTM object stays in the discovered list until you remove it manually. In environments with a lot of VS churn, this can accumulate over time. The question is which failure mode you'd rather manage: pool members silently disappearing during a maintenance window, or occasionally needing to clean up stale objects after a planned decommission. For most production environments, the latter is far easier to deal with — and far less likely to wake someone up at 2am. How to Make the Change Via tmsh: tmsh modify gtm server /Common/site1-ltm \ virtual-server-discovery enabled-no-delete tmsh save sys config Via GUI: Go to DNS → GSLB → Servers Select the server object Set Virtual Server Discovery to Enabled (No Delete) Click Update This takes effect immediately and does not affect existing discovered virtual servers or current pool memberships. Cleaning Up Stale Objects When you intentionally decommission a virtual server on LTM, remove the leftover GTM object manually: # List virtual servers under a GTM server object tmsh list gtm server /Common/site1-ltm virtual-server # Remove a specific stale entry tmsh modify gtm server /Common/site1-ltm \ virtual-servers delete { /Common/old-vs-name } tmsh save sys config Make this part of your standard VS decommission runbook and stale objects will never pile up. Quick Diagnostic When Members Go Missing Before assuming it's a discovery issue, check iQuery health across all GTM devices first: tmsh show gtm iquery Look for: State: should be connected to all entries Reconnects: A high count suggests instability even if the connection looks up Configuration Time: None means the config has never successfully synced from that LTM Then confirm which GTM holds local ID 0 and verify its connectivity specifically: tmsh list sys db gtm.peerinfolocalid If the local ID 0 device is the one with the broken iQuery connection, that's your answer — regardless of what the other devices are showing. Wrapping Up Whether it's an LTM upgrade or an HA failover, the pattern is the same: iQuery goes quiet for a moment, GTM interprets silence as deletion, and your pool memberships are gone. It's working as designed — just not in a way that's useful to you. enabled-no-delete is a one-line change that stops this from happening. The cleanup overhead it introduces is predictable and manageable. The alternative — rebuilding pool memberships after an unplanned event — is not. Have you run into either of these scenarios in your environment? Drop a comment below, especially if you've seen the local ID 0 shift cause issues during a rolling GTM upgrade.342Views1like0Comments
Use Fully Qualified Domain Name (FQDN) for GSLB Pool Member with F5 DNS
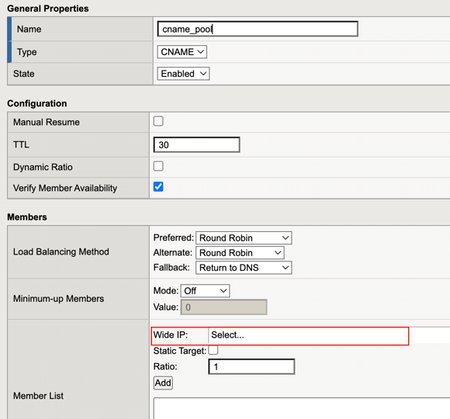
Normally, we define a specific IP (and port) to be used as GSLB pool member. This article provides a custom configuration to be able to use Fully Qualified Domain Name (FQDN) as GSLB pool member--with all GSLB features like health-check monitoring, load balancing method, persistence, etc. Despite GSLB as a mechanism to distribute traffic across datacenters having reached years of age, it has not become less relevant this recent years. The fact that internet infrastructure still rely heavily on DNS technology means GSLB is continuously used due to is lightweight nature and smooth integration. When using F5 DNS as GSLB solution, usually we are dealing with LTM and its VS as GSLB server and pool member respectively. Sometimes, we will add a non-LTM node as a generic server to provide inter-DC load balancing capability. Either way, we will end up with a pair of IP and port to represent the application, in which we sent a health-check against. Due to the trend of public cloud and CDN, there is a need to use FQDN as GSLB pool member (instead of IP and port pair). Some of us may immediately think of using a CNAME-type GSLB pool to accommodate this. However, there is a limitation in which BIG-IP requires a CNAME-type GSLB pool to use a wideIP-type pool member, in which we will end up with an IP and port pair (again!) We can use "static target", but there is "side-effect" where the pool member will always consider available (which then triggers the question why we need to use GSLB in the first place!). Additionally, F5 BIG-IP TMUI accepts FQDN input when we configure GSLB server and pool member. However, it will immediately translate to IP based on configured DNS. Thus, this is not the solution we are looking for Now this is where F5’s BIG-IP power (a.k.a programmability) comes into play. Enter the realm of customization... We all love customization, but at the same time do not want that to be overly complicated so that life becomes harder on day-2 🙃. Thus, the key is to use some customization, but simple enough to avoid unnecessary complication. Here is one idea to solve our FQDN as GSLB pool problem above The customized configuration object includes 1. External health-check monitor: Dynamically resolve DNS to translate FQDN into IP address Perform health-check monitoring against current IP address Result is used to determine GSLB pool member availability status 2. DNS iRules: Check #1: Checks if GSLB pool attached to wideIP contains only FQDN-type member (e.g. other pool referring to LTM VS is also attached to the wideIP) If false, do nothing (let DNS response refer to LTM VS) Otherwise, perform check #2 Check #2: Checks current health-check status of requested domain name If FQDN is up, modify DNS response to return current IP of FQDN Otherwise, perform fallback action as requirement (e.g. return empty response, return static IP, use fallback pool, etc.) 3. Internal Datagroup: Store current IP of FQDN, updated according to health-check interval Datagroup record value contains current IP if health-check success. Otherwise, the value contains empty data Here are some of the codes, where configured; wideIP is gslb.test.com, while GSLB pool member FQDN is arcadia.f5poc.id 1. External health-check monitor config gtm monitor external gslb_external_monitor { defaults-from external destination *:* interval 10 probe-timeout 5 run /Common/gslb_external_monitor_script timeout 120 #define FQDN here user-defined fqdn arcadia.f5poc.id } External health-check monitor script #!/bin/sh pidfile="/var/run/$MONITOR_NAME.$1..$2.pid" if [ -f $pidfile ] then kill -9 -`cat $pidfile` > /dev/null 2>&1 fi echo "$$" > $pidfile # Obtain current IP for the FQDN resolv=`dig +short ${fqdn}` # The actual monitoring action here curl -fIs -k https://${fqdn}/ --resolve ${fqdn}:443:${resolv} | grep -i HTTP 2>&1 > /dev/null status=$? if [ $status -eq 0 ] then # Actions when health-check success rm -f $pidfile tmsh modify ltm data-group internal fqdn { records replace-all-with { $fqdn { data $resolv } } } echo "sending monitor to ${fqdn} ${resolv} with result OK" | logger -p local0.info echo "up" else # Actions when health-check fails tmsh modify ltm data-group internal fqdn { records replace-all-with { $fqdn { } } } echo "sending monitor to ${fqdn} ${resolv} with result NOK" | logger -p local0.info fi rm -f $pidfile 2. DNS iRules when DNS_REQUEST { set qname [DNS::question name] # Obtain current IP for the FQDN set currentip [class match -value $qname equals fqdn] } when DNS_RESPONSE { set rname [getfield [lindex [split [DNS::answer]] 4] "\}" 1 ] #Check if return is IP address of specially encoded FQDN IP, 10.10.10.10 in this example if {$rname eq "10.10.10.10" }{ #Response is only from pool with external monitor, meaning no other pool is attached to wideIP if {$currentip ne ""}{ #Current FQDN health-check success DNS::answer clear # Use current IP to construct DNS answer section DNS::answer insert "[DNS::question name]. 123 [DNS::question class] [DNS::question type] $currentip" } else { #Current FQDN health-check failed #Define action to be performed here DNS::answer clear } } } 3. Internal Datagroup ltm data-group internal fqdn { records { # Define FQDN as record name arcadia.f5poc.id { # Record data contains IP, where this will be continuously updated by external monitoring script data 158.140.176.219 } } type string } *GSLB virtual server configuration Some testing The resolve will follow whichever current IP address for the FQDN. If a returning CNAME response is required, you can do so by modifying DNS irules above. The logic and code are open to any improvement, so leave your suggestions in the comments if you have any. Thanks!1.4KViews1like1CommentDNS Caching
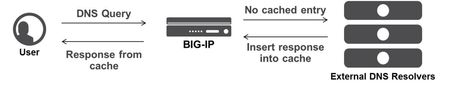
I've been writing some DNS articles over the past couple of months, and I wanted to keep the momentum going with a discussion on DNS Caching. As a reminder, my first five articles are: Let's Talk DNS on DevCentral DNS The F5 Way: A Paradigm Shift DNS Express and Zone Transfers The BIG-IP GTM: Configuring DNSSEC DNS on the BIG-IP: IPv6 to IPv4 Translation We all know that caching improves response time and allows for a better user experience, and the good news is that the BIG-IP is the best in the business when it comes to caching DNS requests. When a user requests access to a website, it's obviously faster if the DNS response comes directly from the cache on a nearby machine rather than waiting for a recursive lookup process that spans multiple servers. The BIG-IP is specifically designed to quickly and efficiently respond to DNS requests directly from cache. This cuts down on administrative overhead and provides a better and faster experience for your users. There are three different types of DNS caches on the BIG-IP: Transparent, Resolver, and Validating Resolver. In order to create a new cache, navigate to DNS >> Caches >> Cache List and create a new cache (I'm using v11.5). Let's check out the details of each one! Transparent Resolver When the BIG-IP is configured with a transparent cache, it uses external DNS resolvers to resolve DNS queries and then cache the responses from the resolvers. Then, the next time the BIG-IP receives a query for a response that exists in cache, it immediately returns the response to the user. Transparent cache responses contain messages and resource records. The diagram below shows a transparent cache scenario where the BIG-IP does not yet have the response to a DNS query in its cache. In this example, the user sends a DNS query, but because the BIG-IP does not have a response cached, it transparently forwards the query to the appropriate external DNS resolver. When the BIG-IP receives the response from the resolver, it caches the response for future queries. A big benefit of transparent caching is that it consolidates content that would otherwise be cached across many different external resolvers. This consolidated cache approach produces a much higher cache hit percentage for your users. The following screenshot shows the configuration options for setting up a transparent cache. Notice that when you select the "Transparent" Resolver Type, you simply configure a few DNS Cache settings and you're done! The Message Cache Size (listed in bytes) is the maximum size of the message cache, and the Resource Record Cache Size (also listed in bytes) is the maximum size of the resource record cache. Pretty straightforward stuff. The "Answer Default Zones" setting is not enabled by default; meaning, it will pass along DNS queries for the default zones. When enabled, the BIG-IP will answer DNS queries for the following default zones: localhost, reverse 127.0.0.1 and ::1, and AS112. The "Add DNSSEC OK Bit On Miss" setting is enabled by default., and simply means that the BIG-IP will add the DNSSEC OK bit when it forwards DNS queries. Adding this bit indicates to the server that the resolver is able to accept DNSSEC security resource records. Resolver Whereas the Transparent cache will forward the DNS query to an external resolver, the "Resolver" cache will actually resolve the DNS queries and cache the responses. The Resolver cache contains messages, resource records, and the nameservers that the BIG-IP queries to resolve DNS queries. The screenshot below shows the configuration options for setting up a Resolver cache. When you select the Resolver cache, you will need to select a Route Domain Name from the dropdown list. This specifies the route domain that the resolver uses for outbound traffic. The Message Cache Size and Resource Record Cache Size are the same settings as in Transparent cache. The Name Server Cache Count (listed in entries) is the maximum number of DNS nameservers on which the BIG-IP will cache connection and capability data. The Answer Default Zones is the same setting as described above for the Transparent cache. As expected, the Resolver cache has several DNS Resolver settings. The "Use IPv4, IPv6, UDP, and TCP" checkboxes are fairly straightforward. They are all enabled by default, and they simply specify whether the BIG-IP will answer and issue queries in those specific formats. The "Max Concurrent UDP and TCP Flows" specifies the maximum number of concurrent sessions the BIG-IP supports. The "Max Concurrent Queries" is similar in that it specifies the maximum number of concurrent queries used by the resolver. The "Unsolicited Reply Threshold" specifies the number of replies to DNS queries the BIG-IP will support before generating an SNMP trap and log message as an alert to a potential attack. DNS cache poisoning and other Denial of Service attacks will sometimes use unsolicited replies as part of their attack vectors. The "Allowed Query Time" is listed in milliseconds and specifies the time the BIG-IP will allow a query to remain in the queue before replacing it with a new query when the number of concurrent distinct queries exceeds the limit listed in the "Max Concurrent Queries" setting (discussed above). The "Randomize Query Character Case" is enabled by default and will force the BIG-IP to randomize the character case (upper/lower) in domain name queries issued to the root DNS servers. Finally, the "Root Hints" setting specifies the host information needed to resolve names outside the authoritative DNS domains. Simply input IP addresses of the root DNS servers and hit the "add" button. Validating Resolver The Validating Resolver cache takes things to the next level by recursively querying public DNS servers and validating the identity of the responding server before caching the response. The Validating Resolver uses DNSSEC to validate the responses (which mitigates DNS attacks like cache poisoning). For more on DNSSEC, you can check out my previous article. The Validating Resolver cache contains messages, resource records, the nameservers that the BIG-IP queries to resolve DNS queries, and DNSSEC keys. When an authoritative server signs a DNS response, the Validating Resolver will verify the data prior to storing it in cache. The Validating Resolver cache also includes a built-in filter and detection mechanism that rejects unsolicited DNS responses. The screenshot below shows the configuration options for setting up a Validating Resolver cache. I won't go into detail on all the settings for this page because most of them are identical to the Validating Resolver cache. However, as you would expect, there are a few extra options in the Validating Resolver cache. The first is found in the DNS Cache settings where you will find the "DNSSEC Key Cache Size". This setting specifies the maximum size (in bytes) of the DNSKEY cache. The DNS Resolver settings are identical to the Resolver cache. The only other difference is found in the DNSSEC Validator settings. The "Prefetch Key" is enabled by default and it specifies that the BIG-IP will fetch the DNSKEY early in the validation process. You can disable this setting if you want to reduce the amount of resolver traffic, but also understand that, if disabled, a client might have to wait for the validating resolver to perform a key lookup (which will take some time). The "Ignore Checking Disabled Bit" is disabled by default. If you enable this setting, the BIG-IP will ignore the Checking Disabled setting on client queries and will perform response validation and only return secure answers. Keep in mind that caching is a great tool to use, but it's also good to know how much space you are willing to allocate for caching. If you allocate too much, you might serve up outdated responses, but if you allocate too little, you will force your users to wait while DNS recursively asks a bunch of servers for information you could have been holding all along. In the end, it's a reminder that you should know how often your application data changes, and you should configure these caching values accordingly. Well, that does it for this edition of DNS caching...stay tuned for more DNS goodness in future articles!3KViews1like3Comments
F5 Intelligent DNS – Optimizing the Mobile Core
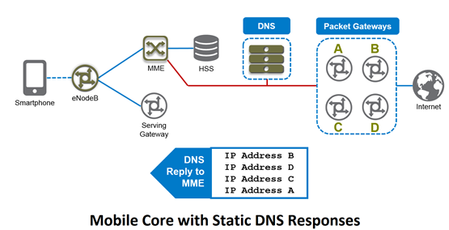
Martin J Brewer, Manager, DNS Product Management F5 has been very active in the service provider footprint for DNS, especially for high performance authoritative or caching resolver functions. In addition to those use cases, now F5 is able to augment them with what we call Intelligent DNS. In essence we’re taking our ability to use our monitoring functions (which are part of F5 BIG-IP GTM) and apply them so that DNS responses for DNS queries for the Mobile Core reflect the availability and health of the services which sit behind those DNS query names. Demo - Intelligent DNS for the Evolved Packet Core So what does this mean in real terms? With these optimizations, subscribers will benefit through increased service reliability and higher performance while Service Providers receive higher customer satisfaction. If subscribers are happy, you get loyalty and you see repeat users by making sure the service works optimally, every time. Perhaps first we need to talk about how a regular Mobile Core operates during connection setup for a core which uses static DNS. As you can see from the diagram, we have a simplified view of the core which is present in 3G and 4G network designs. On the left you’ll see the mobile device, or smartphone, and on the right you’ll see the Packet Gateways (PGWs) or Gateway GPRS Support Nodes (GGSNs). These are the gateways between the Service Provider core network and the internet and other IP services. Now for a device to get connectivity to the internet, it needs to initiate a connection. In 4G/LTE for example, this is performed through the Management Mobility Entity (MME). Now, you’ve probably seen in the Settings area on your smartphone that there’s a reference to an “APN” or Access Point Name. What that APN does is tell the network which service your device needs to establish a data connection. And that APN name is specified as a DNS name. So how does it work? That query ends up turning into a DNS request which is emitted by the MME so it can set up the connection. So it might look something like “apn.carrier.com” and once resolved by the DNS service inside the Mobile Core, it will resolve to an IP address, like 192.168.1.1. Now, the DNS service itself will pass not just one, but a complete list of all of the possible gateway addresses. Some DNS services might also randomize the order of the list so that the MME might spread the load on the PGWs. Sounds reasonable doesn’t it? Well, there are a few problems with that approach: What if the PGW unexpectedly went down? The DNS system has now directed the MME to an unreachable resource. Now it isn’t the end of the world, but it results in a delay in the connection setup and the MME times-out on the PGW that’s no longer in service. This impacts the customer experience and by extension, customer satisfaction. And remember, that until that PGW is removed from the DNS records, it will continue to serve bad DNS answers. To solve this, manual intervention is required, and that increases OpEx for the carrier. And the of course there’s the loading of those PGWs. Let’s take a look…. Just because the DNS service might have randomized the reply order to set some form of load distribution, this doesn’t equate to an even distribution in reality. Data sessions from mobile devices last anywhere from a few seconds to tens of hours, and the loading they place on the PGW is totally determined by how much data the client sends or receives. Placing additional capacity onto an already maxed PGW simply decreased connection speed for the mobile device and again, that leads to poor customer satisfaction. So isn’t there a better way? Using BIG-IP GTM with Intelligent DNS, the DNS service is made into a dynamic directory with intelligent answers based on service availability and loading. The big improvement is that BIG-IP is able to monitor services through a variety of real-time health checks. The system is highly customizable and allows a Mobile Core administrator the ability to use GTP Echo monitors (these are built right in to the BIG-IP GSLB engine) which check for active availability of the protocol that carries the data. They can also use External monitors which can factor in other parameters such as live loading information or consider environmental information, such as device temperature and equipment status. Using these optimizations, the DNS engine considers each IP address it monitors and assigns scores to each so that it may give an optimal reply for any given DNS query. Using this scoring mechanism, BIG-IP GTM can intelligently provide a single IP address as a reply to any given query based on its real-time feed of PGW availability and health. So what are the benefits? If a PGW fails unexpectedly, the BIG-IP Intelligent DNS service identifies the unavailability and stops providing DNS responses which contain that PGW’s IP address. Through loading data, the Intelligent DNS service provides answers for the most appropriate PGW in real-time. No longer will a subscriber be placed onto an overloaded PGW. All of this means there’s reduced OpEx through the automation of DNS records to service availability, together with an optimal user experience. Stop by the F5 Booth at Mobile World Congress in Barcelona from February 24 th through 27 th for a demonstration of F5 Intelligent DNS in action. We’re at hall 5 in booth 5G11.543Views1like0Comments