central management
5 TopicsRunning F5 BIG-IQ Centralized Management on Google Cloud Platform
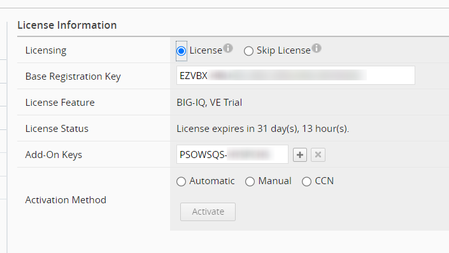
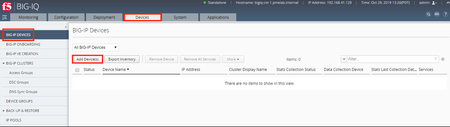
The Problem: No Native BIG-IQ Image for GCP If you're running F5 BIG-IP in Google Cloud Platform and looking to centralize management with BIG-IQ, you'll run into a wall quickly: there's no native BIG-IQ image for GCP. AWS has a BIG-IQ AMI. Azure has a Marketplace image. GCP has neither. That's a problem when your organization has standardized on GCP and needs BIG-IQ living close to the BIG-IP instances it manages — for performance, for latency to the management plane, and for keeping everything inside your cloud perimeter. This article walks through a working solution: running BIG-IQ CM 8.4.2 on GCP using nested KVM virtualization. It's a workaround, and we'll call it that — but it produces a fully functional BIG-IQ instance, running on GCP, with an active license and the complete feature set. Why This Works: Nested KVM GCP's hypervisor is KVM. Normally, GCP VMs don't expose the hardware virtualization extensions (VMX) to guest operating systems, which means you can't run a hypervisor inside a GCP VM. However, GCP supports nested virtualization on specific CPU platforms — specifically Intel Cascade Lake and newer. When you create a VM with nested virtualization enabled, the guest OS can see and use the VMX extensions. You can then run a full KVM hypervisor inside the GCP VM, and run BIG-IQ (delivered as a KVM QCOW2 image) as a nested guest. The key detail: BIG-IQ sees the underlying KVM hypervisor and identifies its platform as Z100 (BIG-IQ Virtual Edition). The license activates normally against F5's activation servers. BIG-IQ behaves exactly as it would in an on-premises KVM deployment. What You'll Need A GCP project with Compute Engine API enabled The BIG-IQ 8.4.2 Virtual Edition QCOW2 image from downloads.f5.com A BIG-IQ VE license key (same license used for on-premises KVM) gcloud CLI installed and authenticated Cost note: The VM size used here ( n2-standard-8 , 8 vCPU / 32GB RAM) runs ~$0.38/hour in us-central1 . Shut it down when not in use — a stopped GCP VM only incurs disk storage costs. Architecture Internet | v +------------------------------------------+ | GCP Compute Engine VM | | n2-standard-8 (Intel Cascade Lake) | | Ubuntu 22.04 LTS -- External IP: x.x.x.x | | | | QEMU/KVM (user-mode networking) | | +--------------------------------------+ | | | BIG-IQ CM 8.4.2 | | | | Platform: Z100 (BIG-IQ VE) | | | | IP: 10.0.2.15 (QEMU NAT) | | | | Hostname: f5-biq-gcp.f5.com | | | +--------------------------------------+ | | | | Port forwarding: :443/:80 -> :443/:80 | +------------------------------------------+ Step 1: Create the GCP Network # Create a dedicated VPC gcloud compute networks create bigiq-vpc \ --subnet-mode=custom \ --bgp-routing-mode=regional # Create subnet gcloud compute networks subnets create bigiq-subnet \ --network=bigiq-vpc \ --region=us-central1 \ --range=10.50.0.0/24 # Firewall: SSH access to KVM host gcloud compute firewall-rules create bigiq-allow-ssh \ --network=bigiq-vpc \ --allow=tcp:22 \ --source-ranges=0.0.0.0/0 # Firewall: BIG-IQ management UI gcloud compute firewall-rules create bigiq-allow-mgmt \ --network=bigiq-vpc \ --allow=tcp:80,tcp:443,tcp:8443 \ --source-ranges=0.0.0.0/0 Security tip: Restrict --source-ranges to your corporate IP ranges in production. Step 2: Create the KVM Host VM The --enable-nested-virtualization flag and --min-cpu-platform are the critical pieces. Without Cascade Lake or newer, nested virtualization isn't available. gcloud compute instances create bigiq-kvm-host \ --zone=us-central1-a \ --machine-type=n2-standard-8 \ --network=bigiq-vpc \ --subnet=bigiq-subnet \ --boot-disk-size=200GB \ --boot-disk-type=pd-ssd \ --e-family=ubuntu-2204-lts \ --image-project=ubuntu-os-cloud \ --min-cpu-platform="Intel Cascade Lake" \ --enable-nested-virtualization \ --metadata=enable-oslogin=true Verify nested virtualization is working after the VM starts: gcloud compute ssh bigiq-kvm-host --zone=us-central1-a \ --command="grep -c vmx /proc/cpuinfo" # Should return a number > 0 (we see 16 on n2-standard-8) Step 3: Install KVM gcloud compute ssh bigiq-kvm-host --zone=us-central1-a # On the host: sudo apt-get update && sudo apt-get install -y \ qemu-kvm libvirt-daemon-system libvirt-clients \ virtinst unzip wget Step 4: Download and Extract the BIG-IQ Image Download BIG-IQ-8.4.2-0.0.27.qcow2.zip from downloads.f5.com. Once you have the download URL from the portal, pull it directly to the host: sudo chmod 777 /var/lib/libvirt/images wget -O /var/lib/libvirt/images/BIG-IQ-8.4.2-0.0.27.qcow2.zip \ "<your-signed-download-url>" cd /var/lib/libvirt/images unzip BIG-IQ-8.4.2-0.0.27.qcow2.zip # Extracts to BIG-IQ-8.4.2-0.0.27.qcow2 (8.5GB) Step 5: Start BIG-IQ Important: Start QEMU directly rather than through libvirt / virt-install . In nested KVM environments, libvirt's pause/resume handshake during domain creation can deadlock, leaving the VM frozen. Starting QEMU directly avoids this entirely. sudo qemu-system-x86_64 \ -name bigiq \ -machine pc,accel=kvm \ -cpu host \ -m 16384 \ -smp 4 \ -drive file=/var/lib/libvirt/images/BIG-IQ-8.4.2-0.0.27.qcow2,format=qcow2,if=virtio \ -netdev user,id=net0,hostfwd=tcp::4443-:443,hostfwd=tcp::8080-:80 \ -device virtio-net-pci,netdev=net0 \ -serial file:/var/log/bigiq-console.log \ -display none \ -daemonize BIG-IQ first boot takes 10–15 minutes. Monitor progress: tail -f /var/log/bigiq-console.log # Wait for: "mcpd has reached 'running' state" Step 6: Configure Port Forwarding QEMU user-mode networking binds the guest's ports to the host's localhost. You need two iptables rules to make BIG-IQ reachable externally: # Enable IP forwarding sudo sysctl -w net.ipv4.ip_forward=1 # Forward external HTTPS/HTTP to QEMU's forwarded ports sudo iptables -t nat -A PREROUTING -i ens4 -p tcp --dport 443 \ -j REDIRECT --to-port 4443 sudo iptables -t nat -A PREROUTING -i ens4 -p tcp --dport 80 \ -j REDIRECT --to-port 8080 # BIG-IQ redirects to :443 after login — catch that loop locally sudo iptables -t nat -A OUTPUT -p tcp -d 127.0.0.1 --dport 443 \ -j REDIRECT --to-port 4443 BIG-IQ is now reachable at https://<your-gcp-external-ip> . Step 7: Initial Setup and Licensing Navigate to https://<your-gcp-external-ip> in your browser. Login Page The BIG-IQ login page confirms the instance is running: On a fresh BIG-IQ VE installation, the default credentials are admin / admin . You'll be required to change the password immediately on first login. Licensing After login, BIG-IQ walks you through a 7-step setup wizard. The first step is licensing. Enter your BIG-IQ VE registration key and click Activate — BIG-IQ will reach out to activate.f5.com to validate it. The license activates successfully, showing: Base Registration Key: your key License Activation Date: activation date License Expiration Date: expiry date Licensed Modules: BIG-IQ, VE, Centralized Manager, 30 Instances Confirming Platform Detection Once setup is complete, navigate to System → This Device → General Properties. The Platform field is the key indicator: Field Value Product BIG-IQ Version Installed 8.4.2 Build Installed 0.0.27 Platform Z100 Platform Marketing Name BIG-IQ Virtual Edition Physical Memory 16384 MB CPU Intel(R) Xeon(R) CPU @ 2.80GHz Platform Z100 is BIG-IQ recognizing the KVM hypervisor — exactly what allows the license to activate and the full feature set to be available. If GCP's hypervisor layer were blocking VMX access (which happens without nested virtualization enabled), BIG-IQ would fail to identify its platform and licensing would fail. Step 8: BIG-IQ is Ready With licensing complete, you have a fully functional BIG-IQ Centralized Management instance running on GCP: From here you can: Add BIG-IP devices under Devices → BIG-IP Devices (add the management IP, credentials, and BIG-IQ discovers the device) Manage license pools under Devices → License Management Push configurations under Configuration Monitor application health under Monitoring Important Operational Notes iptables Persistence The iptables rules above don't survive a reboot. To make them persistent: sudo apt-get install -y iptables-persistent sudo netfilter-persistent save You'll also need to restart QEMU on host reboot. Add a systemd service or cron @reboot job for production use. BIG-IQ Management IP Detection Because we're using QEMU user-mode NAT, BIG-IQ sees 10.0.2.15 as its management address (QEMU's internal NAT address), not the GCP external IP. This is cosmetic for a standalone demo — BIG-IQ still manages BIG-IP devices correctly over the network. For production, consider using a bridged network configuration instead. Reaching BIG-IP Instances from BIG-IQ BIG-IQ needs network connectivity to each BIG-IP's management interface to add and manage it. With QEMU user-mode networking, outbound connectivity from BIG-IQ works fine (QEMU NATs it through the host). Ensure your GCP firewall rules allow the host to reach your BIG-IP management IPs on port 443. High Availability BIG-IQ HA requires a secondary instance. You'd need a second KVM host VM and configure BIG-IQ's built-in HA pairing. The process is the same — deploy a second BIG-IQ using this guide, then configure HA from the UI. Support Posture F5 supports BIG-IQ VE on certified hypervisors. Running inside nested KVM on GCP is a "best effort" configuration — you're one extra layer deep from what F5 certifies. For demo, lab, and proof-of-concept use cases this is perfectly suitable. For production, evaluate whether a BIG-IQ instance running in a supported environment (on-premises, AWS, or Azure) and connected to GCP over VPN or interconnect is a better fit. Cleanup When you're done, tear everything down to avoid ongoing charges: # Delete the VM (and its boot disk) gcloud compute instances delete bigiq-kvm-host --zone=us-central1-a # Delete firewall rules gcloud compute firewall-rules delete bigiq-allow-ssh bigiq-allow-mgmt # Delete subnet and VPC gcloud compute networks subnets delete bigiq-subnet --region=us-central1 gcloud compute networks delete bigiq-vpc Summary There's no native BIG-IQ image for GCP — but that doesn't mean GCP customers are blocked from using it. Nested KVM virtualization on an Intel Cascade Lake Compute Engine instance gives you a fully functional BIG-IQ CM deployment that: Activates licenses normally against F5's servers Delivers the complete BIG-IQ feature set Runs entirely within your GCP environment Takes about 30 minutes to set up end-to-end If you're a GCP-first shop running BIG-IP VEs in the cloud, this gets BIG-IQ into your environment without waiting for an official marketplace image. Questions? Drop them in the comments or find me on the F5 Community. Chris Miller — Solutions Architect, F581Views3likes1CommentBIG-IQ 8.3 - no BIG IQ Central Management option
Trying to build a BIG IQ v 8.3 on Hyper V but I keep running into an issue where I can licence the box using a trial licence (all appears to be working as expected) create the Master Keys and reset the Password but as soon as I get to the System Personality the option for BIG-IQ Central Management is not available. It only presents me the option of BIG-IQ Data Collection Device. If skip the licence at Step 1 then I also get the option to create a License Manager but that's not really very useful either. 🤨 The guide I am following is the F5 one - BIG IQ Build Guide - and have assigned the VM 32GB RAM and 8 cores after initially trying it with half the above figures which I thought might be the issue but still no joy. Have deleted the VM and recreated using a new copy of the VHD file - same problem seen so I am at a bit of a loss as to what to try next. Any suggestions would be much appreciated.Solved496Views0likes6CommentsF5 and AppViewX
Anyone out there using AppViewX as an F5 central manager and/or automation tool? The jury is still out for me and I'd like to get some feedback from anyone with real production experience. Also, I find BIG-IQ very lacking with simple features and functions. Thanks!555Views0likes0CommentsImplementing SSL Orchestrator - Management with BIG-IQ
Introduction This article is part of a series on implementing BIG-IP SSL Orchestrator. It includes high availability and central management with BIG-IQ. Implementing SSL/TLS Decryption is not a trivial task. There are many factors to keep in mind and account for, from the network topology and insertion point, to SSL/TLS keyrings, certificates, ciphersuites and on and on. This article focuses on management with BIG-IQ. This article is divided into the following high level sections: BIG-IQ installation Adding BIG-IP devices Visibility and reporting Managing policy Using templates Please forgive me for using SSL and TLS interchangeably in this article. Software versions used in this article: BIG-IP Version: 14.1.2 SSL Orchestrator Version: 5.5 BIG-IQ Version: 7.0.1 Notes on installing BIG-IQ If an existing pair (CM and DCD) are already installed: -Upgrade the BIG-IQ to 7.0.0.1 (latest as of in 10/16/2019): --scp BIG-IQ-7.0.0.1-0.0.6.iso [email protected]:/shared/images --ssh [email protected] --install sys software image BIG-IQ-7.0.0.1-0.0.6.iso volume HD1.2 create-partition reboot --Same on other BIG-IQ -Onboard BIG-IQ: --https://github.com/f5devcentral/f5-big-iq-onboarding Adding BIG-IP devices From the BIG-IQ UI go to Devices > BIG-IP Devices. Click Add Device(s). Enter the IP Address, User Name and Password. Click the down arrow next to Cluster Display Name and select Create New. Name it, in this example “My_Cluster” then click Add. On the next screen select the Services you wish to discover. LTM should be selected by default. Select the box next to SSL Orchestrator and click Continue. The Discovery process may take a few minutes. When complete click Add Device(s) again. Enter the IP Address, User Name and Password of the next BIG-IP device. Click the down arrow to the right of Cluster Display Name and select Use Existing. Under Select a cluster choose My_Cluster. Click Add. LTM should be selected by default. Select the box next to SSL Orchestrator and click Continue. When complete click the link to Complete import tasks. For LTM click the box to Create a snapshot. Click the Import button. Click the arrow to go back. Click the link to Complete import tasks. For LTM click the box to Create a snapshot. Click the Import button. Then scroll to the bottom and click Import. For the Location choose to Create New or Use Existing. In this example we Use Existing Location, “pmelab”. Click Deploy then Yes. You should see a success message like below. Click OK. Repeat the steps above to Import and Deploy the SSL Orchestrator settings on the 2 nd BIG-IP. Note: If you receive an out of sync error message you may need to connect to the BIG-IP Configuration Utility and manually synchronize the devices. Under Services you should see Management, LTM, SSO. If there is an error under Stats Collection click the blue text. Click Save & Close Do this for both BIG-IP devices if needed. The next screen should look like this. Note: The Status icon will indicate overall device health. Notice in this example it’s a yellow triangle. Hover the mouse cursor over the Status icon to get more details. The pop-up message indicates that disc space is running low. You can click the Device Name to drill in and get more detail. Visibility and Reporting For Visibility and Reporting go to Monitoring > SSL Orchestrator > SSL Overview. This screen gives you an overview of your Topologies, Devices and more. Click the highlighted icon on the top right to toggle on/off the different statistical widgets. Click the highlighted icon on the top right to change the refresh rate of this page. Clicking on any of the widgets drills down into more detail. Click the SSL Decryption widget to view more detail. Click SSLO Analytics for more analytical reports. Notice the following on the right. Click the Export button to export this report in a printer friendly format or save as a PDF. There are also extensive filtering criteria, like Destination Countries, that you can use to refine your report data. Managing Policies Edit/create new policy From the BIG-IQ UI go to Configuration > SSL Orchestrator > Security Policies. Click the Security Policy name. Click the pencil icon to edit the Security Policy. Scroll down to view the Rules. Click the pencil icon to edit the Pinners_Rule. We will add another Category to this rule to bypass decryption. Click in the field to the right of the last Category. Start typing Education and it should come up. Select the Education Category and click Save. Note: This rule is still set to Allow, the connection will not be decrypted and it will not be sent to a Service Chain. On the next screen click Deploy then Yes. When complete it should look like the image below. Use Config Templates to make devices changes, like adding a new NTP server. From the BIG-IQ UI go to Devices > Config Templates > Templates. Click Create. Give it a name. In this example NTP_template. Click the Down arrow and select NTP. Click Add. Enter the IP address or hostname of the NTP server you wish to use. If needed, click the Plus sign to add more. Select your time zone, in this example America/Los Angeles. Click Save & Close. Click Deployments > Create. For the Config Template select the NTP_template created previously. Select both Devices and click the arrow to move them from Available to Included. Give the deployment a name, in this example my_deployment. Click Next. Click Deploy then OK. You should see a successful deployment. Summary In this article you learned how to install and configure BIG-IQ. Then you learned how to add BIG-IP devices to BIG-IQ and import their configuration. We also covered some common tasks with Visibility and Reporting. You learned how to manage and update the security policy. And finally, you learned how to use Config Templates to configure common items in your BIG-IP deployment. Next Steps Click Next to proceed to the next article in the series.1.5KViews0likes5Comments