k8s
2 TopicsF5 Container Ingress Services (CIS) and using k8s traffic policies to send traffic directly to pods
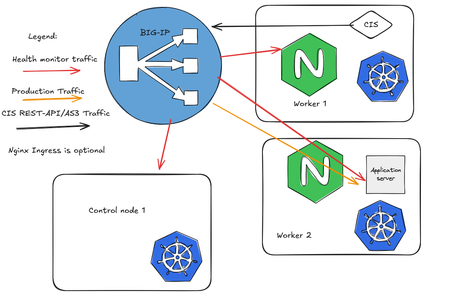
This article will take a look how you can use health monitors on the BIG-IP to solve the issue with constant AS3 REST-API pool member changes or when there is a sidecar service mesh like Istio (F5 has version called Aspen mesh of the istio mesh) or Linkerd mesh. I also have described some possible enchantments for CIS/AS3, Nginx Ingress Controller or Gateway Fabric that will be nice to have in the future. Intro Install Nginx Ingress Open source and CIS F5 CIS without Ingress/Gateway F5 CIS with Ingress F5 CIS with Gateway fabric Summary 1. Intro F5 CIS allows integration between F5 and k8s kubernetes or openshift clusters. F5 CIS has two modes and that are NodePort and ClusterIP and this is well documented at https://clouddocs.f5.com/containers/latest/userguide/config-options.html . There is also a mode called auto that I prefer as based on k8s service type NodePort or ClusterIP it knows how to configure the pool members. CIS in ClusterIP mode generally is much better as you bypass the kube-proxy as send traffic directly to pods but there could be issues if k8s pods are constantly being scaled up or down as CIS uses AS3 REST-API to talk and configure the F5 BIG-IP. I also have seen some issues where a bug or a config error that is not well validated can bring the entire CIS to BIG-IP control channel down as you then see 422 errors in the F5 logs and on CIS logs. By using NodePort and "externaltrafficpolicy: local" and if there is an ingress also "internaltrafficpolicy: local" you can also bypass the kubernetes proxy and send traffic directly to the pods and BIG-IP health monitoring will mark the nodes that don't have pods as down as the traffic policies prevent nodes that do not have the web application pods to send the traffic to other nodes. 2..Install Nginx Ingress Open source and CIS As I already have the k8s version of nginx and F5 CIS I need 3 different classes of ingress. k8s nginx is end of life https://kubernetes.io/blog/2025/11/11/ingress-nginx-retirement/ , so my example also shows how you can have in parallel the two nginx versions the k8s nginx and F5 nginx. There is a new option to use The Operator Lifecycle Manager (OLM) that when installed will install the components and this is even better way than helm (you can install OLM with helm and this is even newer way to manage nginx ingress!) but I found it still in early stage for k8s while for Openshift it is much more advanced. I have installed Nginx in a daemonset not deployment and I will mention why later on and I have added a listener config for the F5 TransportServer even if later it is seen why at the moment it is not usable. helm install -f values.yaml ginx-ingress oci://ghcr.io/nginx/charts/nginx-ingress \ --version 2.4.1 \ --namespace f5-nginx \ --set controller.kind=daemonset \ --set controller.image.tag=5.3.1 \ --set controller.ingressClass.name=nginx-nginxinc \ --set controller.ingressClass.create=true \ --set controller.ingressClass.setAsDefaultIngress=false cat values.yaml controller: enableCustomResources: true globalConfiguration: create: true spec: listeners: - name: nginx-tcp port: 88 protocol: TCP kubectl get ingressclasses NAME CONTROLLER PARAMETERS AGE f5 f5.com/cntr-ingress-svcs <none> 8d nginx k8s.io/ingress-nginx <none> 40d nginx-nginxinc nginx.org/ingress-controller <none> 32s niki@master-1:~$ kubectl get pods -o wide -n f5-nginx NAME READY STATUS RESTARTS AGE IP NODE NOMINATED NODE READINESS GATES nginx-ingress-controller-2zbdr 1/1 Running 0 62s 10.10.133.234 worker-2 <none> <none> nginx-ingress-controller-rrrc9 1/1 Running 0 62s 10.10.226.87 worker-1 <none> <none> niki@master-1:~$ The CIS config is shown below. I have used "pool_member_type" auto as this allows Cluster-IP or NodePort services to be used at the same time. helm install -f values.yaml f5-cis f5-stable/f5-bigip-ctlr cat values.yaml bigip_login_secret: f5-bigip-ctlr-login rbac: create: true serviceAccount: create: true name: namespace: f5-cis args: bigip_url: X.X.X.X bigip_partition: kubernetes log_level: DEBUG pool_member_type: auto insecure: true as3_validation: true custom_resource_mode: true log-as3-response: true load-balancer-class: f5 manage-load-balancer-class-only: true namespaces: [default, test, linkerd-viz, ingress-nginx, f5-nginx] # verify-interval: 35 image: user: f5networks repo: k8s-bigip-ctlr pullPolicy: Always nodeSelector: {} tolerations: [] livenessProbe: {} readinessProbe: {} resources: {} version: latest 3. F5 CIS without Ingress/Gateway Without Ingress actually the F5's configuration is much simpler as you just need to create nodeport service and the VirtualServer CR. As you see below the health monitor marks the control node and the worker node that do not have pod from "hello-world-app-new-node" as shown in the F5 picture below. Sending traffic without Ingresses or Gateways removes one extra hop and sub-optimal traffic patterns as when the Ingress or Gateway is in deployment mode for example there could be 20 nodes and only 2 ingress/gateway pods on 1 node each. Traffic will need to go to only those 2 nodes to enter the cluster. apiVersion: v1 kind: Service metadata: name: hello-world-app-new-node labels: app: hello-world-app-new-node spec: externalTrafficPolicy: Local ports: - name: http protocol: TCP port: 8080 targetPort: 8080 selector: app: hello-world-app-new type: NodePort --- apiVersion: "cis.f5.com/v1" kind: VirtualServer metadata: name: vs-hello-new namespace: default labels: f5cr: "true" spec: virtualServerAddress: "192.168.1.71" virtualServerHTTPPort: 80 host: www.example.com hostGroup: "new" snat: auto pools: - monitor: interval: 10 recv: "" send: "GET /" timeout: 31 type: http path: / service: hello-world-app-new-node servicePort: 8080 For Istio and Linkerd Integration an irule could be needed to send custom ALPN extensions to the backend pods that now have a sidecar. I suggest seeing my article at "the Medium" for more information see https://medium.com/@nikoolayy1/connecting-kubernetes-k8s-cluster-to-external-router-using-bgp-with-calico-cni-and-nginx-ingress-2c45ebe493a1 Keep in mind that for the new options with Ambient mesh (sidecarless) the CIS without Ingress will not work as F5 does not speak HBONE (or HTTP-Based Overlay Network Environment) protocol that is send in the HTTP Connect tunnel to inform the zTunnel (layer 3/4 proxy that starts or terminates the mtls) about the real source identity (SPIFFE and SPIRE) that may not be the same as the one in CN/SAN client SSL cert. Maybe in the future there could be an option based on a CRD to provide the IP address of an external device like F5 and the zTunnel proxy to terminate the TLS/SSL (the waypoint layer 7 proxy usually Envoy is not needed in this case as F5 will do the HTTP processing) and send traffic to the pod but for now I see no way to make F5 work directly with Ambient mesh. If the ztunnel takes the identity from the client cert CN/SAN F5 will not have to even speak HBONE. 4. F5 CIS with Ingress Why we may need an ingress just as a gateway into the k8s you may ask? Nowadays many times a service mesh like linkerd or istio or F5 aspen mesh is used and the pods talk to each other with mTLS handled by the sidecars and an Ingress as shown in https://linkerd.io/2-edge/tasks/using-ingress/ is an easy way for the client-side to be https while the server side to be the service mesh mtls, Even ambient mesh works with Ingresses as it captures traffic after them. It is possible from my tests F5 to talk to a linkerd injected pods for example but it is hard! I have described this in more detail at https://medium.com/@nikoolayy1/connecting-kubernetes-k8s-cluster-to-external-router-using-bgp-with-calico-cni-and-nginx-ingress-2c45ebe493a1 Unfortunately when there is an ingress things as much more complex! F5 has Integration called "IngressLink" but as I recently found out it is when BIG-IP is only for Layer 3/4 Load Balancing and the Nginx Ingress Controller will actually do the decryption and AppProtect WAF will be on the Nginx as well F5 CIS IngressLink attaching WAF policy on the big-ip through the CRD ? | DevCentral Wish F5 to make an integration like "IngressLink" but the reverse where each node will have nginx ingress as this can be done with demon set and not deployment on k8s and Nginx Ingress will be the layer 3/4, as the Nginx VirtualServer CRD support this and to just allow F5 in the k8s cluster. Below is how currently this can be done. I have created a Transportserver but is not used as it does not at the momemt support the option "use-cluster-ip" set to true so that Nginx does not bypass the service and to go directly to the endpoints as this will cause nodes that have nginx ingress pod but no application pod to send the traffic to other nodes and we do not want that as add one more layer of load balancing latency and performance impact. The gateway is shared as you can have a different gateway per namespace or shared like the Ingress. apiVersion: v1 kind: Service metadata: name: hello-world-app-new-cluster labels: app: hello-world-app-new-cluster spec: internalTrafficPolicy: Local ports: - name: http protocol: TCP port: 8080 targetPort: 8080 selector: app: hello-world-app-new type: ClusterIP --- apiVersion: k8s.nginx.org/v1 kind: TransportServer metadata: name: nginx-tcp annotations: nginx.org/use-cluster-ip: "true" spec: listener: name: nginx-tcp protocol: TCP upstreams: - name: nginx-tcp service: hello-world-app-new-cluster port: 8080 action: pass: nginx-tcp --- apiVersion: k8s.nginx.org/v1 kind: VirtualServer metadata: name: nginx-http spec: host: "app.example.com" upstreams: - name: webapp service: hello-world-app-new-cluster port: 8080 use-cluster-ip: true routes: - path: / action: pass: webapp The second part of the configuration is to expose the Ingress to BIG-IP using CIS. --- apiVersion: v1 kind: Service metadata: name: f5-nginx-ingress-controller namespace: f5-nginx labels: app.kubernetes.io/name: nginx-ingress spec: externalTrafficPolicy: Local type: NodePort selector: app.kubernetes.io/name: nginx-ingress ports: - name: http protocol: TCP port: 80 targetPort: http --- apiVersion: "cis.f5.com/v1" kind: VirtualServer metadata: name: vs-hello-ingress namespace: f5-nginx labels: f5cr: "true" spec: virtualServerAddress: "192.168.1.81" virtualServerHTTPPort: 80 snat: auto pools: - monitor: interval: 10 recv: "200" send: "GET / HTTP/1.1\r\nHost:app.example.com\r\nConnection: close\r\n\r\n" timeout: 31 type: http path: / service: f5-nginx-ingress-controller servicePort: 80 Only the nodes that have a pod will answer the health monitor. Hopefully F5 can make some Integration and CRD that makes this configuration simpler like the "IngressLink" and to add the option "use-cluster-ip" to the Transport server as Nginx does not need to see the HTTP traffic at all. This is on my wish list for this year 😁 Also if AS3 could reference existing group of nodes and just with different ports this could help CIS will need to push AS3 declaration of nodes just one time and then the different VirtualServers could reference it but with different ports and this will make the AS3 REST-API traffic much smaller. 5. F5 CIS with Gateway fabric This does not at the moment work as gateway-fabric unfortunately does not support "use-cluster-ip" option. The idea is to deploy the gateway fabric in daemonset and to inject it with a sidecar or even without one this will work with ambient meshes. As k8s world is moving away from an Ingress this will be a good option. Gateway fabric natively supports TCP , UDP traffic and even TLS traffic that is not HTTPS and by exposing the gateway fabric with a Cluster-IP or Node-Port service then with different hostnames the Gateway fabric will select to correct route to send the traffic to! helm install ngf oci://ghcr.io/nginx/charts/nginx-gateway-fabric --create-namespace -n nginx-gateway -f values-gateway.yaml cat values-gateway.yaml nginx: # Run the data plane per-node kind: daemonSet # How the data plane gets exposed when you create a Gateway service: type: NodePort # or NodePort # (optional) if you’re using Gateway API experimental channel features: nginxGateway: gwAPIExperimentalFeatures: enable: true apiVersion: gateway.networking.k8s.io/v1 kind: Gateway metadata: name: shared-gw namespace: nginx-gateway spec: gatewayClassName: nginx listeners: - name: https port: 443 protocol: HTTPS tls: mode: Terminate certificateRefs: - kind: Secret name: wildcard-tls allowedRoutes: namespaces: from: ALL --- apiVersion: gateway.networking.k8s.io/v1 kind: HTTPRoute metadata: name: app-route namespace: app spec: parentRefs: - name: shared-gw namespace: nginx-gateway hostnames: - app.example.com rules: - backendRefs: - name: app-svc port: 8080 F5 Nginx Fabric mesh is evolving really fast from what I see , so hopefully we see the features I mentioned soon and always you can open a github case. The documentation is at https://docs.nginx.com/nginx-gateway-fabric and as this use k8s CRD the full options can be seen at TLS - Kubernetes Gateway API 6. Summary With the release of TMOS 21 F5 now supports much more health monitors and pool members, so this way of deploying CIS with NodePort services may offer benefits with TMOS 21.1 that will be the stable version as shown in https://techdocs.f5.com/en-us/bigip-21-0-0/big-ip-release-notes/big-ip-new-features.html With auto mode some services can still be directly exposed to BIG-IP as the CIS config changes are usually faster to remove a pool member pod than BIG-IP health monitors to mark a node as down. The new version of CIS that will be CIS advanced may take of the concerns of hitting a bug or not well validated configuration that could bring the control channel down and TMOS 21.1 may also handle AS3 config changes better with less cpu/memory issue, so there could be no need in the future of using trafficpolicies and NodePort mode and k8s services of this type. For ambient mesh my example with Ingress and Gateway seems the only option for direct communication at the moment. We will see what the future holds!1.3KViews6likes2Comments
Automating TLS Certificates in Kubernetes with cert-manager and F5 Distributed Cloud DNS
Introduction If you run workloads in Kubernetes or Open Shift, you've almost certainly dealt with TLS certificates. You need them everywhere — Ingress controllers, internal services, mutual TLS between microservices, and API gateways. Managing them by hand is error-prone and doesn't scale: certificates expire silently, rotation is forgotten, and the person who originally created the wildcard cert is now working somewhere else. cert-manager solves this elegantly. It's a Kubernetes-native certificate controller that automates the issuance, renewal, and management of TLS certificates. It speaks ACME — the same protocol Let's Encrypt uses — but ACME is a standard, not a Let's Encrypt exclusive. You can point cert-manager at: Let's Encrypt (free, public, widely trusted) ZeroSSL, Buypass, Google Trust Services — other public CAs supporting ACME Step CA / HashiCorp Vault / Smallstep — for private PKI running inside your infrastructure Any commercial CA that has implemented an ACME endpoint This means the same workflow, the same Kubernetes manifests, and the same tooling can back both your public-facing services and your internal, corporate-signed certificates. One operator to rule them all. Why DNS-01 Challenge? ACME offers multiple ways to prove you own a domain. The most common is the HTTP-01 challenge, where the ACME server checks a well-known URL on your domain. It works well, but has limitations: The endpoint must be publicly reachable on port 80 It cannot issue wildcard certificates (*.example.com) The DNS-01 challenge takes a different approach: cert-manager (via a solver webhook) creates a _acme-challenge.example.com TXT record in your DNS zone. The ACME server checks for this record. Once verified, the TXT record is cleaned up automatically. Benefits: Works behind firewalls — no inbound HTTP needed Supports wildcard certificates — a single *.example.com certificate covers all subdomains Fully automated — the webhook handles record creation and deletion If your DNS is managed by F5 Distributed Cloud (F5 XC), you can now wire this entire flow together with the open-source cert-manager-webhook-f5xc solver. Architecture Overview Here's what happens when cert-manager issues a certificate using the F5 XC webhook: Developer applies Certificate manifest ▼ cert-manager creates Order + Challenge ▼ cert-manager calls webhook (DNS-01 solver) ▼ Webhook calls F5 XC DNS API → Creates TXT record: _acme-challenge.example.com ▼ ACME server (Let's Encrypt / other) validates the TXT record ▼ Webhook cleans up the TXT record ▼ cert-manager stores the issued certificate in a Kubernetes Secret The webhook runs as a standard Kubernetes Deployment inside your cluster, registered with cert-manager via a ValidatingWebhookConfiguration. It receives solver calls from cert-manager and translates them into F5 XC DNS API calls using an API token you provide as a Kubernetes Secret. Prerequisites Before we start, make sure you have the following in place: A Kubernetes cluster (1.21+) cert-manager installed (v1.14+) kubectl apply -f https://github.com/cert-manager/cert-manager/releases/latest/download/cert-manager.yaml Helm 3.8+ An F5 Distributed Cloud tenant with DNS management enabled Your domain's DNS zone managed in F5 XC F5 XC credentials for DNS API access — either an API Token or a Client Certificate (P12); see Step 1 below for details Least privilege note: The service account or user whose credentials you use must have permission to manage DNS records. As of the time of writing, the built-in role f5xc-dns-management-admin is sufficient. Avoid using tenant-admin or other overly broad roles — the webhook only needs to create and delete TXT records in your DNS zone. Step 1: Prepare F5 XC Credentials The webhook supports two authentication methods against the F5 XC DNS API: an API Token or a Client Certificate (P12). Both are stored as a Kubernetes Secret in the cert-manager namespace. Obtaining credentials in F5 XC Console Regardless of which method you choose, the service account must have sufficient permissions to manage DNS records. Follow the least-privilege principle: In the F5 XC Console, navigate to Account Settings → Administration. Create a dedicated service credential under IAM and assign it the f5xc-dns-management-admin role in the system namespace — this is the minimum required role as of the time of writing and grants access to DNS Zone Management without unnecessary privileges elsewhere in the tenant. Or use an existing account privileges under Personal Management credentials. Generate the credentials of your preferred type (API Token or API Certificate) Option A: API Token (simpler, recommended for most setups) Take the API Token obtained from the F5XC console and use it with the following command kubectl create secret generic f5xc-api-token \ --namespace cert-manager \ --from-literal=token=<YOUR_F5XC_API_TOKEN> Option B: Client Certificate (P12) F5 XC also supports certificate-based authentication using a P12 (PKCS#12) client certificate, which may be preferred in environments. Use the certificate and password generated in the previous step and store it as a Secret: kubectl create secret generic f5xc-client-cert \ --namespace cert-manager \ --from-file=certificate.p12=<PATH_TO_YOUR.p12> \ --from-literal=password=<P12_PASSWORD> Refer to the webhook documentation for the exact certificateSecretRef fields to use in the solver config when choosing this method. Verify the secret was created: kubectl get secret f5xc-api-token -n cert-manager Step 2: Install the Webhook via Helm The chart is published as an OCI artifact on GitHub Container Registry. Install it into the cert-manager namespace: helm install cert-manager-webhook-f5xc \ oci://ghcr.io/wenkow/charts/cert-manager-webhook-f5xc \ --namespace cert-managerbaba Check the rollout: kubectl rollout status \ deployment cert-manager-webhook-f5xc \ -n cert-manager kubectl get pods -n cert-manager Step 3: Configure a ClusterIssuer A ClusterIssuer tells cert-manager which ACME server to use and how to solve challenges. Here we're pointing it at Let's Encrypt production and configuring the F5 XC DNS-01 solver. Note on groupName: The field appears twice in the YAML below and serves different purposes. At the webhook level, it's a fixed identifier (acme.f5xc.io) that tells cert-manager which registered webhook to call. Inside config, it's the RRSet group name within your F5 XC DNS zone — a logical container for DNS records created by the webhook. You can choose any name; F5 XC will create the group if it doesn't exist. clusterissuer.yaml: apiVersion: cert-manager.io/v1 kind: ClusterIssuer metadata: name: letsencrypt-f5xc-prod spec: acme: email: admin@example.com server: https://acme-v02.api.letsencrypt.org/directory privateKeySecretRef: name: letsencrypt-f5xc-prod-account-key solvers: - dns01: webhook: # Fixed identifier — tells cert-manager which webhook to call groupName: acme.f5xc.io solverName: f5xc config: # Your F5 XC tenant name (subdomain part of your console URL) tenantName: my-tenant # RRSet group name in F5 XC DNS zone groupName: "cert-manager" # ttl: 120 # optional, default is 120 seconds apiTokenSecretRef: name: f5xc-api-token key: token # If using certificate-based auth instead of a token, replace # apiTokenSecretRef with certificateSecretRef — see webhook docs. Apply it: kubectl apply -f clusterissuer.yaml Verify it's ready: kubectl get clusterissuer letsencrypt-f5xc-prod Step 4: Request a Certificate Now the fun part. Create a Certificate resource. Note that we're requesting both the apex domain and a wildcard — something that's only possible with DNS-01. certificate.yaml: apiVersion: cert-manager.io/v1 kind: Certificate metadata: name: example-tls namespace: default spec: secretName: example-tls issuerRef: name: letsencrypt-f5xc-prod kind: ClusterIssuer dnsNames: - example.com - "*.example.com" Apply it: kubectl apply -f certificate.yaml Step 5: Watch the Certificate Lifecycle This is where it gets satisfying to watch. cert-manager creates an Order, which spawns one or more Challenge objects. Each Challenge triggers the F5 XC webhook to create a DNS TXT record. Watch Certificate status kubectl get certificate example-tls -n default -w Inspect the Order kubectl get orders -n default kubectl describe order example-tls-1-3552197254 -n default Status: Authorizations: Challenges: Token: <token> Type: dns-01 URL: https://acme-v02.api.letsencrypt.org/acme/chall/... Identifier: example.com Initial State: valid URL: https://acme-v02.api.letsencrypt.org/acme/authz/... Wildcard: true Challenges: Token: <token> Type: dns-01 URL: https://acme-v02.api.letsencrypt.org/acme/chall/... Identifier: example.com Initial State: valid URL: https://acme-v02.api.letsencrypt.org/acme/authz/... Wildcard: false Certificate: REDACTED Finalize URL: https://acme-v02.api.letsencrypt.org/acme/finalize/... State: valid URL: https://acme-v02.api.letsencrypt.org/acme/order/... Events: Type Reason Age From Message ---- ------ ---- ---- ------- Normal Complete 8m37s cert-manager-orders Order completed successfully Inspect the Challenges before it's done kubectl get challenges -n default kubectl describe challenge example-tls-<1234567890> -n default Verify the Issued Certificate kubectl get secret example-tls -n default -o jsonpath='{.data.tls\.crt}' \ | base64 -d | openssl x509 -noout -text | grep -E "Subject:|DNS:|Not After" Not After : Aug 19 19:22:31 2026 GMT Subject: CN = example.com DNS:*.example.com, DNS:example.com Both the apex domain and the wildcard are covered by a single certificate. Using a Custom or Internal ACME Server One of the most powerful aspects of this setup is that the ACME server is completely configurable. If you run an internal CA — for example HashiCorp Vault with the ACME secrets engine, or Step CA — just change the server field in your ClusterIssuer: spec: acme: email: admin@internal.example.com server: https://vault.internal.example.com/v1/pki/acme/directory # or # server: https://step-ca.internal.example.com/acme/acme/directory The webhook doesn't care which ACME server you use — it only handles the DNS side of the challenge. This makes the setup equally useful for: Internet-facing services using Let's Encrypt Internal services using a corporate CA Mixed environments where different ClusterIssuer objects point to different CAs, all sharing the same F5 XC DNS solver Troubleshooting Tips Challenge stays in pending for a long time Check the webhook logs for API errors: kubectl logs -n cert-manager -l app=cert-manager-webhook-f5xc --tail=50 READY: False on ClusterIssuer Usually means cert-manager couldn't register an ACME account. Check that the email field is valid and the ACME server URL is reachable. TXT record not appearing in F5 XC - Verify that the credentials you stored in the Secret have the right DNS permissions. In F5 XC Console, check that the service account has the f5xc-dns-management-admin role (or equivalent). API token permission issues will typically surface as 403 Forbidden errors in the webhook logs. Summary The cert-manager-webhook-f5xc project closes the loop between F5 Distributed Cloud DNS and the Kubernetes-native certificate management ecosystem. With a few manifests and a Helm install, you get: Fully automated certificate issuance and renewal — no manual interventions, no expiry surprises Wildcard certificate support out of the box via DNS-01 ACME provider flexibility — works with Let's Encrypt, commercial CAs, or your internal PKI Clean Kubernetes-native UX — certificates are just resources; the entire lifecycle is observable with standard kubectl commands The webhook is open source, available on GitHub and packaged on Artifact Hub. Contributions and feedback are welcome. Related Resources cert-manager documentation cert-manager DNS01 webhook reference F5 Distributed Cloud DNS Management docs GitHub: Wenkow/cert-manager-webhook-f5xc Artifact Hub: cert-manager-webhook-f5xc83Views1like0Comments